SensorHub: one dashboard for every sensor (series project)
Objectives
Section titled “Objectives”- Combine the DPS368, SHT4x, BMI270, BMM350 and PDM microphone on one dashboard
- Schedule each sensor read so the screen does not stutter
- Present the dashboard and explain how each value is shown
Concepts
Section titled “Concepts”One lv_timer orchestrates four sensors, not four FreeRTOS tasks as the upstream README describes
Section titled “One lv_timer orchestrates four sensors, not four FreeRTOS tasks as the upstream README describes”The upstream README describes this episode creating “4 reader tasks (2 KB stack each) at equal priority” that
push data through a single tagged-union message queue, dispatched by a consumer through lv_async_call(). The
real code at commit 9a8e3ed has no xTaskCreate, xQueueCreate, or lv_async_call anywhere in
sensorhub_presenter.c. The real architecture is one lv_timer at HUB_UI_POLL_MS = 100, acting as its own
cooperative scheduler — every 100 ms it checks which sensors are due and reads only those. Everything still runs
on the single LVGL thread; no other thread ever touches sensor reading.
A “next due time” per sensor, all inside one timer
Section titled “A “next due time” per sensor, all inside one timer”Each sensor has its own next_..._ms variable (next_dps_ms, next_sht_ms, next_bmi_ms, next_bmm_ms).
Every time the timer runs (every 100 ms), it checks (int32_t)(now_ms - next_xxx_ms) < 0; if not due yet, it
skips that sensor, and if due, it reads that sensor and sets the next due time to
now_ms + <that sensor's own period>. Each period is exactly the value from that sensor’s own lesson, unchanged
(DPS368_SAMPLE_PERIOD_MS = 1000, SHT4X_SAMPLE_PERIOD_MS = 1000, BMI270_SAMPLE_PERIOD_MS = 200,
BMM350_SAMPLE_PERIOD_MS = 120) — not the 200/500/20/50 ms table the upstream README states.
A side effect of the 100 ms tick: periods that are not multiples of 100 get rounded up
Section titled “A side effect of the 100 ms tick: periods that are not multiples of 100 get rounded up”Because the main timer ticks exactly every 100 ms, a sensor whose own period is not a multiple of 100 (such as BMM350 at 120 ms) can never actually be read on its own exact period. At t=100 ms, 120 has not been reached yet, so it is skipped; at t=200 ms it has, so it reads and sets next to 320, which then gets skipped again at t=300, reading for real only at t=400. The effective period in practice becomes 200 ms, not 120 ms. A measurable consequence: BMM350’s auto-calibration, which needs 140 samples (lesson 3.4), takes about 28 seconds in this episode, not the 16.8 seconds it takes running alone in EP04, because every sample now arrives roughly twice as slowly due to this rounding.
BMM350 calibration starts automatically at boot, unlike lesson 3.4’s button press
Section titled “BMM350 calibration starts automatically at boot, unlike lesson 3.4’s button press”sensorhub_presenter_start() calls bmm350_reader_start_calibration() itself immediately at startup, unlike
lesson 3.4, where the user had to press a Calibrate button. This dashboard wants the compass ready as soon as
possible without the user needing to know an extra step (they just need to rotate the board as instructed while
the other pages keep working).
The real screen is five tabs, not a 2×2 grid plus a bottom bar as the upstream README draws it
Section titled “The real screen is five tabs, not a 2×2 grid plus a bottom bar as the upstream README draws it”The upstream README draws the layout as a 2×2 grid (DPS368/SHT4x on top, BMI270/BMM350 below) plus a mic bar at
the bottom, all shown at once. The real code has a sensorhub_page_t enum with five values
(SENSORHUB_PAGE_HOME, _ENV, _MOTION, _COMPASS, _AUDIO), and sensorhub_view_set_active_page() hides
whichever page is not selected — this is a tabbed, one-page-at-a-time view, following the same navigation
shell pattern from module 2 (lesson 2.4 onward), not all tiles shown together on one screen. The Audio page itself
shows the already-computed sound level (peak/average, from lesson 3.6), not a raw waveform.
The BMM350 patch is still required
Section titled “The BMM350 patch is still required”The BMM350 SensorAPI’s I3C soft-reset bug (explained in detail in lesson 3.4) lives in the exact same library this episode uses — it must be patched before building here too. The fix is idempotent, so if it was already applied for EP04 in the same workspace, it does not need to be redone.
Worked example
Section titled “Worked example”This episode’s code lives on the Developer Hub (pinned to commit 9a8e3ed) — read the Why section of the
upstream README
to understand the capstone’s brief, but the excerpts below are copied from the actual files (Apache-2.0,
tesaiot/developer-hub, same commit), because the real architecture differs substantially from what the upstream
README describes.
app_ui/sensorhub/sensorhub_presenter.c — one lv_timer calling every sensor’s poll each tick:
static void sensorhub_poll_timer_cb(lv_timer_t *timer){    (void)timer;    uint32_t now_ms = lv_tick_get();
    sensorhub_poll_dps(now_ms);    sensorhub_poll_sht(now_ms);    sensorhub_poll_bmi(now_ms);    sensorhub_poll_bmm(now_ms);    sensorhub_poll_bmm_calibration();    sensorhub_poll_mic();    /* ... */}/* ... */s_ctx.poll_timer = lv_timer_create(sensorhub_poll_timer_cb, HUB_UI_POLL_MS, NULL);
The “next due time” pattern for one sensor (DPS368 shown; the same shape repeats for SHT4x/BMI270/BMM350):
/* Poll DPS368 on its own sampling period and push value to Env page. */static void sensorhub_poll_dps(uint32_t now_ms){    if ((!s_ctx.dps_ready) || ((int32_t)(now_ms - s_ctx.next_dps_ms) < 0))    {        return;    }
    s_ctx.next_dps_ms = now_ms + DPS368_SAMPLE_PERIOD_MS;
dps368_sample_t sample; if (dps368_reader_poll(&sample)) { s_ctx.dps_sample = sample; sensorhub_view_update_env(&s_ctx.dps_sample, s_ctx.has_sht ? &s_ctx.sht_sample : NULL); /* ... */ }}main_example.ccallssensorhub_presenter_start()thenpdm_probe_logger_start(), exactly as the upstream README describesapp_sensor/bmi270/bmi270_config.h,app_sensor/bmm350/bmm350_config.h,app_sensor/dps368/dps368_config.h,app_sensor/sht4x/sht4x_config.h— each sensor’s real period, unchanged from its own lesson- See the full folder at
int_ep07_sensorhub_final/— each sensor’s own driver/reader files are identical to lessons 3.1–3.4; only the UI layer that combines them is new
Common mistakes
Section titled “Common mistakes”- Assuming there are 4 FreeRTOS tasks plus a queue, as the upstream README describes — the real code uses one
lv_timeras a cooperative scheduler. Trust the real code when explaining the architecture. - Misremembering the read periods as 200/500/20/50 ms — the real values are 1000/1000/200/120 ms, taken directly from each sensor’s own unmodified config.h.
- Forgetting the 100 ms main tick rounds up periods that are not multiples of 100 — BMM350 (120 ms) is actually read every 200 ms in practice, making auto-calibration take nearly twice as long as it does running alone in EP04.
- Assuming the screen shows every tile at once in a 2×2 grid — it is really five tabs (Home/Env/Motion/Compass/Audio), showing one page at a time.
- Forgetting to patch the BMM350 bug — the same bug from lesson 3.4 is still present; it must be patched before building here too.
Build and flash
Section titled “Build and flash”# In the master template folder (see lesson 1.1)# 1) Delete the old episode's files in proj_cm55/apps/# 2) Copy all of this episode's files into proj_cm55/apps/make buildmake program # flash through KitProg3Or open this example on the Developer Hub and flash the ready-made firmware.
See it work first
Section titled “See it work first”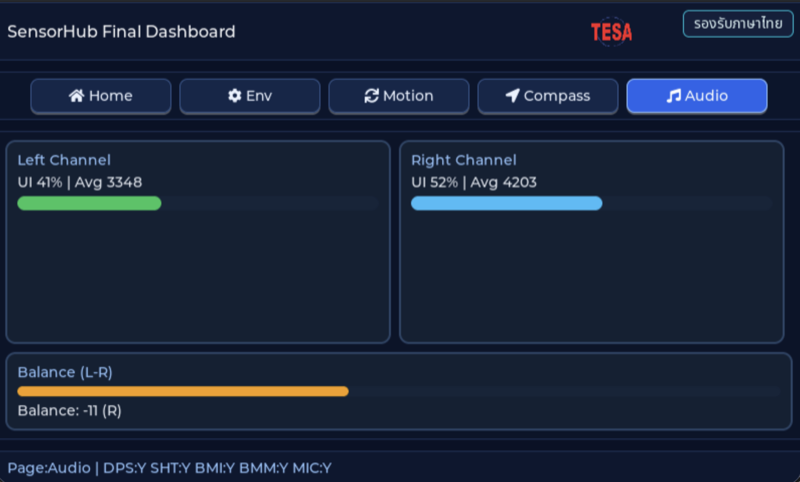
Before reading the code, guess what objects this screen has, and what changes when the user taps it or when a sensor value changes.
Try a change
Section titled “Try a change”- Guess before you change anything: pick one value the example’s README explains in the How section, and write down what you expect to change on the screen or in the log.
- Change and run: build + flash, then compare against your guess. If it does not match, find which part you misunderstood.
- Extend: add one thing the example does not yet have, and keep a photo or video in your portfolio.
Check your understanding
Section titled “Check your understanding”- Which sensor should be read most often, and which can be read more slowly?
- What causes the screen to stutter when combining several sensors?
- If you were to send this data set to the TESAIoT Platform, which values would you choose to send?
The answers are in the example’s README and in the code. If you cannot answer one, go back and read the Why / What / How section again.
References
Section titled “References”- Episode README · code folder · commit
9a8e3ed - Open this example on the Developer Hub
- The code belongs to the Developer Hub and is referenced by link, not copied into this repository
Review questions
Answer on your own first, then open the answer.
-
In the code at this commit, how does the dashboard schedule reading the four sensors? (Objective 2)
- มี FreeRTOS task อ่านเซนเซอร์ตัวละหนึ่ง task แล้วส่งค่าเข้าคิวเดียว
- อ่านครบทั้งสี่ตัวทุกครั้งที่ timer ทำงาน
- lv_timer ตัวเดียวทุก 100 ms ใน LVGL context ตรวจเวลาถึงกำหนดของแต่ละตัว (DPS368 1000 ms, SHT4x 1000 ms, BMI270 200 ms, BMM350 120 ms) แล้วอ่านเฉพาะตัวที่ถึงรอบ ส่วนไมโครโฟนมี task ของตัวเอง
- แต่ละเซนเซอร์มี lv_timer ของตัวเอง
Show answer
Answer: C. lv_timer ตัวเดียวทุก 100 ms ใน LVGL context ตรวจเวลาถึงกำหนดของแต่ละตัว (DPS368 1000 ms, SHT4x 1000 ms, BMI270 200 ms, BMM350 120 ms) แล้วอ่านเฉพาะตัวที่ถึงรอบ ส่วนไมโครโฟนมี task ของตัวเอง
sensorhub_poll_timer_cb() ถูกสร้างด้วย HUB_UI_POLL_MS = 100 และเรียก sensorhub_poll_dps/sht/bmi/bmm ที่เทียบ now_ms กับ next_*_ms ส่วนไมค์ใช้ pdm_probe_logger task เดิม แล้ว hub หยิบค่าล่าสุดผ่าน mic_presenter_get_latest_sample() README ของ episode บรรยายแบบ reader task และคิว ซึ่งไม่ตรงกับโค้ดที่ commit นี้
-
BMM350_SAMPLE_PERIOD_MS is 120 but the hub timer ticks every 100 ms. In practice, how often is the BMM350 read? (Objective 2)
- 200 ms
- 100 ms
- 120 ms
- 240 ms
Show answer
Answer: A. 200 ms
รอบ t = 100 ms ยังไม่ถึง next_bmm_ms (120) จึงข้าม มาถึงรอบ t = 200 ms จึงอ่านแล้วตั้ง next เป็น 320 ซึ่งจะได้อ่านอีกทีที่ t = 400 ms ช่วงเวลาจริงจึงถูกปัดขึ้นเป็นผลคูณของ 100 ms ผลต่อเนื่องคือ auto-calibration 140 ตัวอย่างใช้ราว 28 วินาที ไม่ใช่ 16.8 วินาทีอย่างใน EP04
-
What mainly makes the screen stutter when several sensor reads sit inside the LVGL timer, and how does the code limit it? (Objective 2)
- ฟอนต์ภาษาไทยทำให้วาดช้า
- จอมีความละเอียดสูงเกินไป
- เพราะใช้ FreeRTOS
- การอ่าน I2C/I3C แต่ละครั้งบล็อก LVGL thread ระหว่างรอ bus โค้ดจึงกระจายการอ่านตามคาบเวลาของแต่ละตัว อ่านตัวที่เปลี่ยนช้าแค่วินาทีละครั้ง และย้ายไมโครโฟนที่ต้องรับ 16 kHz ไปไว้ใน task แยก
Show answer
Answer: D. การอ่าน I2C/I3C แต่ละครั้งบล็อก LVGL thread ระหว่างรอ bus โค้ดจึงกระจายการอ่านตามคาบเวลาของแต่ละตัว อ่านตัวที่เปลี่ยนช้าแค่วินาทีละครั้ง และย้ายไมโครโฟนที่ต้องรับ 16 kHz ไปไว้ใน task แยก
ทุกอย่างใน sensorhub_poll_timer_cb() รันใน LVGL context ระหว่างที่ driver รอ bus การวาดจอต้องรอด้วย การอ่านทุกตัวทุก 100 ms จะกินเวลามากโดยไม่จำเป็น ความดันและความชื้นเปลี่ยนช้าจึงอ่านวินาทีละครั้งก็พอ ส่วนงานเสียงหนักและต่อเนื่องจึงอยู่ใน task ที่ขับด้วย interrupt
-
If the SHT4x fails to initialise, what happens to the dashboard? (Objective 1)
- แดชบอร์ดไม่เปิดเลย
- sht_ready เป็น false การอ่าน SHT4x ถูกข้าม footer ขึ้น SHT:- ส่วนเซนเซอร์อื่นและไมโครโฟนทำงานต่อตามปกติ
- โค้ดลองอ่าน SHT4x ทุก 100 ms จนกว่าจะสำเร็จ
- ค่าอุณหภูมิจาก DPS368 ถูกใช้แทนความชื้น
Show answer
Answer: B. sht_ready เป็น false การอ่าน SHT4x ถูกข้าม footer ขึ้น SHT:- ส่วนเซนเซอร์อื่นและไมโครโฟนทำงานต่อตามปกติ
sensorhub_presenter_start() init ทีละตัวและเก็บผลใน flag ของตัวเอง sensorhub_poll_sht() ออกทันทีถ้า sht_ready เป็น false และ footer แสดงสถานะ Y หรือ - ของทุกแหล่ง การแยกความล้มเหลวของแต่ละตัวทำให้ระบบรวมยังใช้งานได้
-
Which presentation decisions does this dashboard's code actually make? (choose all that apply) (Objective 3)
- แบ่งเป็นแท็บ Home (ภาพรวม) Env Motion Compass Audio และแสดงทีละหน้า
- footer บอกความพร้อมของทุกแหล่งข้อมูล (DPS/SHT/BMI/BMM/MIC)
- แสดงรูปคลื่นเสียงดิบ 16 kHz ในหน้า Audio
- เริ่ม calibrate เข็มทิศอัตโนมัติตั้งแต่เปิดเครื่อง พร้อมแสดงความคืบหน้า
- วาดทุกเซนเซอร์ใหม่ที่ 60 ครั้งต่อวินาที
Show answer
Answer: A. แบ่งเป็นแท็บ Home (ภาพรวม) Env Motion Compass Audio และแสดงทีละหน้า · B. footer บอกความพร้อมของทุกแหล่งข้อมูล (DPS/SHT/BMI/BMM/MIC) · D. เริ่ม calibrate เข็มทิศอัตโนมัติตั้งแต่เปิดเครื่อง พร้อมแสดงความคืบหน้า
sensorhub_view_set_active_page() ซ่อนหน้าที่ไม่ได้เลือก sensorhub_update_footer() พิมพ์สถานะทุกแหล่ง และ presenter เรียก bmm350_reader_start_calibration() ตั้งแต่ start หน้า Audio แสดงระดับเสียงที่คำนวณแล้ว ไม่ใช่คลื่นดิบ และจังหวะวาดถูกกำหนดโดยคาบเวลาของแต่ละเซนเซอร์ เมื่อจะส่งข้อมูลขึ้นแพลตฟอร์มก็ใช้หลักเดียวกัน คือเลือกค่าสรุปที่มีความหมาย ไม่ใช่ข้อมูลดิบทุกตัวอย่าง
Cite this lesson
If you teach from this lesson or reuse it in slides or documents, credit it with the text below. If you changed it, add (adapted) after the title.
"SensorHub: one dashboard for every sensor (series project)" from TESA Open Knowledge by the Thai Embedded Systems Association (TESA), https://github.com/tesaiot/tesa-qualification-program, licensed under CC BY-NC 4.0
Thai attribution: "SensorHub: แดชบอร์ดรวมเซนเซอร์ทุกตัว (งานปิดชุด)" จาก TESA Open Knowledge โดยสมาคมสมองกลฝังตัวไทย (Thai Embedded Systems Association: TESA) https://github.com/tesaiot/tesa-qualification-program สัญญาอนุญาต CC BY-NC 4.0
This lesson adapts the source below; keep its credit too.
https://github.com/tesaiot/developer-hub/blob/9a8e3ed1d813bfd67fabf6b7ac15c6ff9750b465/int_ep07_sensorhub_final · Code stays in the Developer Hub and is linked at pinned commits, never copied: the episodes, practice codes and main-branch examples are Apache-2.0; the master template and the OPTIGA client carry Infineon/Cypress EULAs.
TESA Open Knowledge · © 2026 สมาคมสมองกลฝังตัวไทย (TESA) · CC BY-NC 4.0
Content is licensed CC BY-NC 4.0. Reuse it non-commercially and credit the Thai Embedded Systems Association (TESA) every time. · How to cite TESA