Pressure and temperature from the DPS368 over I2C
Objectives
Section titled “Objectives”- Read pressure and temperature from the DPS368 over I2C and show them on screen
- Explain the driver → reader → presenter → view layering of the episode
- Check the reading against a local reference pressure and explain the difference
Concepts
Section titled “Concepts”What the DPS368 is, and what its spec numbers mean
Section titled “What the DPS368 is, and what its spec numbers mean”The DPS368 is a capacitive-MEMS barometric pressure sensor from Infineon. It measures pressure across 300–1200 hPa with a precision around ±0.002 hPa (roughly a 2 cm change in altitude), and it also measures temperature in the same package, because the pressure reading has to be compensated using the sensor’s own internal temperature (this math is already done inside Infineon’s library, so we never write that formula ourselves).
Four code layers: driver → reader → presenter → view
Section titled “Four code layers: driver → reader → presenter → view”The code splits the work across four layers matching the folder names. Under app_sensor/dps368/ there is
dps368_driver (talks to the sensor through Infineon’s own xensiv_dps3xx library directly) and dps368_reader
(wraps the driver into one function, dps368_reader_poll(), that returns a bool for whether a new sample
arrived). Under app_ui/dps368/ there is dps368_presenter (owns the timer and decides when to update the
screen) and dps368_view (creates and updates plain labels only — no gauge or arc widget, despite what one might
assume). Each layer only knows about its immediate neighbor — dps368_view knows nothing about I2C at all, and
dps368_driver knows nothing about LVGL at all.
Reaching the sensor over a bus the master already set up, with an I2C address fallback
Section titled “Reaching the sensor over a bus the master already set up, with an I2C address fallback”main_example.c passes &sensor_i2c_controller_hal_obj (the HAL handle the master template already opened
before example_main() was ever called — see lesson 1.1) straight into dps368_presenter_start(), with no
repeated cyhal_i2c_init(). Inside, app_dps368_service_init() first tries the default address
(XENSIV_DPS3XX_I2C_ADDR_DEFAULT = 0x77); if that does not respond, it tries the alternate address
(XENSIV_DPS3XX_I2C_ADDR_ALT = 0x76, set by the sensor’s SDO pin). The code therefore works on boards that strap
the SDO pin either way, with no code change needed.
The real polling mechanism: one lv_timer on the LVGL thread, not a separate FreeRTOS task
Section titled “The real polling mechanism: one lv_timer on the LVGL thread, not a separate FreeRTOS task”dps368_presenter_start() calls lv_timer_create(dps368_poll_sensor_cb, DPS368_SAMPLE_PERIOD_MS, NULL), where
DPS368_SAMPLE_PERIOD_MS = 1000 (once per second). dps368_poll_sensor_cb() runs on the same LVGL thread as
the code that draws the screen — it is not a separate FreeRTOS task pushing data through a queue and back into
LVGL with lv_async_call(), as one might otherwise assume. The I2C read
(dps368_driver_read_hpa_c()) is therefore a direct, blocking call inside the timer’s callback, because one
I2C transaction is fast enough not to stutter the screen. At once per second, this episode chooses simplicity
over splitting threads, because a single sensor does not justify the complexity of a task-plus-queue design.
Telling “no new sample yet” apart from a real error
Section titled “Telling “no new sample yet” apart from a real error”dps368_reader_poll() checks for one special driver return code, XENSIV_DPS3XX_RSLT_ERR_DATA_NOT_READY. On
that code it returns false but does not treat it as an error — it simply means the sensor’s next conversion
cycle has not finished yet. Any other error code is a real problem, which the presenter shows on the status label
as "Sensor: read error (0x........)". Separating these two cases matters: if “not ready yet” were treated as an
error every time, the screen would flash an error message every second the sensor simply had not finished its
next reading.
Worked example
Section titled “Worked example”This episode’s code lives on the Developer Hub (pinned to commit 9a8e3ed) — read the Why section of the
upstream README
to understand its purpose, but the excerpts below are copied from the actual files (Apache-2.0,
tesaiot/developer-hub, same commit), because the real polling mechanism differs from what the upstream README
describes (no separate FreeRTOS task or queue).
app_ui/dps368/dps368_presenter.c — a single lv_timer that polls and updates the screen:
static void dps368_poll_sensor_cb(lv_timer_t *timer){    (void)timer;
    dps368_sample_t sample;    bool has_new_sample = dps368_reader_poll(&sample);
    if (has_new_sample)    {        dps368_view_update_sample(&sample);        /* ... */        return;    }
    cy_rslt_t rslt = dps368_reader_get_last_error();    if (CY_RSLT_SUCCESS == rslt)    {        return;   /* not-ready is not an error */    }    /* ... real error -> update status label ... */}
app_sensor/dps368/dps368_reader.c — separating “not ready yet” from a real error:
if (CY_RSLT_SUCCESS == rslt){    s_last_sample.pressure_hpa = pressure_hpa;    s_last_sample.temperature_c = temperature_c;    s_last_sample.sample_count++;    if (NULL != out_sample) { *out_sample = s_last_sample; }    return true;}
/* At low sample rate, polling can happen before conversion is ready. */if (rslt == XENSIV_DPS3XX_RSLT_ERR_DATA_NOT_READY){    s_last_error = CY_RSLT_SUCCESS;    return false;}
s_last_error = rslt;return false;
app_sensor/app_dps368_service.c — trying the primary I2C address first, then falling back:
rslt = mtb_xensiv_dps3xx_init_i2c(&s_dps368, i2c_bus, XENSIV_DPS3XX_I2C_ADDR_DEFAULT);if (CY_RSLT_SUCCESS != rslt){ rslt = mtb_xensiv_dps3xx_init_i2c(&s_dps368, i2c_bus, XENSIV_DPS3XX_I2C_ADDR_ALT); /* ... */}main_example.chands the master’s I2C handle todps368_presenter_start(), exactly as the upstream README describes- The
basic_label_legacy.*anddps368_monitor_legacy.*files are the pre-refactor version kept for comparison — they are not part of the episode’s real running code - See the full folder at
int_ep01_dps368_monitor/
Common mistakes
Section titled “Common mistakes”- Assuming a separate FreeRTOS task polls the sensor every 100 ms — the real code uses a single
lv_timeron the LVGL thread at 1000 ms, reading I2C as a direct blocking call inside it, with no queue orlv_async_call(). This works because there is only one sensor and the I2C transaction is short — if more, slower sensors are added later, that is when splitting off a real task becomes worth considering (see EP07 — SensorHub Final). - Treating
XENSIV_DPS3XX_RSLT_ERR_DATA_NOT_READYas an error — it must always be separated from other error codes, because it only signals that the next conversion cycle has not finished, not a failure. Treating it as an error every time produces a misleading log/status. - Forgetting the sensor has two possible I2C addresses — hard-coding only
0x77breaks on boards that strap the SDO pin the other way. Always try the fallback the wayapp_dps368_service_init()does.
Build and flash
Section titled “Build and flash”# In the master template folder (see lesson 1.1)# 1) Delete the old episode's files in proj_cm55/apps/# 2) Copy all of this episode's files into proj_cm55/apps/make buildmake program # flash through KitProg3Or open this example on the Developer Hub and flash the ready-made firmware.
See it work first
Section titled “See it work first”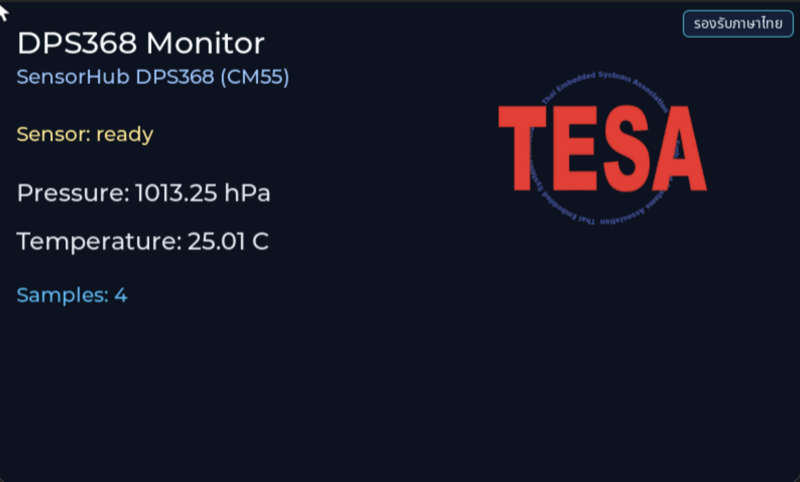
Before reading the code, guess what objects this screen has, and what changes when the user taps it or when a sensor value changes.
Try a change
Section titled “Try a change”- Guess before you change anything: pick one value the example’s README explains in the How section, and write down what you expect to change on the screen or in the log.
- Change and run: build + flash, then compare against your guess. If it does not match, find which part you misunderstood.
- Extend: add one thing the example does not yet have, and keep a photo or video in your portfolio.
Check your understanding
Section titled “Check your understanding”- What does the presenter layer do that the view does not?
- How should the pressure change when you lift the board up by one floor of a building?
- If the sensor does not respond on I2C, at which layer should the error message appear?
The answers are in the example’s README and in the code. If you cannot answer one, go back and read the Why / What / How section again.
References
Section titled “References”- Episode README · code folder · commit
9a8e3ed - Open this example on the Developer Hub
- The code belongs to the Developer Hub and is referenced by link, not copied into this repository
Review questions
Answer on your own first, then open the answer.
-
If the DPS368 does not answer on I2C at start-up, what do you see? (Objective 1)
- บอร์ดรีเซ็ตวนไม่หยุด
- ค่าความดันเป็น 0.00 hPa แต่สถานะขึ้น ready
- driver ลอง address หลักแล้วลอง address สำรอง ถ้าไม่ตอบทั้งคู่จะ log INIT_FAIL จอขึ้น “Sensor: init failed” และไม่สร้าง timer อ่านค่า
- presenter ลองใหม่ทุก 1 วินาทีจนกว่าเซนเซอร์จะตอบ
Show answer
Answer: C. driver ลอง address หลักแล้วลอง address สำรอง ถ้าไม่ตอบทั้งคู่จะ log INIT_FAIL จอขึ้น “Sensor: init failed” และไม่สร้าง timer อ่านค่า
dps368_driver_init() เรียก mtb_xensiv_dps3xx_init_i2c() ด้วย DPS368_I2C_ADDR_PRIMARY ก่อนแล้วจึง ALTERNATE เมื่อยังล้ม dps368_presenter_start() เรียก dps368_view_set_init_failed() แล้ว return ก่อน lv_timer_create() จึงไม่มีการอ่านซ้ำ ต้องแก้สายหรือบอร์ดแล้วรีเซ็ต ส่วน I2C bus เองถูก master เตรียมไว้ให้แล้ว episode แค่รับ handle sensor_i2c_controller_hal_obj
-
An I2C read fails at run time. How do the layers cooperate to put the error on screen? (Objective 2)
- driver คืนรหัส error, reader เก็บเป็น last error, presenter ตัดสินใจแสดงเมื่อรหัสเปลี่ยน แล้วเรียก view ให้เขียนข้อความ
- driver เรียก lv_label_set_text() เองทันทีที่อ่านล้ม
- view อ่าน I2C เองเพื่อตรวจว่าเซนเซอร์ยังอยู่
- master template ตรวจแล้วแสดงข้อความให้
Show answer
Answer: A. driver คืนรหัส error, reader เก็บเป็น last error, presenter ตัดสินใจแสดงเมื่อรหัสเปลี่ยน แล้วเรียก view ให้เขียนข้อความ
dps368_reader_poll() เก็บ s_last_error presenter อ่านด้วย dps368_reader_get_last_error() และเรียก dps368_view_set_read_error() เฉพาะเมื่อรหัสต่างจากครั้งก่อน เพื่อไม่ให้จอกระพริบและ log ท่วม view ไม่รู้จัก I2C และ driver ไม่รู้จัก LVGL แต่ละชั้นจึงเปลี่ยนแยกกันได้
-
Sometimes xensiv_dps3xx_read() returns XENSIV_DPS3XX_RSLT_ERR_DATA_NOT_READY. How does the code handle it, and why? (Objective 2)
- ถือเป็น error ร้ายแรงและแสดงบนจอทันที
- init เซนเซอร์ใหม่ทุกครั้ง
- หน่วงเวลา 100 ms แล้วอ่านซ้ำในรอบเดียวกัน
- reader คืน false แต่ไม่ถือเป็น error presenter จึงข้ามรอบนั้นเงียบ ๆ และจอคงค่าเดิม เพราะที่อัตรา 1 ครั้งต่อวินาทีกับ oversampling 8 เท่า การ poll อาจมาถึงก่อนการแปลงค่าเสร็จ ซึ่งเป็นเรื่องปกติ
Show answer
Answer: D. reader คืน false แต่ไม่ถือเป็น error presenter จึงข้ามรอบนั้นเงียบ ๆ และจอคงค่าเดิม เพราะที่อัตรา 1 ครั้งต่อวินาทีกับ oversampling 8 เท่า การ poll อาจมาถึงก่อนการแปลงค่าเสร็จ ซึ่งเป็นเรื่องปกติ
comment ใน dps368_reader.c เขียนว่า At low sample rate, polling can happen before conversion is ready. จึงตั้ง s_last_error = CY_RSLT_SUCCESS เพื่อไม่ให้ presenter แสดง error ปลอม ตัวอย่างนี้ poll ผ่าน lv_timer ทุก DPS368_SAMPLE_PERIOD_MS (1000 ms) ในขณะที่เซนเซอร์วัดอยู่เบื้องหลัง (background mode)
-
You carry the board up one floor (about 3 m). How should the pressure reading change? (Objective 3)
- เพิ่มขึ้นราว 0.35 hPa
- ลดลงราว 0.35 hPa
- ลดลงราว 3.5 hPa
- ไม่เปลี่ยน เพราะเซนเซอร์ละเอียดไม่พอ
Show answer
Answer: B. ลดลงราว 0.35 hPa
README ของ episode ให้ตัวเลขว่ายกขึ้น 1 เมตร ความดันลดราว 0.12 hPa (ใกล้ระดับน้ำทะเล) 3 เมตรจึงลดราว 0.36 hPa ความละเอียดของ DPS368 ราว ±0.002 hPa จึงเห็นได้ชัด แต่ควรดูค่าเฉลี่ยหลายวินาที เพราะลมและแอร์ในห้องทำให้ค่าแกว่งได้
-
The board reads 1005 hPa while a nearby weather station reports 1012 hPa. What best explains the difference? (Objective 3)
- เซนเซอร์เสีย ต้องเปลี่ยนตัวใหม่
- ค่าจากบอร์ดเป็นหน่วย kPa
- ค่าที่สถานีรายงานมักปรับเป็นระดับน้ำทะเลแล้ว ส่วนบอร์ดวัดความดันจริงตรงความสูงที่วางอยู่ ส่วนต่างราว 7 hPa ตรงกับความสูงราว 60 เมตร จึงต้องเทียบในเกณฑ์เดียวกันก่อน
- ความดันในอาคารสูงกว่าภายนอกเสมอ
Show answer
Answer: C. ค่าที่สถานีรายงานมักปรับเป็นระดับน้ำทะเลแล้ว ส่วนบอร์ดวัดความดันจริงตรงความสูงที่วางอยู่ ส่วนต่างราว 7 hPa ตรงกับความสูงราว 60 เมตร จึงต้องเทียบในเกณฑ์เดียวกันก่อน
สูตร barometric ใน README คือ h = 44330 × (1 − (P/P0)^0.1903) แทนค่า 1005 กับ 1012 hPa ได้ราว 58 เมตร ให้ตรวจก่อนว่าค่าอ้างอิงเป็นความดันที่ปรับเป็นระดับน้ำทะเลหรือความดันที่สถานี และจุดที่วัดสูงเท่าไร ก่อนสรุปว่าเซนเซอร์คลาด
Cite this lesson
If you teach from this lesson or reuse it in slides or documents, credit it with the text below. If you changed it, add (adapted) after the title.
"Pressure and temperature from the DPS368 over I2C" from TESA Open Knowledge by the Thai Embedded Systems Association (TESA), https://github.com/tesaiot/tesa-qualification-program, licensed under CC BY-NC 4.0
Thai attribution: "อ่านความดันและอุณหภูมิจาก DPS368 ผ่าน I2C" จาก TESA Open Knowledge โดยสมาคมสมองกลฝังตัวไทย (Thai Embedded Systems Association: TESA) https://github.com/tesaiot/tesa-qualification-program สัญญาอนุญาต CC BY-NC 4.0
This lesson adapts the source below; keep its credit too.
https://github.com/tesaiot/developer-hub/blob/9a8e3ed1d813bfd67fabf6b7ac15c6ff9750b465/int_ep01_dps368_monitor · Code stays in the Developer Hub and is linked at pinned commits, never copied: the episodes, practice codes and main-branch examples are Apache-2.0; the master template and the OPTIGA client carry Infineon/Cypress EULAs.
TESA Open Knowledge · © 2026 สมาคมสมองกลฝังตัวไทย (TESA) · CC BY-NC 4.0
Content is licensed CC BY-NC 4.0. Reuse it non-commercially and credit the Thai Embedded Systems Association (TESA) every time. · How to cite TESA