Hands-on: the mini-HMI dashboard and the 10-minute soak test
Module 3 — Sensor Visualization on HMI · Slides: slides.md · Module overview · Course page
Fill the blanks in the s08_dashboard.py practice file one at a time until all four cards respond, then prove it with a 10-minute soak run that logs the loop count every two minutes, so you can tell a hang from a slowdown.
Objectives
Section titled “Objectives”By the end of this lesson you will be able to:
- Fill the blanks in practice/s08_dashboard.py one at a time, running after each, until the IMU chart follows shaking on all three lines, the compass turns with the board and the direction name changes, the CapSense lamps light on touch and dim on release, the Bar and % move, and the Arc and Seg7 change together when you turn the knob
- Run the dashboard for 10 minutes, logging the loop count every two minutes in all six slots, with no Traceback and no steadily growing loop ms, and tell a hang from a slowdown using the loop count and loop ms
- Match at least three silent symptoms from the trap table (such as trailing widgets that never appear, a card hiding its text, widgets hiding every two seconds, a frozen Seg7, or a compass that jumps when passing north) to their cause and fix
- Explain at least three decisions in the solution, namely wrapping each sensor read in its own try, keeping the last value and letting the stale lamp speak, rewriting numbers once per second while the chart moves every 200 ms, and a hold button that does not stop the program
Before you start
Section titled “Before you start”Keep your paper layout and budget table from lesson 3.7, and your notes from walking through the solution in lesson 3.8, close by. Prepare a six-slot table in your learning log to record the loop count at minutes 0, 2, 4, 6, 8 and 10, and a stopwatch. On the board’s screen, keep the BENTO Playground card open, and never press back during the test. Plug the USB cable in firmly, because a loose cable can reset the board mid-test, and then we would blame the code for nothing.
- Equipment: an Eva Kit or TESAIoT Dev Kit board with the BENTO MicroPython firmware installed, or the BENTO Emulator in BENTO IDE
- Before this: Lesson 3.8 — Building the dashboard: four cards in one loop
Concepts
Section titled “Concepts”Lessons 3.7–3.9’s passing criteria fits in one sentence: the four-card dashboard runs continuously for 10 minutes with no hang and no crash. The first five items on the checklist take about an hour to build; the ten minutes of running long cannot be skipped, because it is the item that separates a toy from something that actually works. The practice file already has the full screen; three cards are already written for you. Our job is to fill in the missing pieces one at a time and run after each, because once code runs past thirty lines, filling in one piece at a time is the only way to know where it broke, and most traps in UI work are completely silent, with no error — our eyes are the main debugging tool.
The solution uses the full budget of exactly 32. The room left over from lesson 3.7’s paper layout goes to the stale-value lamp, the hold/pause button, two lamps on the touch card, and the warning threshold on the knob card (a Spinbox and a warning lamp). The widget-count block sits at the top of the file, not in a notebook, because documentation far from the code always goes stale. The whole layout uses one formula: 24 left margin, 16 gap, cards 136 tall on both rows (24 + 368 + 16 + 360 + 24 = 792), and the buttons sit in the header strip, because the two rows of cards already use up all 398 of the height.
The solution’s loop makes several decisions. try wraps the read per sensor, not the whole loop — if the compass alone has trouble, the other three cards
must still work. except never writes zero — it keeps the last value, and if reading fails for more than STALE_MS (3000 ms) in a row, the stale-value lamp
lights to answer “is the number I’m seeing the current value”. This lamp is only written when its state changes, because the screen’s command queue has a
bottom to it. The chart, bar, needle and lamps can move every 200 ms because the eye reads shape, but numbers are rewritten once per second (UI_TEXT_MS),
because nobody can read a number flickering five times a second. The pause button just sets running = False; the loop count keeps moving, so a viewer knows
the machine has not hung. time.ticks_diff() is used instead of subtracting directly, because ticks_ms() wraps back to zero on a long enough run.
Silent traps worth remembering: Seg7 takes text — use .text(). Call .value() and the number stays frozen at 0000 forever, on both the board and
in the Emulator, with no error. Forget ui.poll() and the screen hides its widgets for about two seconds on a repeating cycle, and every button on screen dies completely.
During a long run, a loop count that has frozen means the loop is dead, but a loop count still moving while loop ms slowly grows means it is slowing down, not hanging —
something is accumulating inside the loop. These two symptoms need different fixes — tell them apart before you start working on either.
Worked example
Section titled “Worked example”Three example files that keep a card standing up for the full ten minutes. Open whichever is relevant to the card you’re working on — you do not need to do them all first.
- 06_compass_readout.py (about 10 minutes) — while filling the compass’s blank, run it and set the board still; the heading-over-time chart must be a straight line.
A jittery line means the compass is not yet calibrated enough. Notice it uses
seg.text(), neverseg.value(). This file has been confirmed on the Eva Kit; it has not yet been run on the Dev Kit - 05_door_open_switch.py (about 10 minutes) — watch the two-level threshold (hysteresis) that keeps the status label from flickering when the value hovers near the threshold.
Predict first what happens if the open and close thresholds are set close together, then try changing it. The thresholds 45 and 25 are in board units, not µT. If opening this
raises
OSError, skip to the IMU card first and note it down, because this file has not yet been run by anyone on a real board - If your team picks a sound card as the fifth card, 03_mic_clap_trigger.py uses
peak()to catch a clap thatrms()averages away, and 07_mic_window_stats.py lets you togglefreshand watch the audio queue grow to a full 625 ms with your own eyes
08_win_titled_card.py is an alternative card frame, ui.Win, which comes with a title bar. It costs two handles, the same as Panel + Label,
but the title bar eats about 60 px of height, and text= only works at creation — so a value that must change can never sit on the title.
| File | What this file teaches |
|---|---|
| examples/03_mic_clap_trigger.py | Clap and the lamp toggles |
| examples/05_door_open_switch.py | A magnetic switch reporting whether a door is open or closed |
| examples/06_compass_readout.py | A compass you can actually use, with a degree number |
| examples/07_mic_window_stats.py | The raw waveform, three values from one window, and a queue that is falling behind |
| examples/08_win_titled_card.py | A card with a built-in title, and a title you cannot edit |
The slides for this lesson also refer to files that live in other lessons:
- m02-ui-to-hardware/l02-active-low-debounce/examples/05_debounce_count.py — count presses correctly, by waiting for the button to sit still first
- m03-sensor-hmi/l08-dashboard-build/examples/02_mic_sound_level_meter.py — a room sound-level meter
- m03-sensor-hmi/l08-dashboard-build/examples/04_magnet_presence.py — detecting whether a magnet is nearby
- shared/usecase/01_andon_severity_lamp.py — a factory-style status tower light (andon light)
- shared/usecase/05_short_long_press.py — one button, two meanings
- shared/usecase/14_hard_iron_calibration.py — compass calibration, made into something measurable
Screens from the BENTO Emulator for this lesson’s examples (click a file name to open the code)
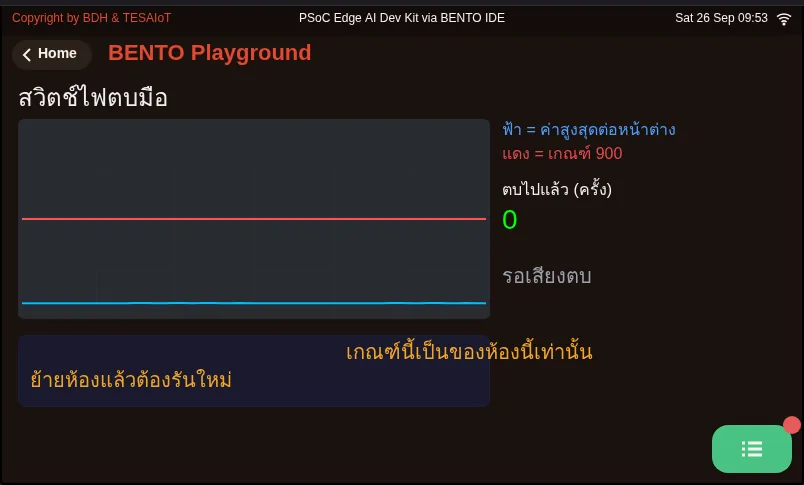
03_mic_clap_trigger.py Clap and the lamp toggles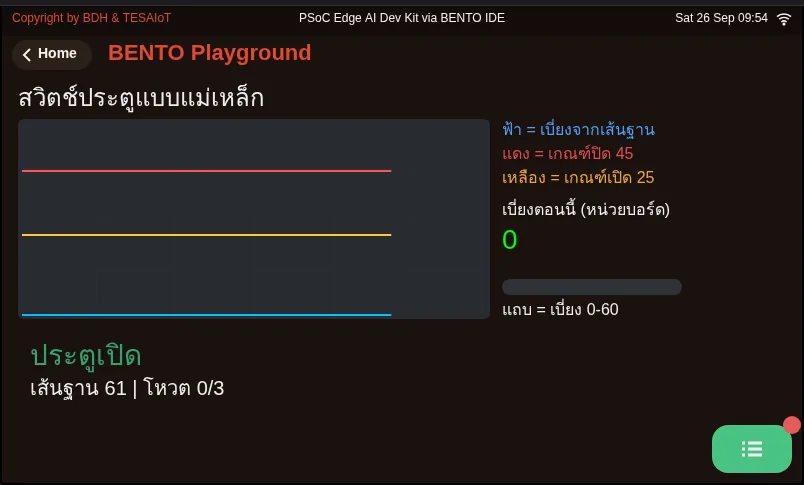
05_door_open_switch.py A magnetic switch reporting whether a door is open or closed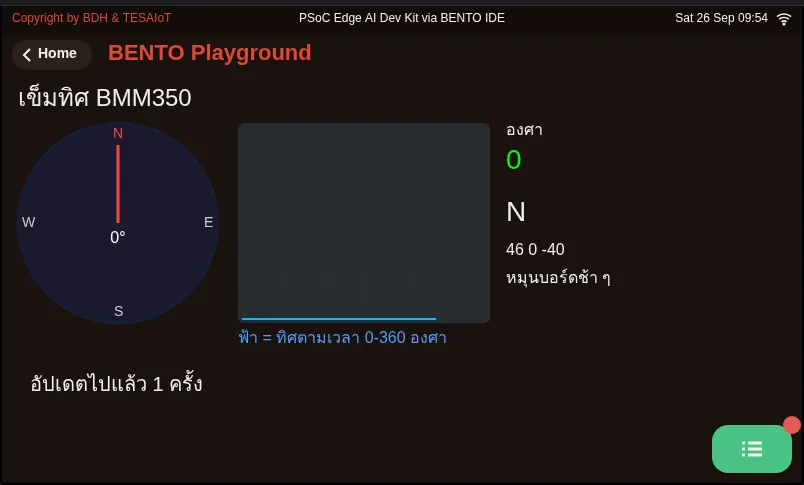
06_compass_readout.py A compass you can actually use, with a degree number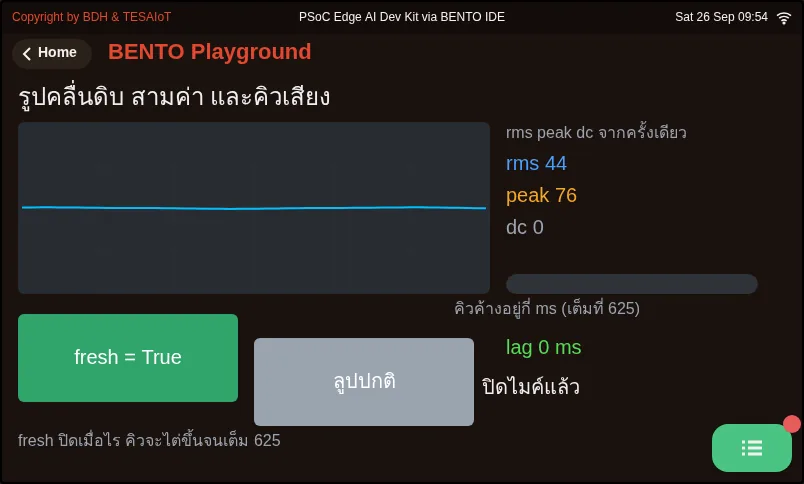
07_mic_window_stats.py The raw waveform, three values from one window, and a queue that is falling behind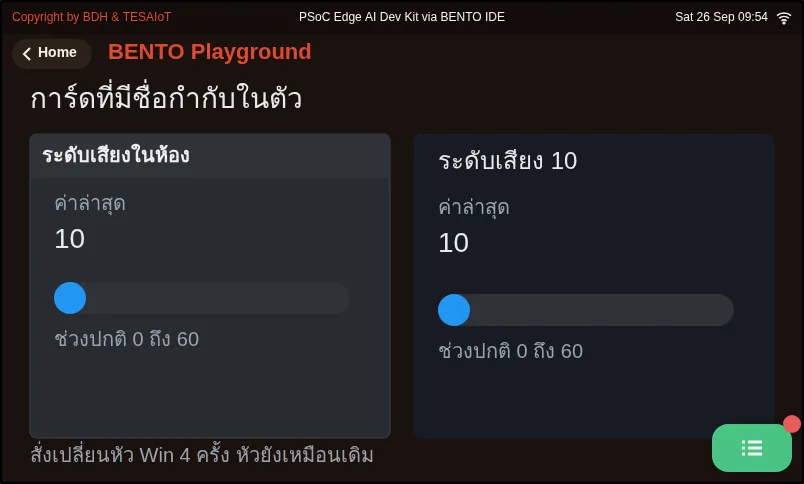
08_win_titled_card.py A card with a built-in title, and a title you cannot editPractice
Section titled “Practice”The practice file has seven # เติม: (fill in) hints. Fill in one at a time and press Program to Device to see the result each time — never fill them all in and run once.
- Blanks 1–2 first, then run.
sensors.bmi270.motion()inside the try block is one throw-away read, not switching the sensor on. Never callsensors.init()on either board (the Eva Kit always raisesOSError; the Dev Kit passes but does not need it). Blank 2 isimu_panel = ui.Panel(...)for the IMU card, copying the shape from the three cards already written - Blanks 3–6, one at a time, running after each. Values arrive one card at a time:
imu_chart.set_next(sy, int(ay * 10))makes the third line appear ·compass.value(int(heading))makes the needle turn ·cap_bar.value(int(cap['slider']))makes the bar follow the finger ·pot_seg7.text("{:.1f}".format(pct))changes the Seg7. Never use.value()on Seg7 - Blank 7 is last, and deliberately try it wrong once. Run for about half a minute with the loop
for ev in ui.poll():not yet working (if it is already in your file below the hint, comment out the whole block temporarily), and note what the screen does. That is the symptom of forgettingui.poll()— then uncomment it
Once complete, edit TEAM to your team’s name, check that the budget block at the top of the file still matches the real widgets, then start the long run. If the screen hangs partway through,
press RESTART on the Playground page and start the timer over from zero — never keep counting from before.
| Practice file | Topic |
|---|---|
| practice/s08_dashboard.py | The 4-card Mini-HMI dashboard, on the Eva Kit / Dev Kit (fill-in version) |
Solution
Section titled “Solution”Open the solution after trying on your own at least once, and read how to use the solutions first.
| Solution | Goes with |
|---|---|
| solution/s08_dashboard.py | practice/s08_dashboard.py |
Check your understanding
Section titled “Check your understanding”The same questions are in quiz.yaml for automatic marking.
-
You fill the knob card’s blank as pot_seg7.value(int(pct)), run it with no error, but the Seg7 stays frozen at 0000 even though the Arc follows the knob. What should you do? (choose one · objective 1)
- A) Change it to pot_seg7.text(“{:.1f}”.format(pct)), because Seg7 takes text, not a value
- B) Add value=28 when creating the Seg7 to make the font bigger
- C) Move that line outside the UI_TEXT_MS condition so it writes every 200 ms
- D) Call sensors.init() before reading the knob
Solution
A — The firmware side has no .value() path for Seg7, so the command vanishes silently and the number stays frozen at 0000, on both the board and in the Emulator. You must send it as text with .text(); Seg7’s value= is also discarded, because its font is fixed.
-
During a long run, the loop count keeps moving every interval, but the loop-ms figure in the header slowly climbs from 3 to 40 ms. Which conclusion is correct? (choose one · objective 2)
- A) It is a slowdown, not a hang; something is accumulating inside the loop, and this fails the “loop ms does not keep growing” item
- B) It is a real hang; the loop is dead, so press RESTART and keep counting
- C) It’s normal, since the loop count is still moving, so the ten-minute criteria still passes
- D) The sensor is not answering; check the stale-value lamp
Solution
A — A real hang means both the loop count and loop ms stop together. If the loop count keeps moving while loop ms keeps climbing, it is slowing down because something is accumulating, which the MVP criteria forbids. If a restart is needed, the timer must start over from zero — never keep counting.
-
Your team’s trailing card never appears on screen at all, with no error, and the previous script had only just finished running. What is the most likely cause? (choose one · objective 3)
- A) It went over the 64-widget ceiling, because ui.screen() was never called at the top of the script, so leftovers from before still hold their slots
- B) The Panel was created before the Label
- C) sleep_ms(200) is too long, so CM55 never draws
- D) The Emulator only supports four cards
Solution
A — Whatever goes over the 64 ceiling never appears and gives no warning. ui.screen() clears every existing widget; skip it and leftovers from a previous script eat into the budget before anything even starts. The fix is to recount and call ui.screen() at the top of the script. Creating a Panel before a Label is actually the correct order.
-
The compass card’s needle jumps back every time the board turns past north. Which fix addresses the real cause? (choose one · objective 3)
- A) Write heading = sensors.bmm350.heading() % 360.0, to keep the value from ever exceeding 360
- B) Change ui.Compass to ui.Arc
- C) Lower the cadence to 50 ms so the needle keeps up
- D) Call cal_reset() every loop round
Solution
A — If Compass receives a value like 361, the needle jumps back. Taking % 360.0 always keeps the degree value in the range 0 up to but not including 360. This symptom has no error at all — you can only see it with your own eyes.
-
Which statements match the decisions in the s08_dashboard.py solution file? Choose every correct one. (choose all that apply · objective 4)
- A) try wraps the read per sensor; if the compass does not answer, the other three cards keep working
- B) After failing to read for more than 3 seconds in a row, the stale lamp lights, while the on-screen number still shows the last value actually read
- C) The numbers on the cards are rewritten once per second, while the chart, bar, needle and lamps move every 200 ms
- D) Pressing pause stops the loop, so the loop count freezes to signal it has stopped
- E) The stale lamp is written every loop round, to make sure the screen received it
Solution
A, B, C — Choosing the boundary of try is a decision about what can break while the system stays usable. except keeps the last value because zero looks exactly like a real one. Pause just sets running to False; the loop count keeps moving to signal the machine has not hung, and the stale lamp is written only when it changes, because the screen’s command queue has a bottom to it.
MVP checkpoint. Lessons 3.7–3.9 pass when every item below is true.
- All four cards sit on one screen, with no overlap and nothing spilling past the 792×398 edge
- The IMU card’s chart runs following real shaking of the board
- The compass turns with the board, and the direction letters change with the degree
- Touching a CapSense button lights that lamp; releasing dims it (not vanishes), and dragging a finger moves the Bar and the % number
- Turning the knob changes the Arc and Seg7 together
- The counted widget budget does not exceed 32 (firmware ceiling 64), and the number at the top of the file matches reality
- It runs continuously for 10 minutes, the loop count keeps moving the whole time, no Traceback, and loop ms does not keep growing
- The loop count is recorded every two minutes in all six slots of your learning log
While running, if something looks odd, turn the knob and watch three things at once: the Seg7 number, the loop count, and loop ms. If the loop count moves but Seg7 does not, the problem is on the sensor side; if the loop count has stopped, the problem is in the loop or the screen.
Going further
Section titled “Going further”Keep this file and do not delete it — lessons 4.1–4.3 will open it up further and add the SSID, IP and ping value to this same dashboard, not start over.
If you want to go further, pick one item: a fifth card reporting the program’s own health (uptime, round count, peak loop ms) within the budget of 32 ·
colour zones by the combined acceleration magnitude’s threshold (below 11 green, 11–12 amber, over 12 red) · switching pages with .show() / .hide() ·
run two long sessions, one at sleep_ms(200) and one at sleep_ms(80), and conclude what cadence your team would choose
Next lesson: Lesson 4.1 — WiFi and networking: dBm, DHCP, IP and DNS
Reflect
Section titled “Reflect”- If you had to add a network-status card in lessons 4.1–4.3, what would you cut, or which part of the budget would you use?
- Which card would a real viewer look at most often, and is it in the right place yet?
- What do the six numbers you recorded tell you about your loop, and if one slot came out abnormally low, where would you start looking?
Review questions
Answer on your own first, then open the answer.
-
You filled the knob card blank with pot_seg7.value(int(pct)). There is no error, but the Seg7 stays at 0000 while the Arc follows the knob. What is the fix? (Objective 1)
- เปลี่ยนเป็น pot_seg7.text("{:.1f}".format(pct)) เพราะ Seg7 รับข้อความ ไม่ใช่ค่า
- ใส่ value=28 ตอนสร้าง Seg7 ให้ฟอนต์ใหญ่ขึ้น
- ย้ายบรรทัดนั้นออกนอกเงื่อนไข UI_TEXT_MS ให้เขียนทุก 200 ms
- เรียก sensors.init() ก่อนอ่านลูกบิด
Show answer
Answer: A. เปลี่ยนเป็น pot_seg7.text("{:.1f}".format(pct)) เพราะ Seg7 รับข้อความ ไม่ใช่ค่า
ฝั่งเฟิร์มแวร์ไม่มีเส้นทาง .value() สำหรับ Seg7 คำสั่งจึงหายเงียบ ๆ และตัวเลขค้างที่ 0000 ทั้งบนบอร์ดและใน Emulator ต้องส่งเป็นข้อความด้วย .text() ส่วน value= ของ Seg7 ก็ถูกโยนทิ้งเพราะฟอนต์ถูกฝังไว้ตายตัว
-
During the soak run the loop count keeps rising in every slot, but the loop ms in the header slowly grows from 3 to 40 ms. Which conclusion is correct? (Objective 2)
- ช้า ไม่ใช่ค้าง มีอะไรสะสมอยู่ในลูป และยังไม่ผ่านข้อ loop ms ไม่โตขึ้นเรื่อย ๆ
- ค้างจริง ลูปตายแล้ว ต้องกด RESTART แล้วนับเวลาต่อ
- ปกติ เพราะเลขรอบยังเดิน ถือว่าผ่านเกณฑ์สิบนาที
- เซนเซอร์ไม่ตอบ ให้ดูที่ไฟค่าค้าง
Show answer
Answer: A. ช้า ไม่ใช่ค้าง มีอะไรสะสมอยู่ในลูป และยังไม่ผ่านข้อ loop ms ไม่โตขึ้นเรื่อย ๆ
ค้างจริงคือเลขรอบกับ loop ms หยุดทั้งคู่ แต่ถ้าเลขรอบยังเดินขณะ loop ms โตขึ้นเรื่อย ๆ แปลว่าช้าลงเพราะมีอะไรสะสม ซึ่งเกณฑ์ MVP ห้ามไว้ และถ้าต้องรีสตาร์ต ต้องเริ่มจับเวลาใหม่ตั้งแต่ศูนย์ ห้ามนับต่อ
-
The team's last few widgets never appear, there is no error, and another script ran just before. What is the most likely cause? (Objective 3)
- เกินเพดาน 64 widgets เพราะไม่ได้เรียก ui.screen() ต้นสคริปต์ ของเก่าจึงยังกินช่องอยู่
- สร้าง Panel ก่อน Label
- sleep_ms(200) นานเกินไป CM55 จึงไม่วาด
- Emulator รองรับแค่สี่การ์ด
Show answer
Answer: A. เกินเพดาน 64 widgets เพราะไม่ได้เรียก ui.screen() ต้นสคริปต์ ของเก่าจึงยังกินช่องอยู่
ตัวที่เกินเพดาน 64 ไม่ขึ้นและไม่เตือนอะไร ui.screen() ล้าง widget เดิมทั้งหมด ถ้าไม่เรียก ของจากสคริปต์ก่อนหน้าจะกินงบตั้งแต่ยังไม่เริ่ม แก้โดยนับใหม่และเรียก ui.screen() ต้นสคริปต์ ส่วนการสร้าง Panel ก่อน Label คือลำดับที่ถูก
-
The compass needle jumps back every time the board turns past north. Which fix addresses the cause? (Objective 3)
- เขียน heading = sensors.bmm350.heading() % 360.0 กันค่าที่หลุดเกิน 360
- เปลี่ยน ui.Compass เป็น ui.Arc
- ลด cadence เหลือ 50 ms ให้เข็มตามทัน
- เรียก cal_reset() ทุกรอบลูป
Show answer
Answer: A. เขียน heading = sensors.bmm350.heading() % 360.0 กันค่าที่หลุดเกิน 360
ถ้า Compass ได้ค่าอย่าง 361 เข็มจะกระตุกกลับ การ % 360.0 ทำให้องศาอยู่ในช่วง 0 ถึงไม่ถึง 360 เสมอ อาการนี้ไม่มี error ต้องเห็นด้วยตาเท่านั้น
-
Which statements match the decisions in the s08_dashboard.py solution? Choose all that apply. (Objective 4)
- try ครอบการอ่านทีละเซนเซอร์ เข็มทิศไม่ตอบ อีกสามการ์ดยังทำงานต่อ
- อ่านไม่ได้ติดกันเกิน 3 วินาที ไฟค่าค้างจะติด โดยตัวเลขบนจอยังเป็นค่าล่าสุดที่อ่านได้
- ตัวเลขบนการ์ดเขียนใหม่วินาทีละครั้ง ส่วนกราฟ แถบ เข็ม และไฟขยับทุก 200 ms
- กดหยุดภาพแล้วลูปหยุด เลขรอบจึงนิ่งเพื่อบอกว่าหยุดแล้ว
- ไฟค่าค้างถูกเขียนทุกรอบลูปเพื่อให้แน่ใจว่าจอได้รับ
Show answer
Answer: A. try ครอบการอ่านทีละเซนเซอร์ เข็มทิศไม่ตอบ อีกสามการ์ดยังทำงานต่อ · B. อ่านไม่ได้ติดกันเกิน 3 วินาที ไฟค่าค้างจะติด โดยตัวเลขบนจอยังเป็นค่าล่าสุดที่อ่านได้ · C. ตัวเลขบนการ์ดเขียนใหม่วินาทีละครั้ง ส่วนกราฟ แถบ เข็ม และไฟขยับทุก 200 ms
การเลือกขอบเขตของ try คือการตัดสินใจว่าอะไรพังได้โดยระบบยังใช้งานได้ except คงค่าเดิมเพราะศูนย์หน้าตาเหมือนค่าจริง หยุดภาพแค่ตั้ง running เป็น False เลขรอบยังเดินเพื่อบอกว่าเครื่องไม่ได้ค้าง และไฟค่าค้างเขียนเฉพาะตอนเปลี่ยน เพราะคิวคำสั่งของจอมีก้นถัง
Cite this lesson
If you teach from this lesson or reuse it in slides or documents, credit it with the text below. If you changed it, add (adapted) after the title.
"Hands-on: the mini-HMI dashboard and the 10-minute soak test" from TESA Open Knowledge by the Thai Embedded Systems Association (TESA), https://github.com/tesaiot/tesa-qualification-program, licensed under CC BY-NC 4.0
Thai attribution: "ลงมือทำ: Mini-HMI Dashboard และการทดสอบ 10 นาที" จาก TESA Open Knowledge โดยสมาคมสมองกลฝังตัวไทย (Thai Embedded Systems Association: TESA) https://github.com/tesaiot/tesa-qualification-program สัญญาอนุญาต CC BY-NC 4.0
Lesson link: https://tesaiot.github.io/tesa-qualification-program/en/courses/aiot-micropython/m03-sensor-hmi/l09-dashboard-lab/
This lesson adapts the source below; keep its credit too.
https://github.com/Advance-Innovation-Centre-AIC/embedded-systems-for-aiot-developer/blob/a80bbe88a34bcb9bb8d991f42f9252b77cdab079/session-08.html (slides 32–50)
TESA Open Knowledge · © 2026 สมาคมสมองกลฝังตัวไทย (TESA) · CC BY-NC 4.0
Content is licensed CC BY-NC 4.0. Reuse it non-commercially and credit the Thai Embedded Systems Association (TESA) every time. · How to cite TESA