First program: draw on the screen and light an LED
Objectives
Section titled “Objectives”- Place a text label on the screen with
ui.Labeland print to the Console drawer withlcd.print, and have it run without errors - Blink an LED with
gpio.led(n).on()/off()andtime.sleep_ms()for a given number of times - Predict a result before running it, and explain why the program should end with
led.off()
Before you start
Section titled “Before you start”- From the previous lesson, which command makes a label appear on screen as soon as it is created?
- In the emulator, which button opens the simulated hardware panel that has the LEDs?
See it work first
Section titled “See it work first”Before reading the code, predict first. Open examples/02_blink.py and read only the top three lines that set ROUNDS, ON_MS and OFF_MS,
then write on paper “how many times will the light blink, and how long does each blink last?”
Then run it in the BENTO Emulator (press HW to open the simulated hardware panel first, then press ▶ Run), or on a real board with Program to Device, and compare it with what you predicted.
Concepts
Section titled “Concepts”1. One line of text can go to three places
Section titled “1. One line of text can go to three places”| Command | Where the text goes | Who sees it |
|---|---|---|
ui.Label("...") |
On the screen, at the given x, y position | Someone looking at the screen |
lcd.print("...") |
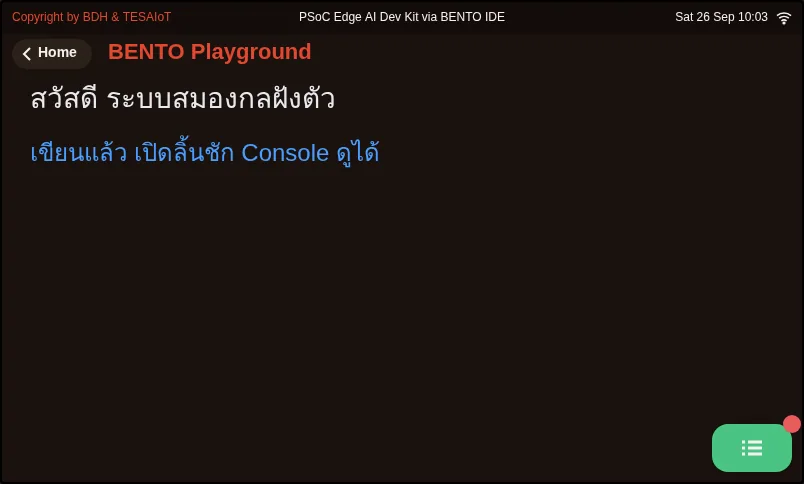
The Console drawer on the screen (opened with the green button in the bottom-right corner) | Someone who opens the drawer |
print("...") |
The console on the computer side | Someone sitting at the computer |
These are three different places. Many beginners run their program and say “I don’t see anything”, when the text is actually waiting in a different place. Run examples/01_hello_screen.py and find the text in all three places.
2. One blink is four beats
Section titled “2. One blink is four beats”Turn on, wait, turn off, wait. The waiting time is what sets the rhythm. A microcontroller runs very fast, so without time.sleep_ms()
the light would turn on and off too quickly for the eye to catch.
led.on() and led.off() set the value directly: read one line and you know exactly what the light will do. That is why we choose these two commands first.
3. A good program says which state it ends in
Section titled “3. A good program says which state it ends in”If a program ends while the light is on, the light stays on forever with nobody intending it. In real work, such as a warning light in a factory, this can mislead people.
Every example file in this course therefore starts with led.off() (start from a known state) and ends with led.off() (end at a known state).
Worked example
Section titled “Worked example”examples/02_blink.py is a shortened version of
examples/s03/02_led_blink.py
from the AIoT in Action course.
- Move 1: pick a light Ask for the list of LEDs from
gpio.board_info()and pick the one whose name starts withRGB_; use the first one if there is none - Move 2: start from a known state
led.off() - Move 3: place a label and a number A status label, plus
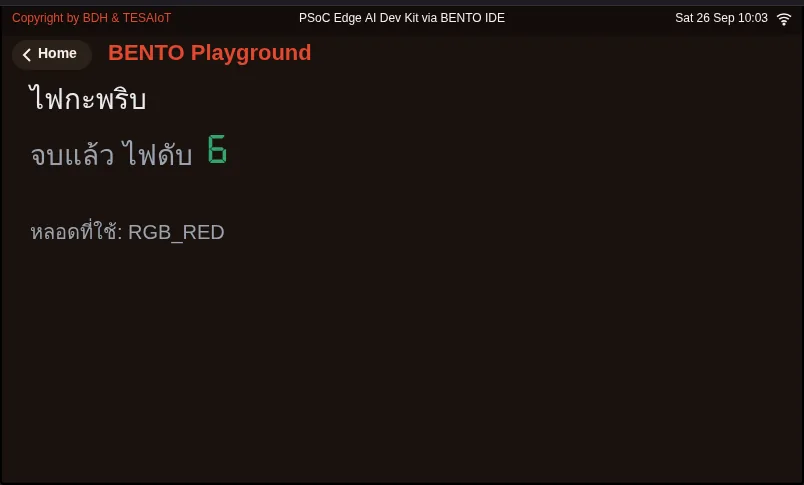
ui.Seg7showing a number like a digital clock - Move 4: loop the blink In a
forloop: turn on, update the label, wait, turn off, count the round, wait - Move 5: end at a known state
led.off()again
The file examples/01_hello_screen.py is a shortened version of
examples/s01/01_first_line.py
and uses the same Move 3.
Screens from the BENTO Emulator for this lesson’s examples (click a file name to open the code)
Practice
Section titled “Practice”Open practice/blink_count.py. It has 2 blanks to fill in (lines starting with # fill in:)
- Blank 1: turn the light on
- Blank 2: add one to the counter, then write the new number to the screen
If you would like to practise without typing, first try arranging the code lines in quiz question 3 into the right order (a Parsons problem), then come back and fill in the real file.
Solution
Section titled “Solution”Try it yourself for at least 15 minutes first, then open solution/blink_count.py and compare.
The comments in the solution explain “why” you count while the light is off, and why you need str() before passing a value to Seg7.
Check your understanding
Section titled “Check your understanding”Answer the questions in quiz.yaml. A score of 80% or more passes.
Modify Set ON_MS = 50 and OFF_MS = 950 in examples/02_blink.py. Predict what the light will look like first, then run it for real.
Make Write a new program that blinks a short–long code, for example three short blinks, three long blinks, three short blinks, then take a screenshot (or a short clip if you are using a real board) and keep it as evidence in your portfolio.
Going further
Section titled “Going further”A blinking light is the “Hello, World” of the embedded world. If you would like to see how a single LED can be dimmed,
look at the example examples/s03/03_led_brightness.py
in the AIoT in Action course.
Reflect
Section titled “Reflect”Did your prediction differ from what actually happened when you ran it? If it did, why? Does predicting before running change the way you read code?
Review questions
Answer on your own first, then open the answer.
-
Where does lcd.print("hello") put its text? (Objective 1)
- คอนโซลฝั่งคอมพิวเตอร์
- ลิ้นชัก Console บนจอบอร์ด
- ป้ายตรงตำแหน่ง x, y บนจอ
- ไม่ปรากฏที่ใดเลย
Show answer
Answer: B. ลิ้นชัก Console บนจอบอร์ด
lcd.print เขียนลงลิ้นชัก Console ต้องเปิดลิ้นชักด้วยปุ่มสีเขียวมุมขวาล่างถึงจะเห็น ส่วน print() ไปที่คอมพิวเตอร์ และ ui.Label ไปที่จอตรง ๆ
-
In ui.Label("hello", x=24, y=8, color=0xE8EAED, value=28), what does value=28 set? (Objective 1)
- ตำแหน่งแนวตั้ง
- สีของตัวอักษร
- ขนาดตัวอักษร
- จำนวนครั้งที่แสดง
Show answer
Answer: C. ขนาดตัวอักษร
สำหรับป้าย value คือขนาดตัวอักษร ตำแหน่งคือ x กับ y และสีคือ color
-
Order the lines inside the blink loop (one blink). (Objective 2)
- led.off()
- time.sleep_ms(ON_MS)
- led.on()
- time.sleep_ms(OFF_MS)
Show answer
Correct order: C. led.on() → B. time.sleep_ms(ON_MS) → A. led.off() → D. time.sleep_ms(OFF_MS)
สั่งติด รอ สั่งดับ รอ ถ้าไม่มีช่วงรอ ไฟจะติดดับเร็วเกินกว่าตาจะเห็น
-
With ROUNDS = 6, ON_MS = 250 and OFF_MS = 250, roughly how long does the blinking take (ignoring drawing time)? (Objective 3)
- 0.5 วินาที
- 1.5 วินาที
- 3 วินาที
- 6 วินาที
Show answer
Answer: C. 3 วินาที
หนึ่งรอบคือ 250 + 250 = 500 ms หกรอบจึงราว 3000 ms เวลาจริงจะนานกว่านี้เล็กน้อยเพราะการวาดจอก็ใช้เวลา
-
Why does the example call led.off() again after the loop? (Objective 3)
- เพราะ MicroPython บังคับให้ทุกโปรแกรมจบด้วย off()
- เพื่อให้แน่ใจว่าโปรแกรมจบที่สถานะที่รู้แน่ ไม่ปล่อยไฟค้างติดโดยไม่ตั้งใจ
- เพื่อให้ไฟกะพริบเพิ่มอีกหนึ่งครั้ง
- เพื่อประหยัดหน่วยความจำ
Show answer
Answer: B. เพื่อให้แน่ใจว่าโปรแกรมจบที่สถานะที่รู้แน่ ไม่ปล่อยไฟค้างติดโดยไม่ตั้งใจ
โปรแกรมที่จบแล้วควรบอกได้แน่ว่าไฟอยู่สถานะไหน ในงานจริงไฟที่ค้างติดผิดจังหวะทำให้คนเข้าใจผิดได้
Cite this lesson
If you teach from this lesson or reuse it in slides or documents, credit it with the text below. If you changed it, add (adapted) after the title.
"First program: draw on the screen and light an LED" from TESA Open Knowledge by the Thai Embedded Systems Association (TESA), https://github.com/tesaiot/tesa-qualification-program, licensed under CC BY-NC 4.0
Thai attribution: "โปรแกรมแรก: เขียนบนจอและเปิดไฟ" จาก TESA Open Knowledge โดยสมาคมสมองกลฝังตัวไทย (Thai Embedded Systems Association: TESA) https://github.com/tesaiot/tesa-qualification-program สัญญาอนุญาต CC BY-NC 4.0
Lesson link: https://tesaiot.github.io/tesa-qualification-program/en/courses/explorer/m01-meet-embedded/l03-first-program/
This lesson adapts the source below; keep its credit too.
https://github.com/Advance-Innovation-Centre-AIC/embedded-systems-for-aiot-developer/blob/a80bbe88a34bcb9bb8d991f42f9252b77cdab079/examples/s03/02_led_blink.py · ตัวอย่างโค้ดทุกไฟล์ในหลักสูตรนี้ย่อและดัดแปลงจากตัวอย่างของ AIoT in Action (MIT) ใช้ API ของ BENTO MicroPython ตามที่ตัวอย่างต้นฉบับใช้ ไม่มีการเพิ่มคำสั่งใหม่
TESA Open Knowledge · © 2026 สมาคมสมองกลฝังตัวไทย (TESA) · CC BY-NC 4.0
Content is licensed CC BY-NC 4.0. Reuse it non-commercially and credit the Thai Embedded Systems Association (TESA) every time. · How to cite TESA