Inside the box: two cores, AIoT and your team's screen
Module 1 — Existing UI-based Application · Slides: slides.md · Module overview · Course page
Run six files that open the remaining modules in the box to see what the board can do, understand why the board has two cores and where AIoT differs from IoT, then complete the practice file until your team name appears on screen.
Objectives
Section titled “Objectives”By the end of this lesson you will be able to:
- Run files 10 to 15, say which module each file opens (gpio machine sensors dsp mic ui), and answer the question “what could this do in your work?” in your learning log for at least three files
- Explain that our Python code lives on the CM33 core and has to pass messages across IPC for the CM55 to draw the screen, and say why sensors.init() is refused on the Eva Kit while sensors.snapshot() works on both boards
- Explain the difference between IoT and AIoT with the example of a machine that vibrates abnormally: where the decision is made and what is sent up to the cloud
- Fill the seven blanks in s01_hello_lcd.py one at a time until the Console drawer shows an h2 title, the team name, the members’ names one by one and a closing green line, without any lcd.print() call going over 127 bytes
Before you start
Section titled “Before you start”Have ready your learning log with the menu table from lesson 1.1, and 09_your_level_rule.py from lesson 1.2 (it must pass all six rows for you to pass this set of lessons).
First review three things from lesson 1.2: ui.poll() after creating a widget · the 127-byte ceiling of lcd.print() · the five span classes.
Then touch the BENTO Playground card on the board’s screen and leave it open.
- Equipment: an Eva Kit or TESAIoT Dev Kit board with the BENTO MicroPython firmware installed, or the BENTO Emulator in BENTO IDE
- Before this: Lesson 1.2 — First lines on screen: the lcd and ui modules
See it work first
Section titled “See it work first”Run 12_every_sense_at_once.py and play with the board: tilt it and watch the az number, touch the touch pads and watch the middle card, turn the knob and watch the ring on the right.
The bottom line is a round counter; if it keeps going up, the values you see are really live. All of this comes from a single command, sensors.snapshot(),
which returns one dict holding bmi270, capsense and pot, read at the same moment.
Concepts
Section titled “Concepts”The nine files in lesson 1.2 use only lcd time ui, three of the board’s eleven modules. The six files in this lesson are not for typing along;
they are for running and watching, no more than five minutes each. The goal is to know what is in this box, not to memorise every function. For numbers that differ between the two boards,
always ask the board in code, for example gpio.num_leds() (Eva Kit 3 LEDs · Dev Kit 5 LEDs) and the button’s name from gpio.button(0).name().
Code from the internet that starts with machine.PWM or machine.ADC will get an AttributeError straight away, because this port has neither.
Inside a single chip there are two cores that work in different ways. Our Python code always lives on the CM33 side, while the CM55 draws the screen. To get anything onto the screen,
we have to leave a message in the IPC mailbox for the CM55, and ui.poll() is the moment we open the box so the other side can collect it.
The two boards differ when it comes to sensors: on the Eva Kit the CM55 owns the whole sensor bus, so sensors.init() is refused
to stop Python from fighting over the bus until the board hangs. On the Dev Kit the CM33 can read the IMU and compass itself, so sensors.init() works.
sensors.snapshot() hides this difference and returns a dict of the same shape on both boards.
IoT is a device with sensors and a network connection that sends data up to a central system. AIoT moves the decision down into the device itself. A machine that vibrates abnormally is a clear example: the IoT way sends the vibration value every second for the cloud to judge, which wastes network, is slow, and goes blind when the network drops. The AIoT way has the board judge on the spot within a fraction of a second, and send to the cloud only when something is abnormal. Files 08 and 09 in lesson 1.2 already have this shape: measure a value, classify its level, then report.
The practice file arranges the work into five moves from easy to hard, and each move confirms the one before it: clearing the screen and the title prove the path to the screen works ·
a fixed message separates whether a problem is in lcd or in the logic · the loop over the names · the closing status says it finished successfully ·
the team sign made with ui is what stays behind for passers-by to read after the program ends. The same data can go to two places: the drawer and the screen.
Worked example
Section titled “Worked example”Open one file at a time, run it and watch for no more than five minutes, then ask a single question: “what could this do in your work?” The answers are the raw material for the final project in lessons 5.1–5.3.
If time is short, the two files you must play with are 12 (how many ways the board senses the world) and 15 (how many ways one number can tell a story).
Things to notice: 10 the left-right table of what machine has and does not have · 11 brightness() can hold a level only on the RGB LED,
the other LEDs use hold(pct, ms) · 12 at the end of the file it tries calling sensors.init() and prints the answer of the board in front of you ·
13 grey raw, green EMA and orange Median lines on one chart (Chart accepts integers only) · 14 the microphone’s “คิวค้าง” (queue backlog) number ·
15 the ui.list() line tells you how many widgets the screen has, and seg.value(50) gives 50, not 50.0
| File | What this file teaches |
|---|---|
| examples/10_board_knows_itself.py | Ask the board what it has, instead of looking it up in the manual |
| examples/11_lights_and_a_button.py | Real lights and a real button, controlled from one line of Python |
| examples/12_every_sense_at_once.py | One command, every sensor at once |
| examples/13_raw_and_filtered.py | A raw line that shakes and the same line held steady, on one chart |
| examples/14_the_board_hears_you.py | Talk to the board and watch it move along |
| examples/15_one_number_many_faces.py | A single number, and ten ways the screen can tell it |
The slides for this lesson also refer to files that live in other lessons:
- m01-ui-application/l02-first-lines-on-screen/examples/05_clear_and_refresh.py — updating in the same place, as opposed to printing line after line downwards
- m01-ui-application/l02-first-lines-on-screen/examples/08_status_screen.py — one status screen, with three modules sharing the work
- m01-ui-application/l02-first-lines-on-screen/examples/09_your_level_rule.py — this file runs, but still gets every answer wrong; your job is to make it right
- shared/web/my_first_reader.html — reads values from the board
Screens from the BENTO Emulator for this lesson’s examples (click a file name to open the code)
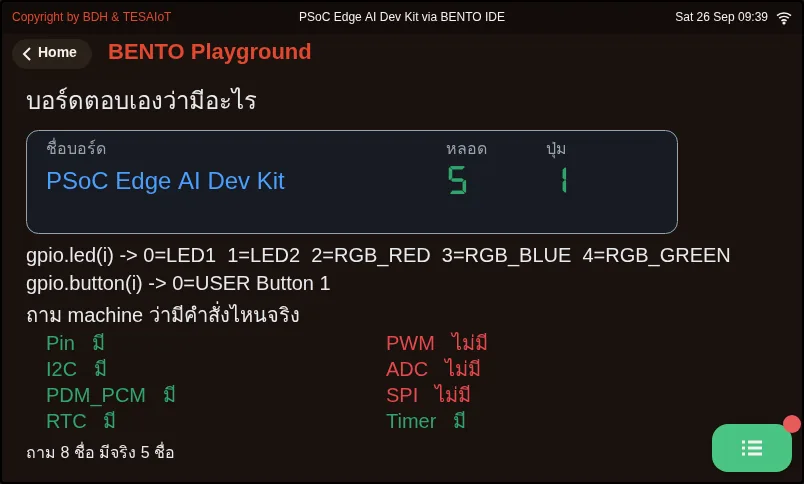
10_board_knows_itself.py Ask the board what it has, instead of looking it up in the manual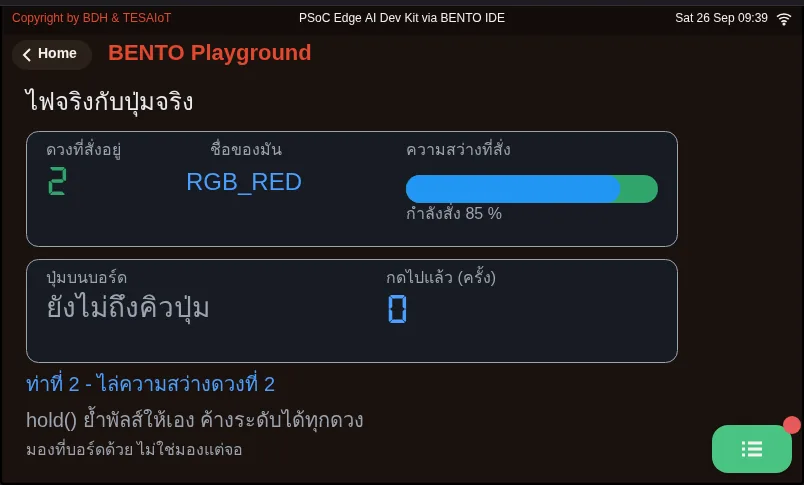
11_lights_and_a_button.py Real lights and a real button, controlled from one line of Python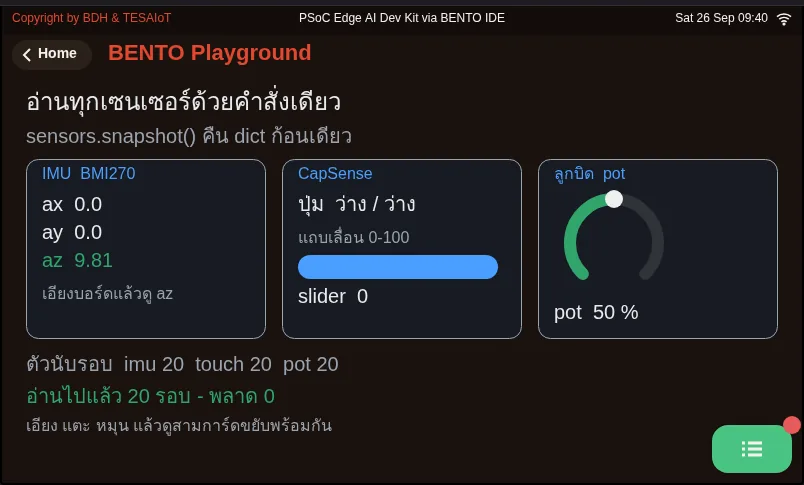
12_every_sense_at_once.py One command, every sensor at once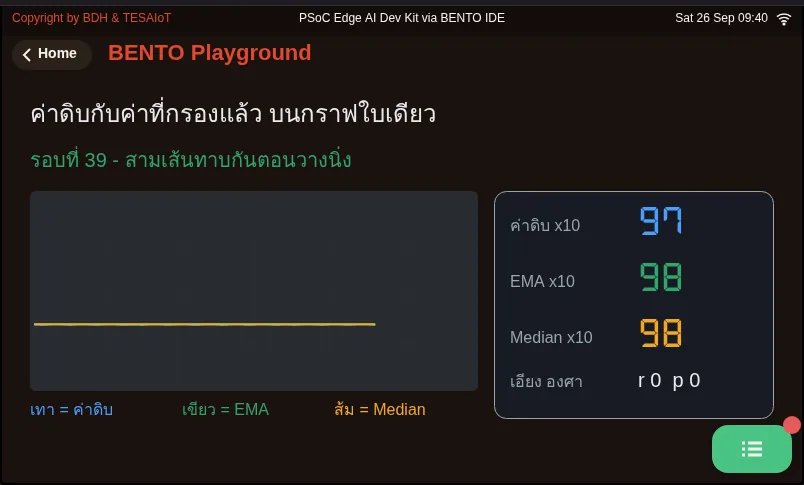
13_raw_and_filtered.py A raw line that shakes and the same line held steady, on one chart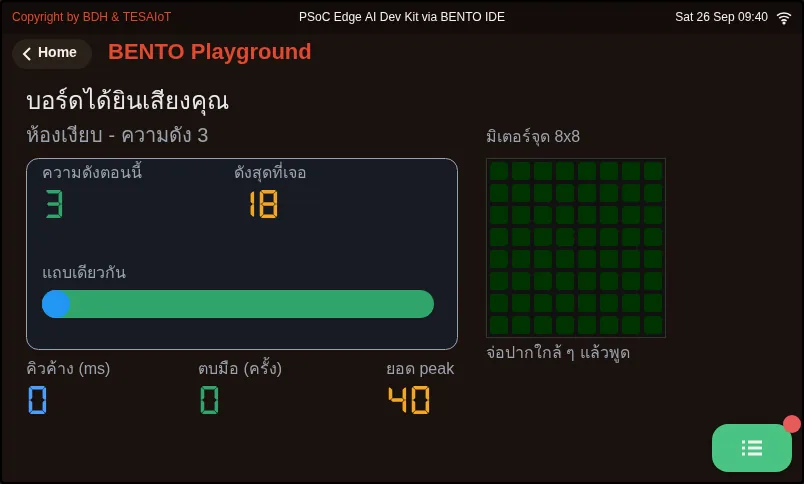
14_the_board_hears_you.py Talk to the board and watch it move along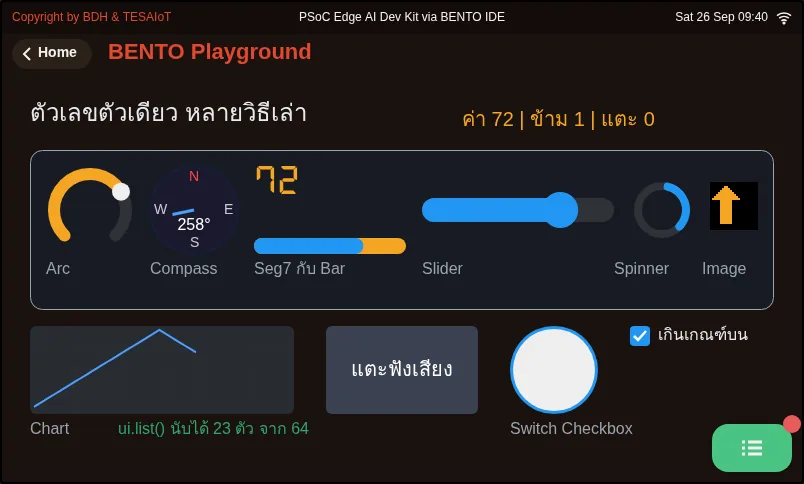
15_one_number_many_faces.py A single number, and ten ways the screen can tell itPractice
Section titled “Practice”Open practice/s01_hello_lcd.py and work in three steps: one, edit the three team-data lines at the top (TEAM_NAME MEMBERS MOTTO).
Two, fill the seven blanks following the # เติม: (fill in) hints one at a time, sending to the board each time; do not fill them all and run once.
Three, when everything is filled, try adding lines of your own. Moves 1–4 write to the Console drawer, while move 5 is already written for you:
it places the team sign, a table, two lights and a byte meter on the Playground page. Read it through before you run it.
You are done when the drawer shows the title, the greeting, the members’ names appearing one by one about 800 ms apart, and two green lines,
and the screen shows the table of names, with the “กำลังเขียน” (writing) light dimmed and the “เขียนครบแล้ว” (all written) light on.
| Practice file | Topic |
|---|---|
| practice/s01_hello_lcd.py | The team’s first message on the board’s screen (fill-in version) |
Solution
Section titled “Solution”Open the solution after trying on your own at least once, and read how to use the solutions first.
| Solution | Goes with |
|---|---|
| solution/s01_hello_lcd.py | practice/s01_hello_lcd.py |
Check your understanding
Section titled “Check your understanding”The same questions are in quiz.yaml for automatic marking.
-
You want every LED to run in a chasing pattern, with one set of code on both the Eva Kit and the Dev Kit. How should you write the loop? (choose one · objective 1)
- A) Loop over range(gpio.num_leds()) and let the board say how many LEDs it has
- B) Loop over range(3), because the Eva Kit has three
- C) Loop over range(5), because the Dev Kit has the most
- D) Look in the board manual and write the number in a separate file for each board
Solution
A — The number of LEDs differs between the two boards (Eva 3 · Dev Kit 5). The slides stress always asking the board in code rather than remembering numbers, so one set of code runs through every LED on any board.
-
On the Eva Kit, calling sensors.init() raises OSError. Which explanation is correct? (choose one · objective 2)
- A) On the Eva Kit the CM55 core owns the sensor bus; this refusal stops Python from fighting over the bus. Use sensors.snapshot() instead
- B) The sensors on the board are broken and must be sent for repair
- C) You forgot to import sensors before calling it
- D) The Eva Kit has no IMU sensor
Solution
A — Python code lives on the CM33 side. On the Eva Kit every sensor sits under the CM55, so values must be requested through IPC. The Dev Kit does allow init() to be called, but snapshot() returns a dict of the same shape on both boards.
-
A machine vibrates abnormally. How does an AIoT system differ from an IoT one? (choose one · objective 3)
- A) The board decides on the spot within a fraction of a second, sends to the cloud only when something is abnormal, and keeps working when the network drops
- B) The board sends the vibration value to the cloud every second and the cloud decides
- C) AIoT needs no sensors, because the cloud can guess by itself
- D) AIoT is IoT with faster WiFi
Solution
A — The heart of AIoT is moving the decision down close to where things happen, and sending to the cloud only what is meaningful. The IoT way of sending every second wastes network, is slow, and goes blind when the network drops.
-
In move 3 of s01_hello_lcd.py, if you move time.sleep_ms(800) out of the loop (reduce the line’s indentation), what do you see on the screen? (choose one · objective 4)
- A) Everyone’s name appears at once, followed by a single delay
- B) The names appear one by one, as before
- C) A SyntaxError
- D) Only the last person’s name appears
Solution
A — In Python, indentation is meaning. A delay inside the loop makes the names appear one by one; moved out of the loop, it runs once after every name has been printed.
-
Why is the closing green line in the practice file split into two lcd.print() calls? (choose one · objective 4)
- A) Combined, a long team name might go over 127 bytes, which is cut off silently, and the \n disappears too
- B) lcd.print() can use a span tag only once per program
- C) So that the two lines have different colours
- D) Because lcd.print() cannot join strings with +
Solution
A — Thai takes 3 bytes per character, so a line that looks short uses up the quota quickly. Splitting from the start keeps the end of the message from vanishing without an error, and move 5 of the file measures the length of TAIL so you can see it on the byte meter.
The MVP checkpoint for lessons 1.1–1.3. The team demonstrates the five menus, explains which menu uses which sensor, and runs lcd.print() so the team’s message appears on the screen.
- Play all five menus: Home, Sensor Dashboard, Smart Watch, Wi-Fi Setting, BENTO Playground (Controls exists only on the Eva Kit, so it is not part of the criteria)
- The menu survey table in the learning log has its first five rows filled in (the Controls row is filled only by teams with an Eva Kit)
- You can point out which menu uses which sensor and answer out loud
- The board’s screen shows the
<h2>title of this set of lessons - The board’s screen shows the team name and every member’s name, one after another
- The board’s screen shows the closing green line
-
09_your_level_rule.pyfrom lesson 1.2 passes all six rows - Take a photo of the board’s screen and attach it to your learning log
Going further
Section titled “Going further”Lessons 1.4–1.6 take the board onto the internet with our own code, then send the numbers from sensors.snapshot() out to the public broker
broker.hivemq.com, for the my_first_reader.html web page on a laptop to read back. Write down in your learning log the team name (team01 to team19) the educator hands out.
If you want to keep going, the slides offer four options to choose one from: the team’s welcome screen · a countdown based on 05_clear_and_refresh.py · exploring the 127-byte trap · a menu map.
Next lesson: Lesson 1.4 — Leaving the desk: the first WiFi connection
Reflect
Section titled “Reflect”- Which menu you played in this set of lessons would you most like to build yourself, and what else do you need to know?
- Data from which sensor would be most useful for the work your team actually does?
- In your work, what decision should move from the cloud down into the device?
Review questions
Answer on your own first, then open the answer.
-
You want every LED to run in sequence with one piece of code on both the Eva Kit and the Dev Kit. How should you write the loop? (Objective 1)
- วนด้วย range(gpio.num_leds()) ให้บอร์ดบอกเองว่ามีกี่ดวง
- วนด้วย range(3) เพราะ Eva Kit มีสามดวง
- วนด้วย range(5) เพราะ Dev Kit มีมากที่สุด
- เปิดคู่มือบอร์ดแล้วเขียนตัวเลขแยกไฟล์ละบอร์ด
Show answer
Answer: A. วนด้วย range(gpio.num_leds()) ให้บอร์ดบอกเองว่ามีกี่ดวง
จำนวน LED ต่างกันระหว่างสองบอร์ด (Eva 3 · Dev Kit 5) สไลด์ย้ำให้ถามบอร์ดด้วยโค้ดเสมอ ไม่ต้องจำเลข โค้ดชุดเดียวจึงวิ่งครบทุกดวงบนบอร์ดใบไหนก็ได้
-
On the Eva Kit, sensors.init() raises OSError. Which explanation is correct? (Objective 2)
- บน Eva Kit คอร์ CM55 เป็นเจ้าของบัสเซนเซอร์ การปฏิเสธนี้กันไม่ให้ Python ไปแย่งบัส ให้ใช้ sensors.snapshot() แทน
- เซนเซอร์บนบอร์ดเสีย ต้องส่งซ่อม
- ลืม import sensors ก่อนเรียก
- Eva Kit ไม่มีเซนเซอร์ IMU
Show answer
Answer: A. บน Eva Kit คอร์ CM55 เป็นเจ้าของบัสเซนเซอร์ การปฏิเสธนี้กันไม่ให้ Python ไปแย่งบัส ให้ใช้ sensors.snapshot() แทน
โค้ด Python อยู่ฝั่ง CM33 บน Eva Kit เซนเซอร์ทั้งหมดอยู่ใต้ CM55 จึงต้องขอค่าผ่าน IPC ส่วน Dev Kit ยอมให้เรียก init() ได้ แต่ snapshot() คืน dict รูปเดียวกันทั้งสองบอร์ด
-
A machine starts vibrating abnormally. How does an AIoT system differ from an IoT one? (Objective 3)
- บอร์ดตัดสินเองที่หน้างานภายในเสี้ยววินาที ส่งขึ้นคลาวด์เฉพาะตอนผิดปกติ และยังทำงานได้เมื่อเน็ตหลุด
- บอร์ดส่งค่าความสั่นทุกวินาทีขึ้นคลาวด์ให้คลาวด์ตัดสิน
- AIoT ไม่ต้องใช้เซนเซอร์ เพราะคลาวด์เดาได้เอง
- AIoT คือ IoT ที่ใช้ WiFi เร็วกว่า
Show answer
Answer: A. บอร์ดตัดสินเองที่หน้างานภายในเสี้ยววินาที ส่งขึ้นคลาวด์เฉพาะตอนผิดปกติ และยังทำงานได้เมื่อเน็ตหลุด
หัวใจของ AIoT คือย้ายการตัดสินใจลงมาใกล้จุดเกิดเหตุ แล้วส่งขึ้นคลาวด์เฉพาะสิ่งที่มีความหมาย แบบ IoT ที่ส่งทุกวินาทีเปลืองเน็ต ช้า และตาบอดเมื่อเน็ตหลุด
-
In move 3 of s01_hello_lcd.py, if you move time.sleep_ms(800) outside the loop (dedent it), what do you see? (Objective 4)
- ชื่อทุกคนขึ้นพร้อมกัน แล้วค่อยหน่วงครั้งเดียว
- ชื่อขึ้นทีละคนเหมือนเดิม
- ได้ SyntaxError
- ขึ้นเฉพาะชื่อคนสุดท้าย
Show answer
Answer: A. ชื่อทุกคนขึ้นพร้อมกัน แล้วค่อยหน่วงครั้งเดียว
ใน Python การเยื้องบรรทัดคือความหมาย การหน่วงที่อยู่ในลูปทำให้ชื่อขึ้นทีละคน ย้ายออกไปนอกลูปมันจะทำงานครั้งเดียวหลังพิมพ์ครบทุกชื่อ
-
Why is the green closing line in the practice file split into two lcd.print() calls? (Objective 4)
- ถ้ารวมกันแล้วชื่อทีมยาว อาจเกิน 127 ไบต์ ซึ่งจะถูกตัดเงียบ ๆ และ \n หายไปด้วย
- lcd.print() ใส่แท็ก span ได้แค่หนึ่งครั้งต่อโปรแกรม
- เพื่อให้สองบรรทัดเป็นคนละสี
- เพราะ lcd.print() ต่อสตริงด้วย + ไม่ได้
Show answer
Answer: A. ถ้ารวมกันแล้วชื่อทีมยาว อาจเกิน 127 ไบต์ ซึ่งจะถูกตัดเงียบ ๆ และ \n หายไปด้วย
ไทยตัวละ 3 ไบต์ บรรทัดที่ดูสั้นจึงกินโควตาเร็ว การแยกตั้งแต่ต้นกันไม่ให้ท้ายข้อความหายโดยไม่มี error และท่าที่ 5 ของไฟล์ก็วัดความยาวของ TAIL ให้เห็นบนมาตรวัดไบต์
Cite this lesson
If you teach from this lesson or reuse it in slides or documents, credit it with the text below. If you changed it, add (adapted) after the title.
"Inside the box: two cores, AIoT and your team's screen" from TESA Open Knowledge by the Thai Embedded Systems Association (TESA), https://github.com/tesaiot/tesa-qualification-program, licensed under CC BY-NC 4.0
Thai attribution: "เปิดกล่อง: สองคอร์ งาน AIoT และป้ายของทีม" จาก TESA Open Knowledge โดยสมาคมสมองกลฝังตัวไทย (Thai Embedded Systems Association: TESA) https://github.com/tesaiot/tesa-qualification-program สัญญาอนุญาต CC BY-NC 4.0
This lesson adapts the source below; keep its credit too.
https://github.com/Advance-Innovation-Centre-AIC/embedded-systems-for-aiot-developer/blob/a80bbe88a34bcb9bb8d991f42f9252b77cdab079/session-01.html (slides 23–51)
TESA Open Knowledge · © 2026 สมาคมสมองกลฝังตัวไทย (TESA) · CC BY-NC 4.0
Content is licensed CC BY-NC 4.0. Reuse it non-commercially and credit the Thai Embedded Systems Association (TESA) every time. · How to cite TESA