Meet the board and the emulator
Objectives
Section titled “Objectives”- Open BENTO IDE and run the example file in the BENTO Emulator until the board name appears on the simulated screen
- State at least two differences between the Eva Kit and the TESAIoT Dev Kit
- Explain what the emulator can answer and what must be proven on a real board
Before you start
Section titled “Before you start”- From the previous lesson, which part of a digital rice cooker “decides”?
- Without a board in your hands, how far do you think you can get learning to program one?
All you need for this lesson is a computer that can open Chrome or Edge (this lesson is designed for a computer or tablet screen, not a phone).
See it work first
Section titled “See it work first”Do these steps first, then read the explanation.
- Open BENTO IDE at https://ide.tesaiot.dev/
- The IDE opens in the Blocks view (snapping blocks together instead of typing). Press the Python button at the top of the screen to switch to the code view
- Copy the whole file from examples/01_board_knows_itself.py and paste it into the code editor
- Press the BENTO Emulator button on the toolbar. The emulator panel slides out on the right; press ▶ Run in that panel
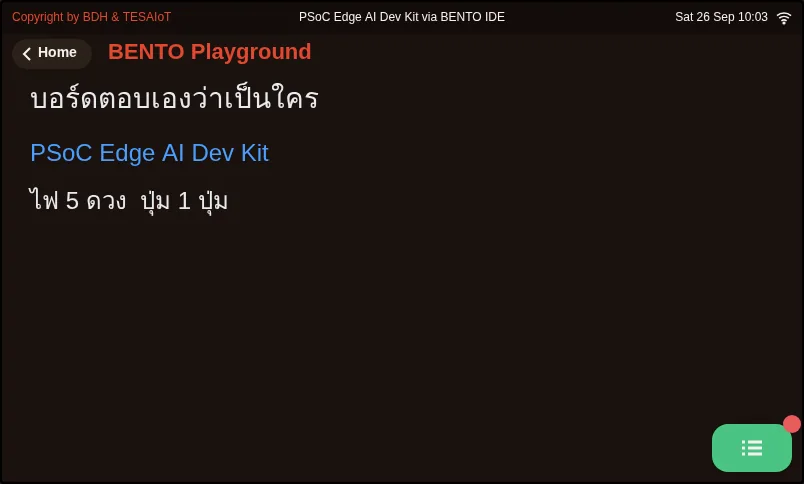
- Look at the simulated screen. You should see the board name in blue, and a line saying how many LEDs and how many buttons it has
If you can see it, congratulations: you have just run a program on a (simulated) microcontroller for the first time.
If you have a board in your hands, connect it to your computer with a USB cable, press Connect in the top-right corner of the IDE and choose the board’s port. Then on the board’s screen, tap the BENTO Playground card and leave it open, and press Program to Device. The result appears on the real board’s screen. The list of LEDs, one by one, is in the Console drawer, which you open with the green button in the bottom-right corner of the Playground page.
Concepts
Section titled “Concepts”1. Two boards that use the same code
Section titled “1. Two boards that use the same code”Courses in TESA Open Knowledge use two boards built around Infineon’s PSoC™ Edge E84 chip.
| Eva Kit | TESAIoT Dev Kit | |
|---|---|---|
| Technical name | KIT_PSE84_EVAL_EPC2 | SoM KIT_PSE84_AI on a QWA309 base board |
| LEDs that Python can control | 3 | 5 |
| Extra sensors | Temperature and humidity (SHT40), air pressure (DPS368) and radar | |
| Screen | 800 x 480 touchscreen | 800 x 480 touchscreen |
The data in this table comes from the AIoT in Action course, which uses both boards.
The example in this lesson does not remember how many LEDs the board has. It asks gpio.board_info(), which returns a bundle of data (a dict) with the board name, the number of LEDs and the list of LEDs.
That is why one piece of code runs on both boards, and in the emulator too.
The PSoC Edge E84 chip has more than one processor core. The BENTO firmware shares the work between the cores: for example, one core runs our MicroPython program and another looks after the display and the touchscreen. For now, just keep this in mind as the reason some commands have to wait for “the other side” to finish.
2. MicroPython
Section titled “2. MicroPython”The programs we write are in MicroPython, a version of Python made small enough to run on a microcontroller. There is no compiling: press run and you see the result straight away, which suits beginners. Professional work that has to squeeze out speed or power uses the C language, which has its own separate course.
These boards have BENTO’s own modules, which this course uses often: ui (drawing on the screen), lcd (the Console drawer), gpio (LEDs and buttons),
sensors (sensors), wifi and mqtt (networking).
3. What the emulator can answer, and what it cannot
Section titled “3. What the emulator can answer, and what it cannot”The BENTO Emulator runs our MicroPython program in the browser and draws a screen the same size as the board’s screen. The HW button in the emulator panel opens a simulated hardware panel with LEDs, buttons, a knob and a tilt pad, so we can try programs without a board.
The emulator answers the questions “does the program run to the end, are there any errors, and what does the screen look like” very well. But it is not a real board. Sensor values are simulated, the WiFi is simulated, and some timing issues and hardware limits can never show up in a browser. The principle we use throughout the course is use the emulator to learn concepts, use a real board to prove and measure.
Worked example
Section titled “Worked example”examples/01_board_knows_itself.py is a shortened version of the example
examples/s01/10_board_knows_itself.py
from the AIoT in Action course. Read through it in this order.
- Move 1: ask the board
info = gpio.board_info()asks once and keeps the answer in a variable - Move 2: clear the screen
ui.screen()wipes what was on the screen, then waits 200 milliseconds for the screen to be ready - Move 3: place a label
ui.Label(text, x=..., y=..., color=..., value=font_size), then tapui.poll()so the label appears at once - Move 4: write to the drawer
lcd.print(...)for details too long for the screen
Screens from the BENTO Emulator for this lesson’s examples (click a file name to open the code)
Practice
Section titled “Practice”At the end of the example file there is a “your turn” task: add a loop that prints the list of buttons from info["btn_names"], in the same way as the loop that prints the list of LEDs.
Before you run it, predict how many buttons the emulator will report, then run it and compare.
Check your understanding
Section titled “Check your understanding”Answer the questions in quiz.yaml. A score of 80% or more passes.
Going further
Section titled “Going further”- Press HW and see what the simulated hardware panel contains. In the next lesson we will control the LEDs on that panel.
- If you want to know how a real board answers differently from the emulator, open the original file
examples/s01/10_board_knows_itself.py, which goes on to ask the board which commands themachinemodule has.
Reflect
Section titled “Reflect”If you had to decide whether to buy a board, what information from this lesson would help you decide, and what would you still need to find out?
Review questions
Answer on your own first, then open the answer.
-
Put the steps for running a program in the BENTO Emulator in order. (Objective 1)
- กด ▶ Run ในแผงอีมูเลเตอร์
- เปิด https://ide.tesaiot.dev/ แล้วสลับเป็นมุมมอง Python
- วางโค้ดลงในช่องแก้โค้ด
- กดปุ่ม BENTO Emulator บนแถบเครื่องมือ
Show answer
Correct order: B. เปิด https://ide.tesaiot.dev/ แล้วสลับเป็นมุมมอง Python → C. วางโค้ดลงในช่องแก้โค้ด → D. กดปุ่ม BENTO Emulator บนแถบเครื่องมือ → A. กด ▶ Run ในแผงอีมูเลเตอร์
เปิด IDE วางโค้ด เปิดแผงอีมูเลเตอร์ แล้วจึงกดรัน ถ้ามีบอร์ดจริงใช้ Connect กับ Program to Device แทนสองขั้นสุดท้าย
-
After creating a ui.Label, which call makes it appear on screen right away? (Objective 1)
- print()
- ui.poll()
- lcd.clear()
- gpio.board_info()
Show answer
Answer: B. ui.poll()
ui.poll() ให้จอประมวลผลงานที่ค้างอยู่ ถ้าไม่เรียก ป้ายก็ขึ้นในที่สุดแต่ช้ากว่า จนดูเหมือนโค้ดพัง
-
Which are differences between the Eva Kit and the TESAIoT Dev Kit? (choose all that apply) (Objective 2)
- จำนวนหลอด LED ที่ Python สั่งได้ (3 ดวง กับ 5 ดวง)
- Dev Kit มีเซนเซอร์อุณหภูมิและความชื้น ความกดอากาศ และเรดาร์เพิ่ม
- Eva Kit ใช้ภาษา C ได้อย่างเดียว เขียน MicroPython ไม่ได้
- ขนาดจอต่างกันมาก โค้ดชุดเดียวใช้ร่วมกันไม่ได้
Show answer
Answer: A. จำนวนหลอด LED ที่ Python สั่งได้ (3 ดวง กับ 5 ดวง) · B. Dev Kit มีเซนเซอร์อุณหภูมิและความชื้น ความกดอากาศ และเรดาร์เพิ่ม
ทั้งสองบอร์ดรัน MicroPython ของ BENTO และมีจอ 800 x 480 เท่ากัน ตัวอย่างชุดเดียวกันจึงรันได้ทั้งสองบอร์ด
-
Which question can the BENTO Emulator answer most reliably? (Objective 3)
- สัญญาณ WiFi ในห้องเรียนแรงพอไหม
- โปรแกรมรันจบโดยไม่มีข้อผิดพลาด และหน้าจอออกมาตามที่ตั้งใจไหม
- ค่าเซนเซอร์บนบอร์ดของฉันแม่นยำแค่ไหน
- บอร์ดกินไฟเท่าไรระหว่างรัน
Show answer
Answer: B. โปรแกรมรันจบโดยไม่มีข้อผิดพลาด และหน้าจอออกมาตามที่ตั้งใจไหม
อีมูเลเตอร์เหมาะกับการเรียนแนวคิดและตรวจโปรแกรม ส่วนเรื่องสัญญาณ ความแม่นของเซนเซอร์ และพลังงาน ต้องวัดบนบอร์ดจริง
Cite this lesson
If you teach from this lesson or reuse it in slides or documents, credit it with the text below. If you changed it, add (adapted) after the title.
"Meet the board and the emulator" from TESA Open Knowledge by the Thai Embedded Systems Association (TESA), https://github.com/tesaiot/tesa-qualification-program, licensed under CC BY-NC 4.0
Thai attribution: "รู้จักบอร์ดและอีมูเลเตอร์" จาก TESA Open Knowledge โดยสมาคมสมองกลฝังตัวไทย (Thai Embedded Systems Association: TESA) https://github.com/tesaiot/tesa-qualification-program สัญญาอนุญาต CC BY-NC 4.0
Lesson link: https://tesaiot.github.io/tesa-qualification-program/en/courses/explorer/m01-meet-embedded/l02-board-and-emulator/
This lesson adapts the source below; keep its credit too.
https://github.com/Advance-Innovation-Centre-AIC/embedded-systems-for-aiot-developer/blob/a80bbe88a34bcb9bb8d991f42f9252b77cdab079/examples/s01/10_board_knows_itself.py · ตัวอย่างโค้ดทุกไฟล์ในหลักสูตรนี้ย่อและดัดแปลงจากตัวอย่างของ AIoT in Action (MIT) ใช้ API ของ BENTO MicroPython ตามที่ตัวอย่างต้นฉบับใช้ ไม่มีการเพิ่มคำสั่งใหม่
TESA Open Knowledge · © 2026 สมาคมสมองกลฝังตัวไทย (TESA) · CC BY-NC 4.0
Content is licensed CC BY-NC 4.0. Reuse it non-commercially and credit the Thai Embedded Systems Association (TESA) every time. · How to cite TESA