The gpio module: LEDs, a button and a board that describes itself
Module 2 — From Screen to Hardware · Slides: slides.md · Module overview · Course page
Open up all 18 names of the gpio module, drive the LEDs and read the real button from Python, then write code that asks the board itself how many LEDs it has, so one file runs on both the Eva Kit and the Dev Kit.
Objectives
Section titled “Objectives”By the end of this lesson you will be able to:
- Drive LEDs with gpio.led(n) using on(), off(), toggle() and value(n), looping over range(gpio.num_leds()) so one file turns off every LED on both the Eva Kit (3) and the Dev Kit (5)
- Tell which methods report something measured (value() on an LED or the button, is_pressed()) and which only echo what you commanded (duty()), and state how they disagree with the visible LED after toggle() or hold()
- Choose brightness(pct) or hold(pct, ms) correctly for LEDs with and without a hardware PWM route, and explain why dimming on this board goes through gpio rather than machine.PWM
- Refer to the user button by gpio.button(0).name() (“USER Button 1”) instead of the silkscreen label, and give the reason the name deliberately differs from the label
Before you start
Section titled “Before you start”The first half of lessons 2.1–2.3 stays entirely on the desk — LEDs, a button and time — no WiFi needed yet. Have your learning log ready to write down three things about your team’s board: how many LEDs it has, what colour each one is, and what the code calls the button. Your team’s phone hotspot (the same name and password from lessons 1.4–1.6) and the team name your educator handed out will be needed again when you publish to the broker in lesson 2.3.
- Equipment: an Eva Kit or TESAIoT Dev Kit board with the BENTO MicroPython firmware installed, or the BENTO Emulator in BENTO IDE
- Before this: Lesson 1.6 — Hands-on: a real value leaves the board, module 1 wrap-up
See it work first
Section titled “See it work first”On the Eva Kit, open the Controls card and touch a coloured circle on screen — the real LED on the board follows your finger.
Teams with a Dev Kit have no such card; run 11_lights_and_a_button.py from lesson 1.3 again instead and watch the LEDs.
Both paths show the same thing: a real thing changes state because of a command, but one that someone else already wrote for you.
In this lesson we open up the module behind it in full, so your team can write its own loop in lessons 2.2–2.3.
Concepts
Section titled “Concepts”An embedded program is a loop that reads something real, decides, and commands something real back. The first tool is the gpio module,
which needs no init, no pin numbers, no mode to set: gpio.led(n).on(), .off(), .toggle(), .value(1),
and gpio.button(0).is_pressed() all work right away. The number n runs from 0 to gpio.num_leds() - 1
(Eva Kit 3 LEDs, Dev Kit 5 LEDs); out of range raises ValueError, and there is only one button, index 0 — calling gpio.button(1) also raises ValueError on both boards.
The whole module has 18 names, no more: five functions (board_info, num_leds, num_buttons, led, button),
two types (gpio.LED, gpio.Button), eight LED methods and three button methods. What you must tell apart is which method reports
something measured and which only echoes what you commanded. led.value() reads the real pin level, but always returns 0 after hold(),
while led.duty() is the percentage you last commanded — it never measures the LED, and toggle() does not change this number.
On the button side, is_pressed() has already interpreted the reading for you (pressed = True), while value() is the raw electrical level, which reads 0 when pressed.
Dimming does not lower the pin’s voltage; it switches on and off faster than the eye can follow, and the eye sees the average.
brightness(pct), with pct from 1–99, picks a path depending on the LED’s wiring: an LED on a hardware PWM route (Eva LED 0–2, Dev Kit RGB LEDs 2–4)
holds its level without blocking; other LEDs get a pulse of about 12 ms and then end with the LED off. If you need every LED to hold, use hold(pct, ms),
which blocks for the full time (leave out ms and it defaults to 500) and also ends with the LED off; the button is not read while it blocks. If you just called brightness()
at a middle value on a PWM LED, you must call off() before hold() to release the pin. brightness(100) leaves the LED lit and held. This firmware has no
machine.PWM, machine.ADC, machine.SPI, and does not expose machine.Timer either; calling them raises AttributeError.
An answer you find online that starts with machine.PWM(...) is not for our board.
The habit of embedded work is ask the device, never guess from memory. gpio.board_info() returns a five-field dict
(name, leds, buttons, led_names, btn_names), and for i in range(3) fails silently on a Dev Kit that has five LEDs,
but for i in range(gpio.num_leds()) stays correct even after you move to a different board.
Watch out for two name traps with different causes. On the Eva Kit, LED 2 is named RGB_RED but lights up blue, because the name is inherited from a table shared across the firmware.
The button’s name, USER Button 1, was deliberately chosen to differ from the silkscreen label, because on the Dev Kit the word “SW2”
points to a power-cutoff switch on the base — never flip any switch on the base that a lesson has not told you to. The engineer’s way is to command on() one LED at a time and watch with your own eyes,
write the result down once, and name your team’s own constants.
Worked example
Section titled “Worked example”Open the files in this order and record the results in your learning log.
01_board_info.py— guess first how many LEDs your team’s board will report and what it calls the button, then run it and compare. Read the list of LEDs by index on screen, and the full dict in the computer’s console. Then uncomment thegpio.button(1)line and run it once so you see theValueErrorwith your own eyes.- Command
on()one LED at a time and watch the real board. Make a three-column table: index · name fromled_names· colour seen with your eyes (Dev Kit: LED1/LED2 are on the module, the RGB LEDs are indexes 2–4). 03_led_brightness.py— move 1 commandsbrightness(40)once; watch the LED yourself and see whether it holds or blinks briefly. Move 2 compareshold(10, …)withhold(90, …), and note how longhold()actually takes. Move 3 commandson()thentoggle(), and shows thatduty()still reports the old number even though the LED is off. Try changingLOW,HIGH,HOLD_MSand running it again.
| File | What this file teaches |
|---|---|
| examples/01_board_info.py | Ask the board first what there is to play with |
| examples/03_led_brightness.py | Hold a dimmed LED long enough for your eyes to compare two levels |
The slides for this lesson also refer to a file that lives in another lesson:
- m01-ui-application/l03-inside-the-box/examples/11_lights_and_a_button.py — real lights and a real button, controlled from one line of Python
Screens from the BENTO Emulator for this lesson’s examples (click a file name to open the code)
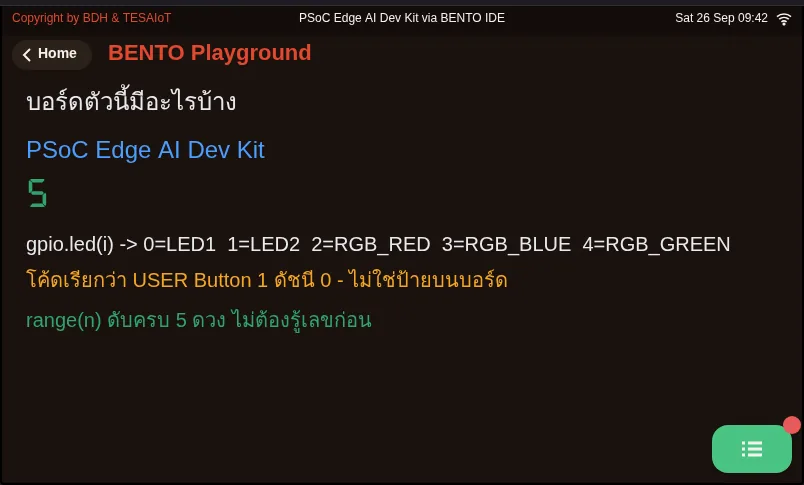
01_board_info.py Ask the board first what there is to play with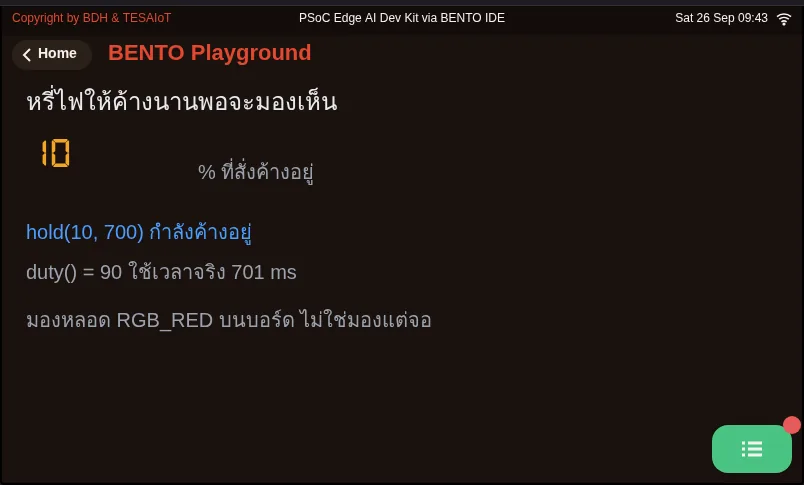
03_led_brightness.py Hold a dimmed LED long enough for your eyes to compare two levelsCheck your understanding
Section titled “Check your understanding”The same questions are in quiz.yaml for automatic marking.
-
A team writes
for i in range(3): gpio.led(i).off()on the Eva Kit, then runs the same file on the Dev Kit. What happens? (choose one · objective 1)- A) All five turn off, because the firmware adjusts the range for you
- B) Only LEDs 0–2 turn off; LEDs 3–4 keep their previous state, with no error visible
- C) It raises ValueError the moment i equals 3
- D) The board resets itself, because the LED count does not match the code
Solution
B — range(3) fails silently on a board with five LEDs; 0–2 are still in range so there is no ValueError, but LEDs 3–4 are never touched at all. Writing range(gpio.num_leds()) instead makes the same file run correctly on either board.
-
You command
led.hold(80, 700)and it runs to completion. Which of these are correct? Choose every correct one. (choose all that apply · objective 2)- A) The LED is off
- B)
led.value()reports 0 - C)
led.duty()still reports 80 - D)
led.value()reports 80, because it reads back the brightness - E)
led.duty()reports 0, because it measures the now-off LED
Solution
A, B, C — hold() always ends with the pin low, so value(), which reads the pin level, gives 0. duty() is the number you last commanded — it never measures the LED — so it still reports 80. The number on screen is therefore not proof that the LED is actually lit.
-
A team commands
brightness(40)on an LED with a hardware PWM route, then immediately callshold(80, 700). The LED does not change and does not turn off at the end. What should they do? (choose one · objective 3)- A) Change 700 to 0.7, because hold() takes time in seconds
- B) Call
off()beforehold(), to release the pin from the PWM route - C) Import machine.PWM first, then call hold()
- D) Use brightness(100) instead, because it ends with the LED off
Solution
B — After brightness() at a middle value on a PWM LED, the pin is still held by PWM, so hold(), which toggles the GPIO pin directly, has no visible effect. You must call off() first. brightness(100) leaves the LED lit and held, and this board has no machine.PWM at all.
-
A teammate with a Dev Kit asks which button to press. What should you tell them? (choose one · objective 4)
- A) Press the button printed SW2 on the base
- B) Press the button the code calls USER Button 1, following the name btn.name() prints on screen
- C) Flip the switches on the base one at a time until a number appears
- D) Use gpio.button(1), because the Dev Kit has more buttons
Solution
B — The name USER Button 1 was deliberately chosen to differ from the silkscreen label, because on the Dev Kit several switches printed “SW” are power-cutoff switches. Never flip a switch a lesson has not told you to, and gpio.button(1) raises ValueError on either board.
-
Which statements about dimming on this board are correct? Choose every correct one. (choose all that apply · objective 3)
- A) brightness(40) on an LED with a hardware PWM route holds its level without blocking
- B) brightness(40) on an LED without a PWM route gets a pulse of about 12 ms and then ends with the LED off
- C) hold(pct, ms) blocks for the full time; the button is not read during that time
- D) For finer dimming, call machine.PWM
- E) brightness(100) ends with the LED off, like a middle value does
Solution
A, B, C — brightness() picks a path depending on the LED’s wiring: LEDs with a PWM route can hold, others get a short pulse and turn off. hold() can hold on any LED but blocks. machine.PWM does not exist in this port (calling it raises AttributeError), and brightness(100) leaves the LED lit and held.
Going further
Section titled “Going further”Lesson 2.2 opens up what happens behind the pin: why commanding 1 turns the LED on but pressing the button reads 0, why one press can be counted several times, and why a good loop must stop using sleep as its clock.
Next lesson: Lesson 2.2 — Behind LEDs and buttons: active-low, debouncing and the endless loop
Reflect
Section titled “Reflect”- If you had to write one set of code to run on three board models with different numbers of LEDs, what would you ask the board before issuing any command?
duty()answers what was commanded;value()answers the pin level. If you had to report the LED’s status on screen, which would you trust — or would you trust neither, and why?
Review questions
Answer on your own first, then open the answer.
-
A team writes `for i in range(3): gpio.led(i).off()` on the Eva Kit and runs the same file on the Dev Kit. What happens? (Objective 1)
- ดับครบห้าดวง เพราะเฟิร์มแวร์ปรับ range ให้เอง
- ดับแค่ดวง 0–2 ส่วนดวง 3–4 อยู่สถานะเดิม โดยไม่มี error ให้เห็น
- โยน ValueError ทันทีที่ i เท่ากับ 3
- บอร์ดรีเซ็ตตัวเอง เพราะจำนวนดวงไม่ตรงกับโค้ด
Show answer
Answer: B. ดับแค่ดวง 0–2 ส่วนดวง 3–4 อยู่สถานะเดิม โดยไม่มี error ให้เห็น
range(3) พังเงียบ ๆ บนบอร์ดที่มีห้าดวง เลข 0–2 ยังอยู่ในช่วงจึงไม่มี ValueError แต่ดวง 3–4 ไม่ถูกแตะเลย ถ้าเขียน range(gpio.num_leds()) ไฟล์เดียวกันจะวิ่งครบเองทั้งสองบอร์ด
-
You call `led.hold(80, 700)` and it runs to completion. Which statements are true? Choose all that apply. (Objective 2)
- หลอดดับแล้ว
- `led.value()` ตอบ 0
- `led.duty()` ยังตอบ 80
- `led.value()` ตอบ 80 เพราะอ่านความสว่างกลับมา
- `led.duty()` ตอบ 0 เพราะไปวัดหลอดที่ดับแล้ว
Show answer
Answer: A. หลอดดับแล้ว · B. `led.value()` ตอบ 0 · C. `led.duty()` ยังตอบ 80
hold() จบด้วยขาต่ำเสมอ value() ที่อ่านระดับขาจึงได้ 0 ส่วน duty() คือเลขที่เราสั่งครั้งล่าสุด ไม่ได้ไปวัดหลอด จึงยังตอบ 80 ตัวเลขบนจอจึงไม่ใช่หลักฐานว่าหลอดกำลังสว่าง
-
A team calls `brightness(40)` on an LED with a hardware PWM route, then `hold(80, 700)` right after. The LED does not change and is not off at the end. What is the fix? (Objective 3)
- เปลี่ยน 700 เป็น 0.7 เพราะ hold() รับเวลาเป็นวินาที
- เรียก `off()` คั่นก่อน `hold()` เพื่อคืนขาจากเส้น PWM
- import machine.PWM ก่อน แล้วค่อยเรียก hold()
- เปลี่ยนไปใช้ brightness(100) แทน เพราะมันจบด้วยหลอดดับ
Show answer
Answer: B. เรียก `off()` คั่นก่อน `hold()` เพื่อคืนขาจากเส้น PWM
หลัง brightness() ค่ากลางบนดวง PWM ขายังถูก PWM ถืออยู่ hold() ซึ่งกะพริบขา GPIO เองจึงไม่เห็นผล ต้อง off() คั่นก่อน ส่วน brightness(100) ทิ้งหลอดติดค้าง และบอร์ดนี้ไม่มี machine.PWM
-
A teammate holding a Dev Kit asks which button to press. How should you answer? (Objective 4)
- กดปุ่มที่พิมพ์ว่า SW2 บนฐาน
- กดปุ่มที่โค้ดเรียกว่า USER Button 1 ตามชื่อที่ btn.name() พิมพ์ขึ้นจอ
- โยกสวิตช์บนฐานทีละตัวจนกว่าจะเจอตัวที่ตัวเลขขึ้น
- ใช้ gpio.button(1) เพราะ Dev Kit มีปุ่มมากกว่า
Show answer
Answer: B. กดปุ่มที่โค้ดเรียกว่า USER Button 1 ตามชื่อที่ btn.name() พิมพ์ขึ้นจอ
ชื่อ USER Button 1 ถูกเลือกโดยตั้งใจให้ไม่ตรงกับป้ายบนแผ่นวงจร เพราะบน Dev Kit สวิตช์ที่พิมพ์ว่า SW หลายตัวเป็นสวิตช์ตัดไฟเลี้ยง ห้ามโยกสวิตช์ที่บทเรียนไม่ได้สั่ง และ gpio.button(1) โยน ValueError ทั้งสองบอร์ด
-
Which statements about dimming LEDs on this board are true? Choose all that apply. (Objective 3)
- brightness(40) บนดวงที่มีเส้น PWM ของฮาร์ดแวร์ ค้างระดับไว้โดยไม่บล็อก
- brightness(40) บนดวงที่ไม่มีเส้น PWM ได้พัลส์ราว 12 ms แล้วจบด้วยหลอดดับ
- hold(pct, ms) บล็อกจนครบเวลา ระหว่างนั้นปุ่มไม่ถูกอ่าน
- อยากหรี่ละเอียดกว่านี้ให้เรียก machine.PWM
- brightness(100) จบด้วยหลอดดับเหมือนค่ากลาง
Show answer
Answer: A. brightness(40) บนดวงที่มีเส้น PWM ของฮาร์ดแวร์ ค้างระดับไว้โดยไม่บล็อก · B. brightness(40) บนดวงที่ไม่มีเส้น PWM ได้พัลส์ราว 12 ms แล้วจบด้วยหลอดดับ · C. hold(pct, ms) บล็อกจนครบเวลา ระหว่างนั้นปุ่มไม่ถูกอ่าน
brightness() เลือกทางตามขาของหลอด ดวงที่มีเส้น PWM ค้างได้ ดวงอื่นได้พัลส์สั้นแล้วดับ hold() ค้างได้ทุกดวงแต่บล็อก ส่วน machine.PWM ไม่มีในพอร์ตนี้ (เรียกแล้วได้ AttributeError) และ brightness(100) ทิ้งหลอดติดค้าง
Cite this lesson
If you teach from this lesson or reuse it in slides or documents, credit it with the text below. If you changed it, add (adapted) after the title.
"The gpio module: LEDs, a button and a board that describes itself" from TESA Open Knowledge by the Thai Embedded Systems Association (TESA), https://github.com/tesaiot/tesa-qualification-program, licensed under CC BY-NC 4.0
Thai attribution: "โมดูล gpio: LED ปุ่ม และบอร์ดที่บอกได้ว่ามีอะไร" จาก TESA Open Knowledge โดยสมาคมสมองกลฝังตัวไทย (Thai Embedded Systems Association: TESA) https://github.com/tesaiot/tesa-qualification-program สัญญาอนุญาต CC BY-NC 4.0
This lesson adapts the source below; keep its credit too.
https://github.com/Advance-Innovation-Centre-AIC/embedded-systems-for-aiot-developer/blob/a80bbe88a34bcb9bb8d991f42f9252b77cdab079/session-03.html (slides 1–12)
TESA Open Knowledge · © 2026 สมาคมสมองกลฝังตัวไทย (TESA) · CC BY-NC 4.0
Content is licensed CC BY-NC 4.0. Reuse it non-commercially and credit the Thai Embedded Systems Association (TESA) every time. · How to cite TESA