Digital compass from the BMM350 over I3C with calibration
Objectives
Section titled “Objectives”- Read the magnetic field from the BMM350 over I3C and compute a heading in degrees
- Run hard-iron calibration and show that the heading improves afterwards
- Explain how metal and currents near the board disturb the compass
Concepts
Section titled “Concepts”What the BMM350 is, and why it needs I3C
Section titled “What the BMM350 is, and why it needs I3C”The BMM350 is Bosch’s latest (2023) 3-axis magnetometer: low noise (1.4 µT RMS), a range up to ±2000 µT
(comfortably covering Earth’s field of roughly 25–65 µT), and the first sensor in this series wired over I3C
instead of I2C. I3C is a bus built on top of I2C’s wiring, adding dynamic addressing and in-band interrupts (IBI)
while staying electrically similar. The master template sets up i3c_controller_init() the same way it sets up
the I2C bus for the DPS368/BMI270/SHT4x — this episode simply receives CYBSP_I3C_CONTROLLER_HW and
&CYBSP_I3C_CONTROLLER_context ready to use, with no init of its own.
A vendor library bug that freezes the screen — patch it before you build
Section titled “A vendor library bug that freezes the screen — patch it before you build”This is the single most important thing about this episode: Bosch’s BMM350_SensorAPI library (v1.10.0, vendored
into the master template) has a known bug over I3C. Inside bmm350_init(), a soft-reset command is sent to the
sensor, which resets the BMM350 back to I2C mode (its factory default). The driver then keeps trying to talk over
I3C to a sensor that no longer listens on I3C, so bmm350_init() blocks waiting for a response that never comes.
The result: bmm350_presenter_start() never returns, the LVGL event loop never starts, and the screen stays
black from boot. You can spot this from the serial log stopping right after [MASTER] I3C init OK, with no
[BMM350] INIT_OK line following it. A patch script (bmm350_fix.bash) or a one-time sed that comments out the
soft-reset line must be run once after make getlibs, before building. The master template deliberately does not
apply this patch automatically through PREBUILD=, because Windows has no bash available by default, and a
prebuild step like that makes builds non-deterministic (running make getlibs again after patching would silently
overwrite the patched file back to pristine).
Calibration must satisfy two conditions, not just elapsed time
Section titled “Calibration must satisfy two conditions, not just elapsed time”bmm350_config.h sets BMM350_CALIBRATION_SAMPLES = 140 at a 120 ms poll period
(BMM350_SAMPLE_PERIOD_MS), totaling about 16.8 seconds (the source comment states this number directly, not a
rounded “15 seconds”). But reaching the sample count is not enough on its own — the code also checks
BMM350_CALIBRATION_MIN_SPAN_UT = 20.0f, meaning the max−min span of both X and Y must be at least 20 µT. If
the board sits still without rotating through all 140 samples, the span stays far narrower than that, and
calibration never finishes, even though the sample count target was met. The reason: with a narrow span, the
computed midpoint is meaningless as a hard-iron offset.
The real code also does a simple soft-iron scale, not just a hard-iron offset as the upstream README says
Section titled “The real code also does a simple soft-iron scale, not just a hard-iron offset as the upstream README says”The upstream README says “Soft-iron calibration will not be done in this episode — it would need an ellipsoid
fit, which is complex.” But the comment in bmm350_config.h states directly: “Runtime heading calibration
(hard-iron + simple soft-iron scale).” The real code computes both the offset (the midpoint) and a per-axis
scale from the average X/Y span, to pull the ellipse closer to a circle in a simple way (not the full, complex
ellipsoid fit the upstream README refers to, but not “doing nothing at all” about scale distortion either).
Calibration lives only in RAM and is lost on a board reset
Section titled “Calibration lives only in RAM and is lost on a board reset”Calibration state is a static variable held in RAM — it is never written to NVM the way the Wi-Fi profile is
(lesson 2.6). bmm350_reader_init() clears the calibration every time it is called, which is every time the board
boots. The user must press Calibrate again after every reset; to remember it across reboots, you would need to add
a store similar to the Wi-Fi profile’s.
Heading is computed from X/Y only, with no tilt compensation
Section titled “Heading is computed from X/Y only, with no tilt compensation”atan2f(y, x), applied to values already corrected by the hard-iron offset and soft-iron scale, gives the heading
angle directly — it never uses the Z axis or any tilt information from the accelerometer. Earth’s magnetic field
has a vertical component too, so tilting the board changes the proportion measured on the X/Y axes and throws off
the heading even after a good calibration. The board must be held flat while reading a heading (tilt-compensated
heading would need to combine data from the BMI270, lesson 3.2 — one of this episode’s suggested extensions).
Worked example
Section titled “Worked example”This episode’s code lives on the Developer Hub (pinned to commit 9a8e3ed) — read the Why section and the BMM350
Vendor Code Fix section of the
upstream README
in full before actually building, but the excerpts below are copied from the actual files (Apache-2.0,
tesaiot/developer-hub, same commit).
app_sensor/bmm350/bmm350_config.h — the real calibration constants:
/* Runtime heading calibration (hard-iron + simple soft-iron scale) * At default 120 ms sample period and 140 samples = ~16.8 seconds. */#define BMM350_CALIBRATION_SAMPLES             (140U)#define BMM350_CALIBRATION_MIN_SPAN_UT         (20.0f)
/* Heading axis mapping for board orientation tuning. * Signs should be +1 or -1. */#define BMM350_HEADING_SWAP_XY                 (0U)#define BMM350_HEADING_X_SIGN                  (1)#define BMM350_HEADING_Y_SIGN                  (1)#define BMM350_HEADING_OFFSET_DEG              (0.0f)
app_ui/bmm350/bmm350_presenter.c — one lv_timer, same pattern as the rest of this module, with a touch-blocking overlay during calibration:
void bmm350_presenter_start(I3C_CORE_Type *i3c_hw, cy_stc_i3c_context_t *i3c_context){    bmm350_view_create();    bmm350_view_set_calibrate_handler(bmm350_calibrate_requested_cb, NULL);
    cy_rslt_t init_rslt = bmm350_reader_init(i3c_hw, i3c_context);    if (CY_RSLT_SUCCESS != init_rslt)    {        bmm350_view_set_init_failed();        return;    }
    bmm350_view_set_ready();    bmm350_update_calibration_ui();
/* Periodic sensor polling runs in LVGL task context. */ (void)lv_timer_create(bmm350_poll_sensor_cb, BMM350_SAMPLE_PERIOD_MS, NULL);}main_example.chands the I3C handle tobmm350_presenter_start(), exactly as the upstream README describesapp_sensor/bmm350/bmm350_driver.cwraps Bosch’s SensorAPI with injected I3C read/write callbacks, exactly as the upstream README describes — this is the vendor file that needs patching before it builds (see above)- See the full folder at
int_ep04_bmm350_compass/
Common mistakes
Section titled “Common mistakes”- Build/flash succeeds but the screen stays black from boot — almost always a forgotten patch for the I3C
soft-reset bug in
BMM350_SensorAPI. Check the serial log for a[BMM350] INIT_OKline after[MASTER] I3C init OK; if it is missing,bmm350_init()is still blocked and the patch must be applied. - Assuming calibration is done once the time/sample count is reached — if the board never rotates far enough to give X and Y a span of at least 20 µT, calibration never finishes even after 140 samples. The board must actually be rotated through every direction (a figure-8 motion).
- Assuming calibration survives a board reset — the value lives only in RAM;
bmm350_reader_init()clears it on every boot, so calibration must be redone every time. - Forgetting heading has no tilt compensation — if the board is not level, the reported heading drifts even after a good calibration.
Build and flash
Section titled “Build and flash”# In the master template folder (see lesson 1.1)# 1) Delete the old episode's files in proj_cm55/apps/# 2) Copy all of this episode's files into proj_cm55/apps/make buildmake program # flash through KitProg3Or open this example on the Developer Hub and flash the ready-made firmware.
See it work first
Section titled “See it work first”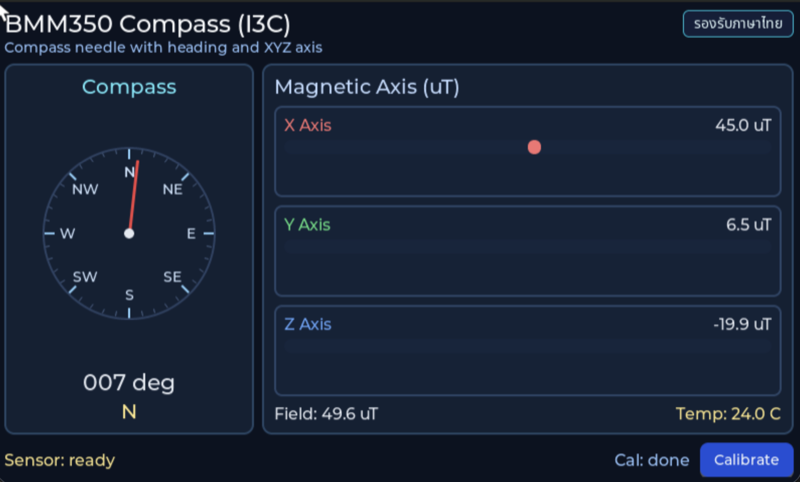
Before reading the code, guess what objects this screen has, and what changes when the user taps it or when a sensor value changes.
Try a change
Section titled “Try a change”- Guess before you change anything: pick one value the example’s README explains in the How section, and write down what you expect to change on the screen or in the log.
- Change and run: build + flash, then compare against your guess. If it does not match, find which part you misunderstood.
- Extend: add one thing the example does not yet have, and keep a photo or video in your portfolio.
Check your understanding
Section titled “Check your understanding”- What is hard-iron error, and how do you correct it?
- Why must you rotate the board through every direction while calibrating?
- How does I3C differ from I2C from a user’s point of view?
The answers are in the example’s README and in the code. If you cannot answer one, go back and read the Why / What / How section again.
References
Section titled “References”- Episode README · code folder · commit
9a8e3ed - Open this example on the Developer Hub
- The code belongs to the Developer Hub and is referenced by link, not copied into this repository
Review questions
Answer on your own first, then open the answer.
-
The example computes heading from atan2 of X and Y only. If you tilt the board up by 30° without turning it, what happens to the heading? (Objective 1)
- คงเดิม เพราะ atan2 ไม่สนความเอียง
- อาจเปลี่ยนไปหลายองศา เพราะเมื่อเอียง ส่วนแนวดิ่งของสนามแม่เหล็กโลกเข้ามาปนในแกน X/Y และโค้ดไม่มีการชดเชยความเอียง จึงควรวางบอร์ดราบขณะอ่านทิศ
- กลายเป็น 0° ทันที
- กลับทิศเป็น 180° เสมอ
Show answer
Answer: B. อาจเปลี่ยนไปหลายองศา เพราะเมื่อเอียง ส่วนแนวดิ่งของสนามแม่เหล็กโลกเข้ามาปนในแกน X/Y และโค้ดไม่มีการชดเชยความเอียง จึงควรวางบอร์ดราบขณะอ่านทิศ
heading_from_xy() ใช้ atan2f(y_corr, x_corr) โดยไม่ใช้แกน Z หรือข้อมูลความเอียงจาก accelerometer สนามแม่เหล็กโลกมีส่วนประกอบแนวดิ่ง การเอียงจึงเปลี่ยนสัดส่วน X/Y และทำให้ทิศคลาด การชดเชยความเอียงต้องใช้ BMI270 ร่วมด้วย
-
You press Calibrate and leave the board still on the table for 30 seconds. What happens to the calibration? (Objective 2)
- เสร็จหลังเก็บครบ 140 ตัวอย่าง (ราว 17 วินาที) โดยใช้ค่าคงที่ที่อ่านได้
- ล้มเหลวแล้วรีเซ็ตเซนเซอร์
- ยังไม่เสร็จ เพราะนอกจากต้องครบ 140 ตัวอย่างแล้ว ช่วง min–max ของทั้ง X และ Y ต้องกว้างอย่างน้อย 20 µT ซึ่งเกิดได้ต่อเมื่อหมุนบอร์ดรอบทิศ แถบ coverage จึงค้างต่ำกว่า 100%
- เสร็จทันทีเพราะไม่มีการเคลื่อนไหวรบกวน
Show answer
Answer: C. ยังไม่เสร็จ เพราะนอกจากต้องครบ 140 ตัวอย่างแล้ว ช่วง min–max ของทั้ง X และ Y ต้องกว้างอย่างน้อย 20 µT ซึ่งเกิดได้ต่อเมื่อหมุนบอร์ดรอบทิศ แถบ coverage จึงค้างต่ำกว่า 100%
calibration_update() ปิดงานเฉพาะเมื่อ samples ≥ BMM350_CALIBRATION_SAMPLES และ calibration_is_coverage_ready() เป็นจริง (span X และ Y ≥ BMM350_CALIBRATION_MIN_SPAN_UT) ถ้าไม่หมุน span เกือบเป็นศูนย์ offset ที่คำนวณได้จะไม่มีความหมาย โค้ดจึงรอต่อไปแทนการยอมรับผลที่ผิด
-
What does the per-axis offset (max + min) / 2 correct? (Objective 2)
- hard-iron: สนามคงที่จากชิ้นส่วนแม่เหล็กบนบอร์ดที่บวกเข้าทุกค่าอ่าน ทำให้วงกลมของค่าอ่านเมื่อหมุนครบรอบเลื่อนออกจากจุดศูนย์กลาง
- ค่าเบี่ยงเบนระหว่างทิศเหนือจริงกับทิศเหนือแม่เหล็ก (declination)
- สัญญาณรบกวนแบบสุ่มของเซนเซอร์
- ความเอียงของบอร์ด
Show answer
Answer: A. hard-iron: สนามคงที่จากชิ้นส่วนแม่เหล็กบนบอร์ดที่บวกเข้าทุกค่าอ่าน ทำให้วงกลมของค่าอ่านเมื่อหมุนครบรอบเลื่อนออกจากจุดศูนย์กลาง
เมื่อหมุนบอร์ดครบรอบ ค่า X/Y ควรวาดเป็นวงกลมรอบศูนย์ hard-iron ทำให้วงกลมเลื่อน จุดกึ่งกลางระหว่าง max และ min คือศูนย์กลางใหม่ จึงลบออก โค้ดยังคำนวณ scale_x/scale_y จาก span เฉลี่ยเพื่อดึงวงรีให้กลมแบบง่าย declination และความเอียงต้องจัดการแยกต่างหาก
-
Calibration succeeded, then the board is reset. Is the correction still applied after the reset? (Objective 2)
- ใช้ เพราะเก็บไว้ใน NVM
- ใช้ เพราะ BMM350 จำค่าไว้ในชิป
- ใช้ได้ครึ่งเดียว เฉพาะแกน X
- ไม่ใช้ ค่าชดเชยอยู่ใน RAM และ bmm350_reader_init() เรียก calibration_clear() ทุกครั้ง ต้อง calibrate ใหม่
Show answer
Answer: D. ไม่ใช้ ค่าชดเชยอยู่ใน RAM และ bmm350_reader_init() เรียก calibration_clear() ทุกครั้ง ต้อง calibrate ใหม่
s_cal เป็นตัวแปร static ใน RAM ไม่มีการเขียนลงหน่วยความจำถาวร ถ้าต้องการให้จำ ต้องบันทึก offset และ scale แบบเดียวกับ profile store ในบทเรียน 2.6 และจำไว้ว่าค่าชดเชยผูกกับบอร์ดและตำแหน่งติดตั้ง
-
After a successful calibration, which situations can make the compass wrong? (choose all that apply) (Objective 3)
- วางบอร์ดใกล้ขาโต๊ะเหล็กหรือลำโพงที่มีแม่เหล็ก
- มีสายไฟกระแสตรงสูงวางผ่านใกล้บอร์ด
- ชิ้นส่วนแม่เหล็กที่ติดอยู่บนบอร์ดตลอดเวลาและอยู่ที่เดิมระหว่าง calibrate
- ค่า field strength สูงกว่าช่วงสนามโลกราว 25–65 µT มาก เป็นสัญญาณว่ามีสนามรบกวนใกล้บอร์ด
Show answer
Answer: A. วางบอร์ดใกล้ขาโต๊ะเหล็กหรือลำโพงที่มีแม่เหล็ก · B. มีสายไฟกระแสตรงสูงวางผ่านใกล้บอร์ด · D. ค่า field strength สูงกว่าช่วงสนามโลกราว 25–65 µT มาก เป็นสัญญาณว่ามีสนามรบกวนใกล้บอร์ด
calibration ชดเชยได้เฉพาะสนามที่เคลื่อนไปพร้อมบอร์ดและคงที่ขณะ calibrate โลหะหรือแม่เหล็กในสิ่งแวดล้อม และกระแสไฟที่สร้างสนามรอบสาย ไม่ได้ถูกรวมไว้จึงทำให้ทิศคลาด README ระบุว่าสนามโลกราว 25–65 µT ตัวอย่างคำนวณ field_strength_ut ให้ดูประกอบ ค่าที่สูงผิดปกติบอกว่าควรย้ายบอร์ดหรือ calibrate ในตำแหน่งใช้งานจริง
Cite this lesson
If you teach from this lesson or reuse it in slides or documents, credit it with the text below. If you changed it, add (adapted) after the title.
"Digital compass from the BMM350 over I3C with calibration" from TESA Open Knowledge by the Thai Embedded Systems Association (TESA), https://github.com/tesaiot/tesa-qualification-program, licensed under CC BY-NC 4.0
Thai attribution: "เข็มทิศดิจิทัลจาก BMM350 บน I3C พร้อม calibration" จาก TESA Open Knowledge โดยสมาคมสมองกลฝังตัวไทย (Thai Embedded Systems Association: TESA) https://github.com/tesaiot/tesa-qualification-program สัญญาอนุญาต CC BY-NC 4.0
This lesson adapts the source below; keep its credit too.
https://github.com/tesaiot/developer-hub/blob/9a8e3ed1d813bfd67fabf6b7ac15c6ff9750b465/int_ep04_bmm350_compass · Code stays in the Developer Hub and is linked at pinned commits, never copied: the episodes, practice codes and main-branch examples are Apache-2.0; the master template and the OPTIGA client carry Infineon/Cypress EULAs.
TESA Open Knowledge · © 2026 สมาคมสมองกลฝังตัวไทย (TESA) · CC BY-NC 4.0
Content is licensed CC BY-NC 4.0. Reuse it non-commercially and credit the Thai Embedded Systems Association (TESA) every time. · How to cite TESA