Behind LEDs and buttons: active-low, debouncing and the endless loop
Module 2 — From Screen to Hardware · Slides: slides.md · Module overview · Course page
Look behind the pins to see why an LED lights on 1 while the button reads 0 when pressed, why one press can count several times, and why a loop that never misses a press must stop using sleep as its timer.
Objectives
Section titled “Objectives”By the end of this lesson you will be able to:
- Explain the active-high LED circuit (the chip pin drives an n-MOSFET gate) and the active-low button (pull-up), predict btn.value() and btn.is_pressed() when pressed and released, and compute the Eva Kit red LED current from the series-resistor formula as about 5.9 mA
- Trace debounce logic with raw, last_raw and stable and DEBOUNCE_MS = 40 so ten presses count exactly ten, and explain why count += 1 must sit under if stable
- Advance an LED chase every STEP_MS with time.ticks_ms() and time.ticks_diff() in the same loop that polls the button every 5 ms without losing a press, and explain why last_step = now must stay inside the if and why times are not subtracted directly
- Make the program remember which LED is lit (led_index) instead of asking the LED’s value() or duty(), and start and end the program with every LED off
Before you start
Section titled “Before you start”Review three things from lesson 2.1: gpio.led(n) commands an LED, btn.is_pressed() reports meaning, while btn.value() reports the raw electrical level,
and duty() only reports the number we last commanded. Have your board or Emulator ready with the BENTO Playground page open,
and have your learning log open to write down numbers from pressing the button, because this lesson has your team’s own trial results answer several questions.
- Equipment: an Eva Kit or TESAIoT Dev Kit board with the BENTO MicroPython firmware installed, or the BENTO Emulator in BENTO IDE
- Before this: Lesson 2.1 — The gpio module: LEDs, a button and a board that describes itself
See it work first
Section titled “See it work first”Run 04_button_active_low.py and do not press anything yet. The big number on the left is 1, paired with the word “released”.
Now hold the user button down: the number drops to 0, the word changes to “pressed”, and the chart line drops at the same moment.
An LED lights when commanded 1, but the button reads 0 when pressed. This lesson starts by answering why these two are inverted.
Concepts
Section titled “Concepts”Active-high LEDs through a MOSFET. The chip pin never supplies current to the LED at all — it connects to the gate of an n-MOSFET, which draws almost no current.
The LED’s current comes from the 3.3 V rail, through a resistor, through the LED, into the drain, and down to ground. Commanding 1 at the gate opens the gate, so the LED lights.
On the Eva Kit (pins P16.7/P16.6/P16.5) the red LED D3 uses a 220 Ω resistor; putting that into the formula $I_F = (3.3 - V_F)/R$ with $V_F \approx 2.0$ V
(a common assumption for a red LED) gives about 5.9 mA. On the Dev Kit, the RGB LEDs sit at P20.6/P20.5/P20.4; the driving circuit there has not yet been checked against the datasheet,
but the code side is exactly the same. And because the gate can switch open and closed very fast, brightness() dims by flickering the gate rapidly, not by lowering the voltage.
Active-low buttons. When not pressed, a pull-up resistor holds the pin at the positive rail, so the value is 1. When pressed, the switch connects the pin to ground, so the value is 0.
This way the pin is never left floating. btn.value() returns this raw level, while btn.is_pressed() has already inverted it for you (pressed = True).
Use value() to understand the circuit, and is_pressed() to write logic.
Polling and bouncing. A program has no way of knowing on its own that someone pressed a button — all it can do is ask again, often enough. Every loop has three beats: read → decide → command.
A finger’s fastest press is roughly 50–80 ms, so asking every 5–20 ms never misses it, but asking every 300 ms lets a press slip through silently, and time.sleep_ms(5)
is what returns the CPU to the screen, the sensors and WiFi. The next problem is that the metal contact bounces apart and reconnects for roughly 1–20 ms; a loop that asks every 5 ms
sees every one of those bounces, and if you counted every change, the number would jump by 3–5 for one single press. On the Eva Kit, the footprint for a debounce resistor and
capacitor is marked do-not-install (DNI), so this board depends entirely on the chip’s internal pull-up and our own code.
Debouncing in software is a single rule: never trust a value that just changed; wait for it to sit still for DEBOUNCE_MS first. Three variables must be kept distinct:
raw, this round’s raw value; last_raw, the previous round’s raw value; stable, the value we have accepted as trustworthy. If raw moves, restart the timer; only once it has sat still long enough and differs from
stable do we accept it — and only count under if stable:, that is, count on the press-down edge, not the release. 40 ms works well for a typical button;
below 10 it still bounces through, above 200 the button starts to feel sluggish.
Two clocks in one loop. sleep_ms(150) halts the entire program; any press that happens during that sleep is never seen by anyone. ticks_ms(),
on the other hand, is the number of milliseconds since the board booted, and answers “is it time yet” without ever stopping. It must be compared with ticks_diff(now, last_step),
because this counter runs up to a ceiling and wraps back around — subtracting directly would give a huge negative number right at the wrap. Our loop therefore sleeps briefly, 5 ms, every round, and lets
ticks_diff decide whether it is time to advance the light. Advancing follows an order: turn off the current LED → led_index = (led_index + 1) % NUM_LEDS → light the new one,
and last_step = now lives only inside the if. Finally, the program must remember the state it commanded itself (led_index), because value()
reports the pin level at the instant you ask (0 after hold()), and duty() only reports the last commanded number. Start with every LED off,
and always end with every LED off too. The loop runs for RUN_MS instead of while True, so the board is handed back to the team for the next run.
Worked example
Section titled “Worked example”Go through in this order, predict before you run every time, and record the results in your learning log.
05_debounce_count.py— predict first whether the orange number (raw count) and the green number (debounced count) will differ after ten presses. Press ten times slowly, then ten more times as fast as you can, and record the difference between the two rounds — a difference of zero does not mean the button never bounces. Then lowerDEBOUNCE_MSby 10 at a time and press ten times again each time, and note the value at which the green number starts to exceed the number of real presses. That number is your team’s own answer to how much your board’s button actually bounces.02_led_blink.py— watch the label on screen against the real LED, and the round counter climbing by one at a time. Notice that this file keeps time withsleep_msand always ends withoff(), because ending withtoggle()would leave the LED lit if the count is odd. Think about where a short press would get lost if you added button-reading into this same loop.06_button_picks_led.py— one button advances the light one LED at a time withcurrent = (current + 1) % N. Press until it wraps all the way around, and compare the row on screen with the real LEDs — everything on screen is read from the variablecurrent, never asked from the LED itself. Try removingif stable:once and see by how many LEDs the light jumps per single press.
| File | What this file teaches |
|---|---|
| examples/02_led_blink.py | Make an LED blink to a rhythm, and count how many times it has blinked |
| examples/04_button_active_low.py | On this button, 0 means pressed, not 1 |
| examples/05_debounce_count.py | Count presses correctly, by waiting for the button to sit still first |
| examples/06_button_picks_led.py | One button controls every LED, by remembering its own state |
The slides for this lesson also refer to a file that lives in another lesson:
- m02-ui-to-hardware/l03-led-button-lab/practice/s03_led_button.py — an LED chase over every LED plus a debounced button counter (fill-in version)
Screens from the BENTO Emulator for this lesson’s examples (click a file name to open the code)
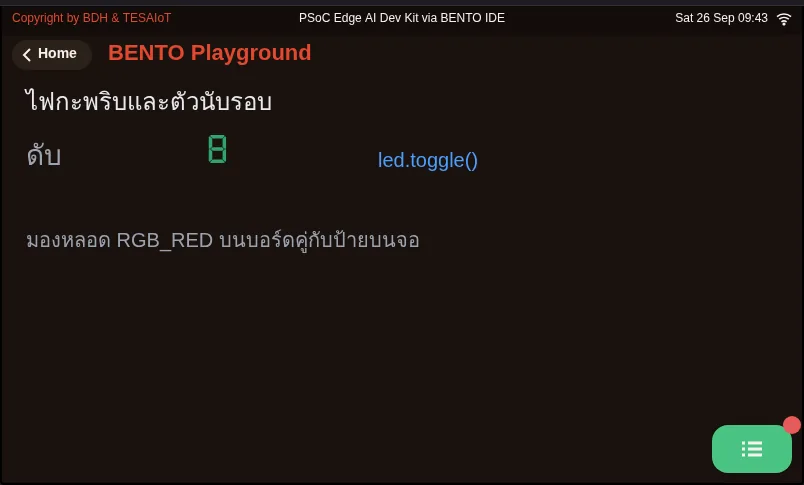
02_led_blink.py Make an LED blink to a rhythm, and count how many times it has blinked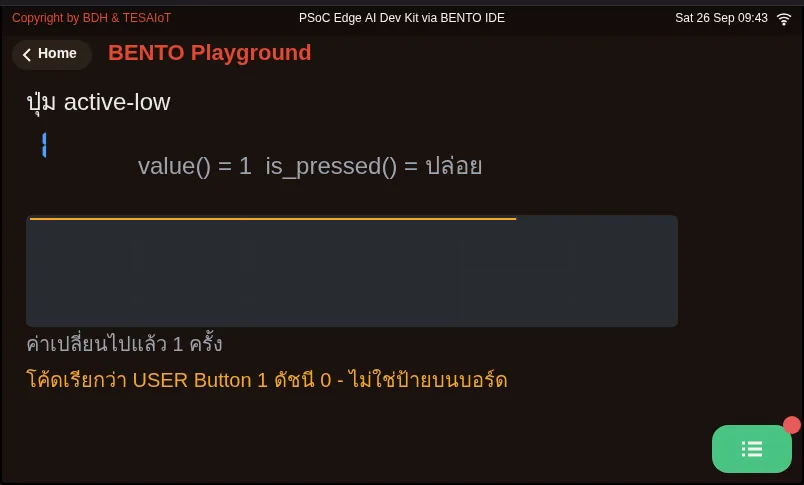
04_button_active_low.py On this button, 0 means pressed, not 1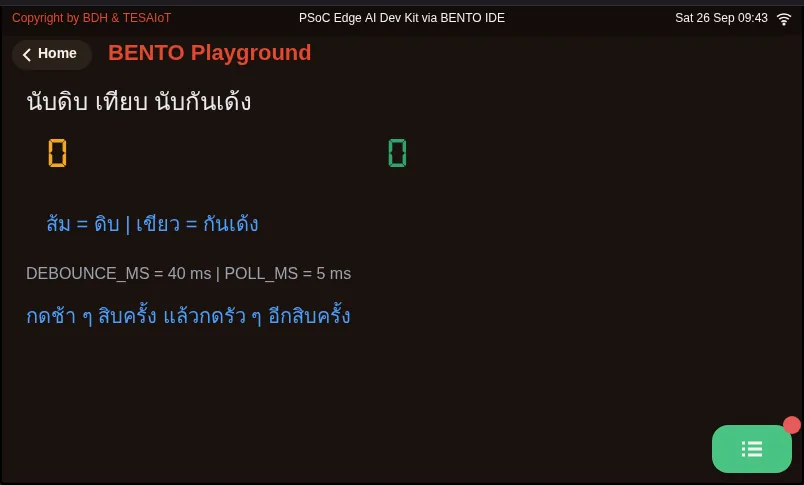
05_debounce_count.py Count presses correctly, by waiting for the button to sit still first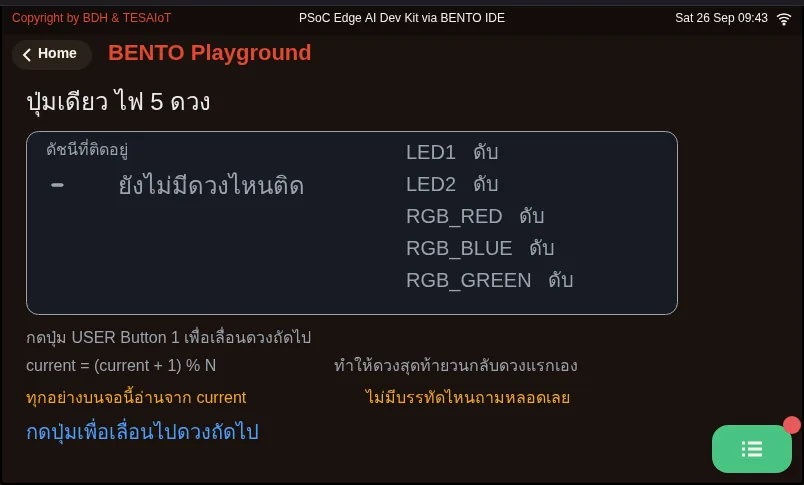
06_button_picks_led.py One button controls every LED, by remembering its own stateCheck your understanding
Section titled “Check your understanding”The same questions are in quiz.yaml for automatic marking.
-
You hold the user button down and read both values in the same round. What is the result? (choose one · objective 1)
- A) btn.value() = 1 and btn.is_pressed() = True
- B) btn.value() = 0 and btn.is_pressed() = True
- C) btn.value() = 0 and btn.is_pressed() = False
- D) btn.value() = 1 and btn.is_pressed() = False
Solution
B — The button is active-low. When released, the pull-up holds the pin at 1; when pressed, the switch connects the pin to ground, giving 0. is_pressed() has already inverted this, so a press gives True.
-
In the circuit for the red LED D3 on the Eva Kit (220 Ω resistor), which statement correctly describes the current path? (choose one · objective 1)
- A) Chip pin P16.7 supplies about 5.9 mA directly into the LED; the resistor is there to protect the chip pin
- B) The chip pin connects to the gate of an n-MOSFET, which draws almost no current; the LED’s roughly 5.9 mA comes from the 3.3 V rail, through the resistor and the LED, down to ground
- C) The chip pin lowers the voltage at the LED when brightness() is commanded at a middle value, so the LED dims
- D) Commanding 0 at the chip pin lights the LED, because the LED is active-low like the button
Solution
B — The chip pin commands the “gate”, not the “water”. The LED’s current runs from the 3.3 V rail, and plugging in (3.3 - 2.0)/220 gives about 5.9 mA. Commanding 1 at the gate lights the LED; dimming happens by flickering the gate rapidly, not by lowering the voltage.
-
A team removes the
if stable:line, socount += 1runs every time stable changes, then presses the button slowly five times. What is the counter likely to show? (choose one · objective 2)- A) Five, because debouncing is still working
- B) Ten, because releasing the button is also a debounced state change
- C) Fifteen to twenty-five, because the button bounces 3–5 times per press
- D) Zero, because stable never changes
Solution
B — Debouncing still filters the bounce, but every press has two settled edges: pressing down and releasing. Without the if stable line, the program counts both edges, so the number jumps by two — which looks like a bouncy button, but is really a bug in our own logic.
-
Which statements about a loop that polls the button every 5 ms and advances the light every 150 ms are correct? Choose every correct one. (choose all that apply · objective 3)
- A) If sleep_ms(150) is used to wait for the LED step, a short press during that sleep is lost
- B) ticks_diff(now, last_step) is used instead of subtracting directly, because the ticks counter runs up to a ceiling and wraps around
- C) If last_step = now is moved outside the if, the light never advances at all
- D) sleep_ms(5) in the loop is only a delay; removing it makes everything work better
- E) Polling the button every 300 ms is enough, because a finger always holds longer than that
Solution
A, B, C — sleep halts the entire program, so nobody sees the button; ticks_diff handles the counter wrapping around; and last_step must be recorded only at the moment it actually advances. sleep_ms(5) is what returns the CPU to the screen and WiFi, and a finger typically holds for only about 50–80 ms, so a 300 ms poll can miss it.
-
Your team’s program needs to print on screen which LED the chase is currently on. Which method is most reliable? (choose one · objective 4)
- A) Loop over gpio.led(i).value() for every LED and pick the one that reads 1
- B) Loop over gpio.led(i).duty() for every LED and pick the one that reads 100
- C) Read from the variable led_index, which the program updates itself every time it commands a move
- D) Call gpio.board_info() and read the led_names field
Solution
C — value() reports the pin level at the instant you ask, and gives 0 after hold() even though the LED was just seen lit. duty() only reports the last commanded number, and toggle() does not update it. The program should therefore remember the state it commanded itself, and this same approach still works for a valve or relay that cannot be read back at all.
Going further
Section titled “Going further”Lesson 2.3 brings all of this together into your team’s own program: an LED chase with an adjustable tempo, a button that counts correctly, and publishing the result to the broker. Also try a special round on the Eva Kit: keep the Controls card open instead of Playground, and watch the circle on screen follow our own light.
Next lesson: Lesson 2.3 — Hands-on: running lights, a button, and the broker
Reflect
Section titled “Reflect”- How much does the button on your team’s board actually bounce, and if you had to pick a
DEBOUNCE_MSfor a user who mashes the button rapidly, what would you weigh against what? - Many real-world outputs can only be commanded, never read back (a valve, a relay, a motor). Without a state variable, how would your program know what it has already commanded?
Review questions
Answer on your own first, then open the answer.
-
You hold the user button down and read both methods in the same loop pass. What do you get? (Objective 1)
- btn.value() = 1 และ btn.is_pressed() = True
- btn.value() = 0 และ btn.is_pressed() = True
- btn.value() = 0 และ btn.is_pressed() = False
- btn.value() = 1 และ btn.is_pressed() = False
Show answer
Answer: B. btn.value() = 0 และ btn.is_pressed() = True
ปุ่มเป็น active-low ตอนปล่อย pull-up ดึงขาไว้ที่ 1 พอกด สวิตช์ต่อขาลงกราวด์จึงได้ 0 ส่วน is_pressed() กลับด้านให้แล้ว กดจึงได้ True
-
In the circuit of the red LED D3 on the Eva Kit (220 Ω resistor), which statement describes the current paths correctly? (Objective 1)
- ขาชิป P16.7 จ่ายกระแสราว 5.9 mA เข้าหลอดโดยตรง ตัวต้านทานมีไว้กันขาชิปพัง
- ขาชิปต่อที่ gate ของ n-MOSFET ซึ่งแทบไม่กินกระแส กระแสหลอดราว 5.9 mA มาจากราง 3.3 V ผ่านตัวต้านทานและหลอดลงกราวด์
- ขาชิปลดแรงดันที่หลอดลงเมื่อสั่ง brightness() ค่ากลาง หลอดจึงหรี่
- สั่ง 0 ที่ขาชิปแล้วหลอดติด เพราะหลอดเป็น active-low เหมือนปุ่ม
Show answer
Answer: B. ขาชิปต่อที่ gate ของ n-MOSFET ซึ่งแทบไม่กินกระแส กระแสหลอดราว 5.9 mA มาจากราง 3.3 V ผ่านตัวต้านทานและหลอดลงกราวด์
ขาชิปสั่ง "ประตู" ไม่ได้สั่ง "น้ำ" กระแสหลอดเดินจากราง 3.3 V และแทนสูตร (3.3 - 2.0)/220 ได้ราว 5.9 mA สั่ง 1 ที่ gate หลอดจึงติด ส่วนการหรี่ทำด้วยการกะพริบ gate ถี่ ๆ ไม่ใช่ลดแรงดัน
-
A team deletes the `if stable:` line so `count += 1` runs whenever stable changes, then presses the button slowly five times. What will the counter most likely show? (Objective 2)
- ห้า เพราะกันเด้งยังทำงานอยู่
- สิบ เพราะการปล่อยปุ่มก็เป็นการเปลี่ยนสถานะที่ผ่านการกันเด้งเหมือนกัน
- สิบห้าถึงยี่สิบห้า เพราะปุ่มเด้งทีละ 3–5 ครั้ง
- ศูนย์ เพราะ stable ไม่มีวันเปลี่ยน
Show answer
Answer: B. สิบ เพราะการปล่อยปุ่มก็เป็นการเปลี่ยนสถานะที่ผ่านการกันเด้งเหมือนกัน
กันเด้งยังกรองการเด้งได้ แต่ทุกการกดมีสองขอบที่นิ่งแล้ว คือกดลงกับปล่อย ถ้าไม่มีบรรทัด if stable โปรแกรมจะนับทั้งสองขอบ เลขจึงกระโดดทีละสอง ซึ่งดูเหมือนปุ่มเด้งทั้งที่เป็นบั๊กของตรรกะเรา
-
Which statements about a loop that polls the button every 5 ms and advances the chase every 150 ms are true? Choose all that apply. (Objective 3)
- ถ้าใช้ sleep_ms(150) เป็นตัวรอไฟวิ่ง การกดปุ่มสั้น ๆ ระหว่างที่หลับจะหายไป
- ใช้ ticks_diff(now, last_step) แทนการลบตรง ๆ เพราะตัวนับ ticks วิ่งถึงเพดานแล้ววนกลับ
- ถ้าย้าย last_step = now ออกไปไว้นอก if ไฟจะไม่วิ่งเลย
- sleep_ms(5) ในลูปเป็นแค่การถ่วงเวลา ตัดออกแล้วทุกอย่างทำงานดีขึ้น
- ถามปุ่มทุก 300 ms ก็พอ เพราะนิ้วกดค้างนานกว่านั้นเสมอ
Show answer
Answer: A. ถ้าใช้ sleep_ms(150) เป็นตัวรอไฟวิ่ง การกดปุ่มสั้น ๆ ระหว่างที่หลับจะหายไป · B. ใช้ ticks_diff(now, last_step) แทนการลบตรง ๆ เพราะตัวนับ ticks วิ่งถึงเพดานแล้ววนกลับ · C. ถ้าย้าย last_step = now ออกไปไว้นอก if ไฟจะไม่วิ่งเลย
sleep หยุดโปรแกรมทั้งตัวจึงไม่มีใครเห็นปุ่ม ticks_diff จัดการตอนตัวนับวนกลับให้ และ last_step ต้องจดเฉพาะตอนที่ขยับจริง ส่วน sleep_ms(5) คือการคืนซีพียูให้จอและ WiFi และนิ้วกดค้างราว 50–80 ms ถามทุก 300 ms จึงหลุดได้
-
Your team's program must show which LED the chase is on. Which method is most reliable? (Objective 4)
- วนถาม gpio.led(i).value() ทุกดวงแล้วเลือกดวงที่ได้ 1
- วนถาม gpio.led(i).duty() ทุกดวงแล้วเลือกดวงที่ได้ 100
- อ่านจากตัวแปร led_index ที่โปรแกรมอัปเดตเองทุกครั้งที่สั่งขยับ
- เรียก gpio.board_info() แล้วอ่านช่อง led_names
Show answer
Answer: C. อ่านจากตัวแปร led_index ที่โปรแกรมอัปเดตเองทุกครั้งที่สั่งขยับ
value() ตอบระดับขา ณ วินาทีที่ถาม และได้ 0 หลัง hold() ทั้งที่เพิ่งเห็นหลอดสว่าง ส่วน duty() ตอบแค่เลขที่สั่งล่าสุดและ toggle() ไม่แก้มัน โปรแกรมจึงควรจำสถานะที่ตัวเองสั่งไว้ ซึ่งย้ายไปคุมวาล์วหรือรีเลย์ที่อ่านกลับไม่ได้ก็ยังใช้ได้
Cite this lesson
If you teach from this lesson or reuse it in slides or documents, credit it with the text below. If you changed it, add (adapted) after the title.
"Behind LEDs and buttons: active-low, debouncing and the endless loop" from TESA Open Knowledge by the Thai Embedded Systems Association (TESA), https://github.com/tesaiot/tesa-qualification-program, licensed under CC BY-NC 4.0
Thai attribution: "หลังไฟและปุ่ม: active-low กันเด้ง และลูปที่ไม่หยุด" จาก TESA Open Knowledge โดยสมาคมสมองกลฝังตัวไทย (Thai Embedded Systems Association: TESA) https://github.com/tesaiot/tesa-qualification-program สัญญาอนุญาต CC BY-NC 4.0
This lesson adapts the source below; keep its credit too.
https://github.com/Advance-Innovation-Centre-AIC/embedded-systems-for-aiot-developer/blob/a80bbe88a34bcb9bb8d991f42f9252b77cdab079/session-03.html (slides 13–27)
TESA Open Knowledge · © 2026 สมาคมสมองกลฝังตัวไทย (TESA) · CC BY-NC 4.0
Content is licensed CC BY-NC 4.0. Reuse it non-commercially and credit the Thai Embedded Systems Association (TESA) every time. · How to cite TESA