Building the dashboard: four cards in one loop
Module 3 — Sensor Visualization on HMI · Slides: slides.md · Module overview · Course page
Read the real four-card dashboard code move by move, from preparing the screen without sensors.init() and choosing widgets by who changes the value, to one loop that reads four sensors synchronously every 200 ms, and meet the five sensors.bmm350 names and eight mic names for a fifth card.
Objectives
Section titled “Objectives”By the end of this lesson you will be able to:
- Explain the three start-up steps (ui.screen(), then sleep_ms(200), then one throw-away motion() read inside try), why the file has no sensors.init(), and why a silence of more than ten seconds on the first read on the Eva Kit is waiting, not a hang
- Justify at least three widget choices in the four cards, such as scaling by 10 before feeding the Chart, using a Bar rather than a Slider for CapSense, two lamps instead of a colour-changing label, and pairing an Arc with a Seg7, and compute the direction name from DIRS with the +22.5, divide-by-45 formula
- Explain all five beats of the main loop (take t0, read four sensors synchronously, update widgets, call ui.poll(), sleep_ms(200)) and why the except branch keeps the last value instead of writing zero
- Choose the right mic and sensors.bmm350 calls for the job, such as one mic.stats() call when you need both rms and peak, and report magnetic() values as a deviation from a baseline in board units, not uT
Before you start
Section titled “Before you start”Bring your paper layout and widget budget table from lesson 3.7 with you. This lesson reads through the real code of lesson 3.9’s solution, s08_dashboard.py,
move by move — keep that file open in another window. On the board’s screen, keep the BENTO Playground card open, and if you want to try the sound card,
be somewhere you can speak or clap near the board.
- Equipment: an Eva Kit or TESAIoT Dev Kit board with the BENTO MicroPython firmware installed, or the BENTO Emulator in BENTO IDE
- Before this: Lesson 3.7 — HMI design: cards, visual order, colour and the widget budget
Concepts
Section titled “Concepts”The firmware already does 70% of the work: drawing every widget with LVGL, managing the cross-core IPC queue, reading four sensors, converting the magnetic field into degrees, and handling touch. The remaining 30% is ours: which values sit together, which value must stand out, what colour means what, how often to update, and who gets a share of the budget. None of these five are Python syntax — they are pure design work.
Move 1, preparing the screen. ui.screen() clears every existing widget — skip it and leftovers from a previous script eat into the budget before anything even starts.
Follow it with sleep_ms(200) so CM55 can catch up, then read sensors.bmi270.motion() once, discarded, inside a try, so the wait happens right there,
before building any cards. The first read on the Eva Kit can stay silent for up to 16 seconds (the Dev Kit has not been measured) — that is waiting,
do not unplug the cable yet, and on the Dev Kit, never flip a switch on the base, because those are power switches. The file deliberately has no sensors.init().
On the Eva Kit, the firmware rejects it with OSError, because the CM55 owns the I2C bus for the whole set of sensors. On the Dev Kit, that line passes but is unnecessary —
so one set of code runs on both boards.
Moves 2–4, four cards. Chart only takes integers, so we multiply the real value by 10 and set the axis to -150 to 150 (that is -15.0 to
+15.0 m/s²); feeding int(ax) directly would give a staircase graph. The first series gets its colour from the Chart’s color=; the other two come from
add_series(), which returns an index for use with set_next(). The chart shows the trend, the number shows the current value, so they sit together. ui.Compass
uses w as its diameter, taking degrees through .value(), where 0 means north. The degree number gets font 28, the largest on the screen,
and the direction name comes from DIRS[int((heading + 22.5) / 45.0) % 8] — adding 22.5 shifts the bucket boundaries so north spans 337.5–22.5
degrees. The touch card uses Bar, not Slider, because a Slider is something a person drags, while a Bar is something the machine displays — the value comes from
a real finger on the CapSense strip, not from the screen. The two buttons use two lamps instead of a colour-changing label, because it still reads apart in black and white,
and the lamp dims when untouched, it does not vanish. The knob card uses an Arc to answer “where in the range is it”, paired with a Seg7 for a number you can write down.
The one rule throughout all of this: pick a widget by “who changes this value”, never by which one looks nicer.
Move 5, the main loop. The moment ui.* is first called, the firmware’s automatic sensor task stops, so we read every sensor ourselves,
synchronously, in one go per round, touching the sensor as few times as possible. motion() gives six axes in one call; capsense.read() gives both buttons and
the slider in one call. Every read is wrapped in try, and except never writes zero — it just raises the ok flag, because zero looks exactly like a real
measured value, and lets the stale-value lamp be the one to tell the viewer. ui.poll() must be called every loop, or the screen hides widgets for about
two seconds before returning. t0 at the top of the loop is the tool for measuring time spent per round; at 200 ms, ten minutes is about three thousand rounds — an expensive line will show itself on its own.
New material for the compass card and a fifth card. sensors.bmm350 has five names, takes no arguments, and raises OSError when it cannot read.
Only heading() moves the calibration forward, and it returns a circular average of the last ten readings. The unit of
magnetic() still cannot be answered — footage from the board measures a combined magnitude of about 1532, while Earth’s field sits at 25–65 µT. The rule is to write
“board units” and always compare against a baseline your team measures itself (direction is still correct, because atan2 only cares about the ratio). cal_reset()
and cal_status() have not yet been run by anyone on a real board. The mic module is baked into the firmware, with eight names; you must call mic.start() first;
the audio queue holds about 625 ms and hands out the oldest data first; stats() defaults to fresh=True, discarding stale data until lag() reads 0–48 ms.
level() is an octave scale — doubling rms raises level by about 9 units — and rms(), peak(), level() each read the mic fresh once,
about 32 ms each time. If you need several values, call stats() once.
Worked example
Section titled “Worked example”Neither of these two files is part of the dashboard — they are pieces for the fifth card the team may choose to add. About 25 minutes.
- 02_mic_sound_level_meter.py — before running, predict about what level a quiet room, speaking, and a clap will give, then run and compare against
the slides’ numbers (7 · 54 · 92). Notice the bar, the number and the chart move together, then try changing
SENSto 5 and measuring the same room again. The 0–100 number fromlevel()is an octave scale — never read it as a percentage of full scale - 04_magnet_presence.py — keep the board still while capturing the baseline, then bring a magnet close, and watch the deviation line spike past the threshold.
Notice the threshold is computed from that room’s own fluctuation (
spread * THRESH_K, but never belowFLOOR_DEV), not a hardcoded number. Try moving it near a steel desk or a computer screen and run again, and only ever record the value in “board units”
The other two sound files (03_mic_clap_trigger.py and 07_mic_window_stats.py) and 05_door_open_switch.py
belong to lesson 3.9. If you want to try switching fresh and watch the queue grow with your own eyes, open 07_mic_window_stats.py.
| File | What this file teaches |
|---|---|
| examples/02_mic_sound_level_meter.py | A room sound-level meter |
| examples/04_magnet_presence.py | Detecting whether a magnet is nearby |
The slides for this lesson also refer to files that live in other lessons:
- m03-sensor-hmi/l09-dashboard-lab/practice/s08_dashboard.py — the 4-card Mini-HMI dashboard, on the Eva Kit / Dev Kit (fill-in version)
- shared/usecase/14_hard_iron_calibration.py — compass calibration, made into something measurable
Screens from the BENTO Emulator for this lesson’s examples (click a file name to open the code)
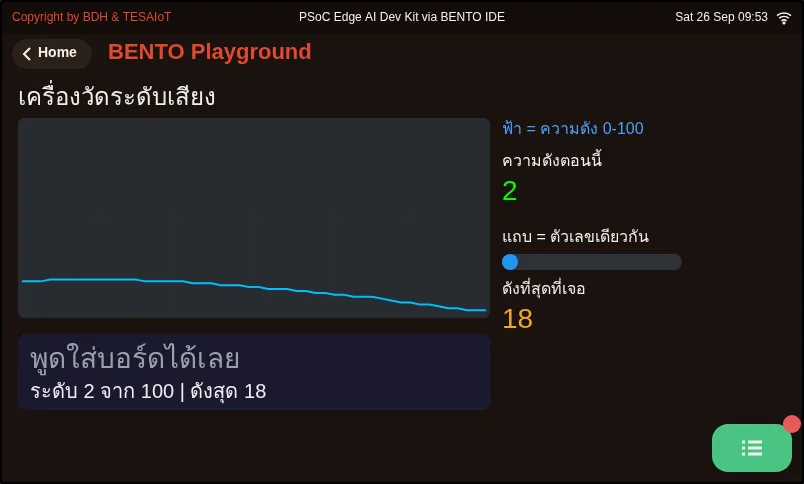
02_mic_sound_level_meter.py A room sound-level meter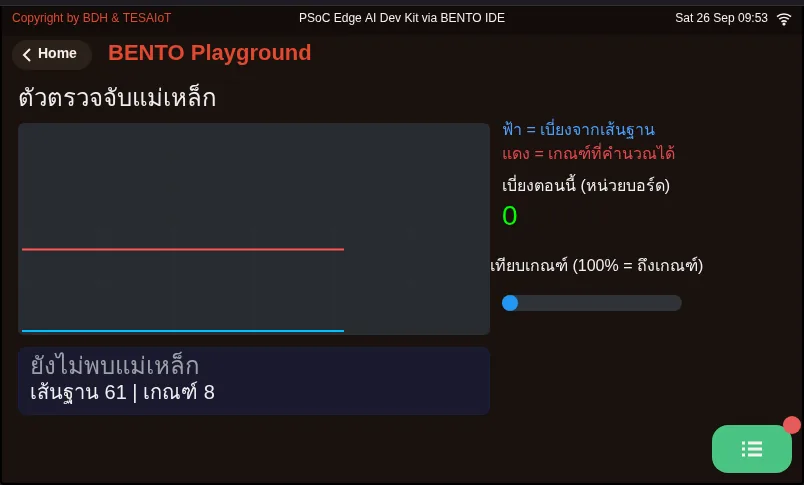
04_magnet_presence.py Detecting whether a magnet is nearbyCheck your understanding
Section titled “Check your understanding”The same questions are in quiz.yaml for automatic marking.
-
A teammate puts sensors.init() back at the top of the file and runs it on the Eva Kit. What happens? (choose one · objective 1)
- A) The firmware rejects it with OSError, because the CM55 owns the I2C bus for the whole set of sensors
- B) It passes and makes the first read faster
- C) It is necessary, or motion() will always return zero
- D) The screen hangs for 16 seconds, then works normally
Solution
A — On the Eva Kit, the display core owns the sensor bus and keeps values ready for Python to read without needing init — init() raises OSError immediately. The long silence on the first read is waiting for the display core to start answering, which the file moves earlier by discarding one read before building any cards.
-
Why does the CapSense card show finger position with ui.Bar instead of ui.Slider, even though they look similar? (choose one · objective 2)
- A) The value comes from a finger on the real CapSense strip; a Slider would mislead viewers into thinking they can drag it on screen
- B) Bar costs half the budget of Slider
- C) Slider cannot accept values over 50
- D) Bar draws faster, so it does not overflow CM55’s queue
Solution
A — A Slider is something a person drags; a Bar is something the machine displays. Its look must match what it can actually do — pick the widget by who changes this value, not by which one looks nicer.
-
heading equals 350.0 degrees. What direction name does DIRS[int((heading + 22.5) / 45.0) % 8] give, with DIRS = [“N”, “NE”, “E”, “SE”, “S”, “SW”, “W”, “NW”]? (choose one · objective 2)
- A) N
- B) NW
- C) W
- D) IndexError, because the index is 8
Solution
A — (350 + 22.5) / 45 = 8.27, truncated to 8, then % 8 gives 0, which is N. Adding 22.5 shifts the bucket boundaries so north spans 337.5–22.5 degrees, and % 8 keeps the index from ever running out of bounds.
-
Which statements about the dashboard’s main loop are correct? Choose every correct one. (choose all that apply · objective 3)
- A) motion() is used once instead of acceleration() and gyroscope(), to touch the sensor as few times as possible
- B) On a failed read, except keeps the last value and raises the ok flag, never writing zero
- C) ui.poll() must be called every loop, even on a page with no buttons at all
- D) The firmware still reads sensors automatically the whole time, so there is no need to read them ourselves in the loop
- E) On a failed read, write 0 to the screen so the viewer knows there is a problem
Solution
A, B, C — The moment ui.* is first called, the firmware’s automatic reading stops, so we read ourselves synchronously and as few times as possible. Zero looks exactly like a real measured value, so the last value is kept and a stale-value lamp tells the viewer instead. poll is the moment CM55 gets to drain its queue — skip it and the screen hides widgets for about two seconds.
-
A team is building a fifth card with mic and wants to add a value from sensors.bmm350. Which statements are correct? Choose every correct one. (choose all that apply · objective 4)
- A) If you need both rms and peak, call mic.stats() once and unpack the values
- B) Calling mic.peak() then mic.rms() back to back gives values from the same audio window
- C) Values from bmm350.magnetic() should be reported as a deviation from a baseline in board units, not uT
- D) Passing sens=9 to mic.start() raises ValueError immediately
- E) Calling only magnetic() makes the calibration converge faster
Solution
A, C — rms(), peak(), level() each read the mic fresh once, about 32 ms apart, from different time windows; stats() gives three values from a single window. The unit of magnetic() still cannot be determined, so it must be compared against a baseline you measure yourself. sens outside 1–5 falls back to 3 silently, and only heading() moves the calibration forward.
Walk through all five moves of the solution. Open s08_dashboard.py in lesson 3.9’s solution folder and answer in your learning log.
- Point to the line that moves the ten-plus-second wait on the Eva Kit to before any card is built, and explain why there is no
sensors.init() - Compare the Panel coordinates for all four cards in the file against your team’s paper layout — which differ, and why
- Compute the direction name from
DIRSby hand for heading 10, 100 and 350 degrees - Write one line of reasoning for choosing Bar over Slider, and two lamps over a colour-changing label
- Point out how many lines in the loop “ask a sensor” per round, and which line keeps the screen from hiding its widgets
- If adding a sound card, write a plan for which
miccall runs how many times per round, and how much of the 200 ms budget would be left
Going further
Section titled “Going further”Lesson 3.9 has you fill seven blanks in the practice file s08_dashboard.py one at a time, then prove it by running continuously for 10 minutes,
recording the round count every two minutes to tell “hung” apart from “slow”.
Next lesson: Lesson 3.9 — Hands-on: the mini-HMI dashboard and the 10-minute soak test
Reflect
Section titled “Reflect”- Which card in the solution chose a widget differently from what you drew in lesson 3.7, and whose reasoning is better?
- If a sensor fails to read for three seconds, how would you want a viewer to know, without reading an error?
- A measurement system that still cannot say what its own unit is — which decisions can its numbers be used for, and which cannot they?
Review questions
Answer on your own first, then open the answer.
-
A teammate adds sensors.init() back at the top of the file and runs it on the Eva Kit. What happens? (Objective 1)
- เฟิร์มแวร์ปฏิเสธด้วย OSError เพราะ CM55 เป็นเจ้าของบัส I2C ของเซนเซอร์ทั้งชุด
- ผ่านไปได้ และทำให้การอ่านครั้งแรกเร็วขึ้น
- จำเป็นต้องมี ไม่งั้น motion() จะคืนศูนย์ตลอด
- จอค้าง 16 วินาทีแล้วทำงานต่อตามปกติ
Show answer
Answer: A. เฟิร์มแวร์ปฏิเสธด้วย OSError เพราะ CM55 เป็นเจ้าของบัส I2C ของเซนเซอร์ทั้งชุด
บน Eva Kit คอร์จอเป็นเจ้าของบัสเซนเซอร์และอ่านค่าเก็บไว้ให้ ฝั่ง Python จึงอ่านได้เลยโดยไม่ต้อง init และ init() ได้ OSError ทันที ส่วนการเงียบนานตอนอ่านครั้งแรกคือการรอคอร์จอเริ่มตอบ ซึ่งไฟล์ย้ายไปเกิดก่อนสร้างการ์ดด้วยการอ่านทิ้งหนึ่งครั้ง
-
Why does the CapSense card show the finger position with ui.Bar rather than ui.Slider, although they look alike? (Objective 2)
- ค่ามาจากนิ้วบนแถบ CapSense จริง Slider จะทำให้คนดูเข้าใจผิดว่าลากบนจอได้
- Bar กินงบน้อยกว่า Slider สองเท่า
- Slider รับค่าเกิน 50 ไม่ได้
- Bar วาดเร็วกว่า จึงไม่ทำให้คิวของ CM55 ล้น
Show answer
Answer: A. ค่ามาจากนิ้วบนแถบ CapSense จริง Slider จะทำให้คนดูเข้าใจผิดว่าลากบนจอได้
Slider คือของที่คนลาก ส่วน Bar คือของที่เครื่องแสดง หน้าตาต้องสอดคล้องกับสิ่งที่ทำได้จริง เลือก widget ตามว่าใครเป็นคนเปลี่ยนค่านี้ ไม่ใช่ตามว่าอันไหนดูดีกว่า
-
heading is 350.0 degrees. What does DIRS[int((heading + 22.5) / 45.0) % 8] give when DIRS = ["N", "NE", "E", "SE", "S", "SW", "W", "NW"]? (Objective 2)
- N
- NW
- W
- IndexError เพราะได้ index 8
Show answer
Answer: A. N
(350 + 22.5) / 45 = 8.27 ตัดเหลือ 8 แล้ว % 8 ได้ 0 คือ N การบวก 22.5 เลื่อนขอบช่องให้ทิศเหนือกินช่วง 337.5–22.5 องศา และ % 8 กันไม่ให้ index หลุดขอบ
-
Which statements about the dashboard's main loop are correct? Choose all that apply. (Objective 3)
- ใช้ motion() ครั้งเดียวแทน acceleration() กับ gyroscope() เพื่อแตะเซนเซอร์ให้น้อยครั้งที่สุด
- ถ้าอ่านพลาด except คงค่าเดิมไว้และยกธง ok ไม่เขียนศูนย์ทับ
- ui.poll() ต้องเรียกทุกลูป แม้หน้านั้นจะไม่มีปุ่มให้กด
- เฟิร์มแวร์ยังอ่านเซนเซอร์อัตโนมัติให้ตลอด จึงไม่ต้องอ่านเองในลูป
- ถ้าอ่านพลาดให้เขียน 0 ลงจอ คนดูจะได้รู้ว่ามีปัญหา
Show answer
Answer: A. ใช้ motion() ครั้งเดียวแทน acceleration() กับ gyroscope() เพื่อแตะเซนเซอร์ให้น้อยครั้งที่สุด · B. ถ้าอ่านพลาด except คงค่าเดิมไว้และยกธง ok ไม่เขียนศูนย์ทับ · C. ui.poll() ต้องเรียกทุกลูป แม้หน้านั้นจะไม่มีปุ่มให้กด
เมื่อเรียก ui.* ครั้งแรก การอ่านอัตโนมัติของเฟิร์มแวร์หยุด เราจึงอ่านเองแบบ sync และอ่านให้น้อยครั้งที่สุด ศูนย์หน้าตาเหมือนค่าที่วัดมาจริง จึงคงค่าเดิมแล้วให้ไฟค่าค้างบอก ส่วน poll คือจังหวะที่ CM55 ได้ระบายคิว ไม่เรียกแล้วจอจะซ่อน widget ราวสองวินาที
-
A team builds a fifth card with mic and wants to add values from sensors.bmm350. Which statements are correct? Choose all that apply. (Objective 4)
- ต้องการทั้ง rms และ peak ให้เรียก mic.stats() ครั้งเดียวแล้วแกะค่าออกมา
- เรียก mic.peak() แล้ว mic.rms() ติดกันได้ค่าจากหน้าต่างเสียงเดียวกัน
- ค่าจาก bmm350.magnetic() ให้รายงานเป็นค่าเบี่ยงจากเส้นฐานในหน่วยบอร์ด ไม่ใช่ uT
- ใส่ sens=9 ใน mic.start() จะได้ ValueError ทันที
- การเรียกแต่ magnetic() ทำให้ค่าคาลิเบรตลู่เข้าเร็วขึ้น
Show answer
Answer: A. ต้องการทั้ง rms และ peak ให้เรียก mic.stats() ครั้งเดียวแล้วแกะค่าออกมา · C. ค่าจาก bmm350.magnetic() ให้รายงานเป็นค่าเบี่ยงจากเส้นฐานในหน่วยบอร์ด ไม่ใช่ uT
rms() peak() level() แต่ละตัวอ่านไมค์ใหม่หนึ่งครั้ง ราว 32 ms และคนละหน้าต่างเวลา stats() ให้สามค่าจากหน้าต่างเดียว หน่วยของ magnetic() ยังตัดสินไม่ได้จึงเทียบกับเส้นฐานที่วัดเอง sens นอกช่วง 1–5 ตกกลับเป็น 3 เงียบ ๆ และมีแต่ heading() ที่ขยับตัวคาลิเบรต
Cite this lesson
If you teach from this lesson or reuse it in slides or documents, credit it with the text below. If you changed it, add (adapted) after the title.
"Building the dashboard: four cards in one loop" from TESA Open Knowledge by the Thai Embedded Systems Association (TESA), https://github.com/tesaiot/tesa-qualification-program, licensed under CC BY-NC 4.0
Thai attribution: "ประกอบแดชบอร์ด: สี่การ์ดในลูปเดียว" จาก TESA Open Knowledge โดยสมาคมสมองกลฝังตัวไทย (Thai Embedded Systems Association: TESA) https://github.com/tesaiot/tesa-qualification-program สัญญาอนุญาต CC BY-NC 4.0
Lesson link: https://tesaiot.github.io/tesa-qualification-program/en/courses/aiot-micropython/m03-sensor-hmi/l08-dashboard-build/
This lesson adapts the source below; keep its credit too.
https://github.com/Advance-Innovation-Centre-AIC/embedded-systems-for-aiot-developer/blob/a80bbe88a34bcb9bb8d991f42f9252b77cdab079/session-08.html (slides 18–31)
TESA Open Knowledge · © 2026 สมาคมสมองกลฝังตัวไทย (TESA) · CC BY-NC 4.0
Content is licensed CC BY-NC 4.0. Reuse it non-commercially and credit the Thai Embedded Systems Association (TESA) every time. · How to cite TESA