Analog and touch: the ADC, the potentiometer and CapSense
Module 2 — From Screen to Hardware · Slides: slides.md · Module overview · Course page
Read the knob through the ADC and the touch buttons and slider through CapSense, tell which numbers you can trust and which you still have to measure yourself, and understand why the value keeps shaking even when your hand is still.
Objectives
Section titled “Objectives”By the end of this lesson you will be able to:
- Choose sensors.pot.read() / .percent() / .voltage() to suit the reader, convert a raw value to percent with the 2^n − 1 denominator (for example 40915 to 62.43%), and state why the voltage figure cannot be trusted until the real board V_ref is measured
- Explain that 0-65535 is the API scale, not the ADC resolution, and find the real resolution from the step size of read() on the real board (steps of k mean 65536/k levels), recorded in your learning log
- Explain how CapSense works (a finger adds capacitance to a copper pad and the PSoC 4000T decides from the difference against a baseline), and fix buttons that report inverted the right way, without touching the code
- Choose sensors.snapshot() over asking for values one by one, use the sequence field to check whether the loop is re-reading the same sample, and name the five functions the Eva Kit rejects with OSError and why
Before you start
Section titled “Before you start”Following on from lessons 2.4–2.6, the things reused today are ui.Label, ui.Bar, ui.Panel, calling ui.poll() every loop round, and time.sleep_ms()
to control timing. The direction of data flow is now reversed: lessons 2.7–2.9 have the hardware command the screen.
Keep your learning log open, because this lesson has several numbers the documentation has not yet measured, which you must record from your team’s own board.
If you have a multimeter, have it ready, and when plugging in the board’s USB cable, do not rest a finger on the touch pad (the reason is in the concepts section, under baseline).
- Equipment: an Eva Kit or TESAIoT Dev Kit board with the BENTO MicroPython firmware installed, or the BENTO Emulator in BENTO IDE
- Before this: Lesson 2.6 — Hands-on: your touch control panel and the next widgets
See it work first
Section titled “See it work first”On the Eva Kit, open the Controls menu and turn the knob slowly — the curved needle on screen sweeps along with your hand at once. The Dev Kit has no such menu;
open the GPIO & RGB Matrix page instead and turn VR1 on the base, watching the VR1-4 bars. For the touch slider, run 01_capsense_dimmer.py
and drag your finger, then stop your hand completely still and stare at the percentage number for ten more seconds — it is still moving even though nobody is touching it.
This is not a broken board and not a bug in the program; it is the nature of reading an analogue value, and it is the question this set of lessons will answer.
Concepts
Section titled “Concepts”A knob does not send a number. It is a hand-adjusted voltage divider: the wiper splits a resistor track into two parts, so turning it halfway gives half the voltage (on the Eva Kit this is R34, a 10 kΩ linear resistor, which shares its path with thermistor TH1, so the two cannot be used at the same time — the default is the pot). The SAR ADC circuit inside the chip holds the voltage steady, then guesses one bit at a time through a binary search, rounding down to the nearest step. One conversion therefore takes time, it is not instant, and the value Python reads is the result of a guess that has already finished, not the voltage at the exact instant you read the variable.
One knob has three faces from the same single measurement. read() returns 0-65535, for looking at raw resolution and jitter; percent() returns 0-100,
which fits ui.Arc / ui.Bar; and voltage() is for comparing against a multimeter. You never need to call sensors.init() (on the Eva Kit, calling it raises OSError).
On the Eva Kit, the display core (CM55) reads the knob and Python picks up the value from a snapshot; on the Dev Kit, CM33 reads VR1 on the QWA309 base directly.
The conversion formula is p = raw / (2^n − 1) × 100%, while the size of one step uses 2^n — do not mix up the denominator — and 65535 is only the API’s scale.
The firmware reads the ADC at 12 bits (0-4095) and then scales it up to 0-65535, so a large number and a fine-grained number are two separate things.
Be careful with the voltage figure: both boards’ schematics specify a 1.8 V reference voltage, but voltage() multiplies by an assumed 3.3 V, and nobody has yet confirmed it with a meter,
so the voltage number cannot yet be spoken of as true.
CapSense has no switches at all — only copper pads under plastic. A finger is a conductor connected to ground through the body; as it approaches, the pad’s capacitance rises.
The chip charges it and times a slightly longer discharge, concluding a finger is present. It measures the closeness of a conductor, not pressure, which is why a thick rubber glove does not register.
On the Eva Kit, buttons CSB1 / CSB2 are CSX type (mutual-capacitance) with separate Tx and Rx pins; the slider is five electrodes averaged into a position from 0-100.
This work is done by a separate PSoC 4000T chip; the display core reads it over I2C (address 0x08), three bytes at a time — button 0, button 1, and the slider position —
and Python asks the display core in turn. In code we only ever see btn0, btn1, slider, identically on both boards.
The chip does not decide from the raw value, but from the difference against a baseline — the value when no finger is present. The baseline slowly tracks changes like humidity and temperature, but cannot keep up with a touch, and on our board it is captured only once, at boot, not when you press Program to Device. If a finger rests on the pad at boot, the button reports inverted for the whole lesson. The fix is to lift every finger completely and unplug and replug the USB cable — running the script again does not capture a new baseline — and on the Dev Kit, never flip a switch on the base, because those switches are power switches.
The sensors module on the Eva Kit has fifteen names: nine functions plus six sub-sensors and a diagnostic. Five functions — init(), scan(), push(),
live_push(), auto() — are rejected by the Eva with OSError, because all five need to drive the SCB0 bus, which the display core holds. On the Dev Kit these five do work,
but that does not mean you should call them (live_push() loops until Ctrl+C, and auto() leaves a background task running after the script ends). This course uses sensors.snapshot(),
which returns a dict with three groups — pot, capsense, bmi270 — read at the same instant, in the identical shape on both boards, unlike read_all(),
which on the Dev Kit returns pot as a float. Every group has a sequence field; if this number has not moved between two rounds, we are reading the same sample again.
The display core reads pot and capsense every 200 ms, so a loop faster than that will certainly meet the same value.
Worked example
Section titled “Worked example”01_capsense_dimmer.py— before running, predict what the raw value fromslider()will do when you release your finger, and whether the LED will turn off. The file first plays a demo pattern (the numbers it prints are not real values yet), then lets you drag for real. Watch the two lines on the chart, told apart by shape, and work out that the code decides “finger released” from the value not moving forIDLE_ROUNDSrounds in a row, not fromslider() == 0, which could just mean a touch at the far-left end. Try changingIDLE_ROUNDSand see how sooner or later the “released” label appears, and notice that the light can hold a level becausehold()is called again every round.09_sensors_api_tour.py— before running, predict which rows on your team’s board will be green (callable) and which will be orange (rejected or skipped), then run and compare. Every row is the result of a real call made in that round; the board’s full reply text is in the console. On the Dev Kit this file deliberately skipspush(),live_push(),auto(), because they really run. It ends withprint(dir(sensors))— the list on the actual board is the truth, and the table in the slides is only a map.
| File | What this file teaches |
|---|---|
| examples/01_capsense_dimmer.py | A touch slider as a dimmer switch |
| examples/09_sensors_api_tour.py | Call every name in the sensors module, and see who answers and who refuses |
The slides for this lesson also refer to a file that lives in another lesson:
- m02-ui-to-hardware/l06-touch-panel-lab/examples/09_scale_led_spinbox.py — three widgets that separate an HMI screen from a toy screen
Screens from the BENTO Emulator for this lesson’s examples (click a file name to open the code)
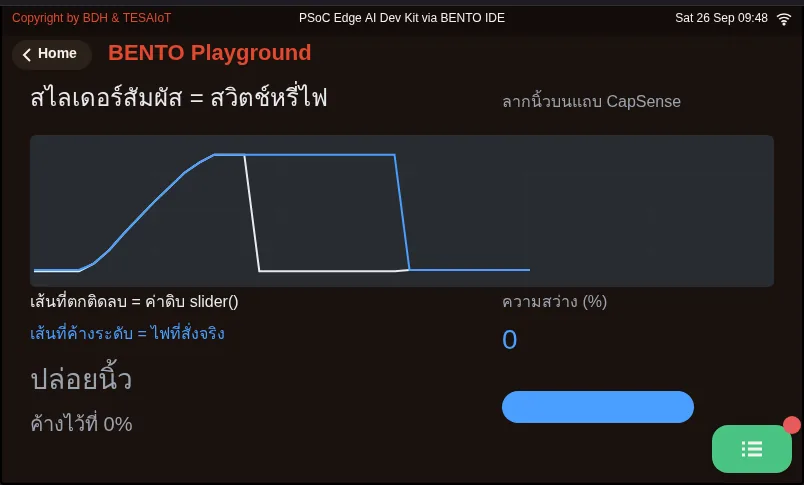
01_capsense_dimmer.py A touch slider as a dimmer switch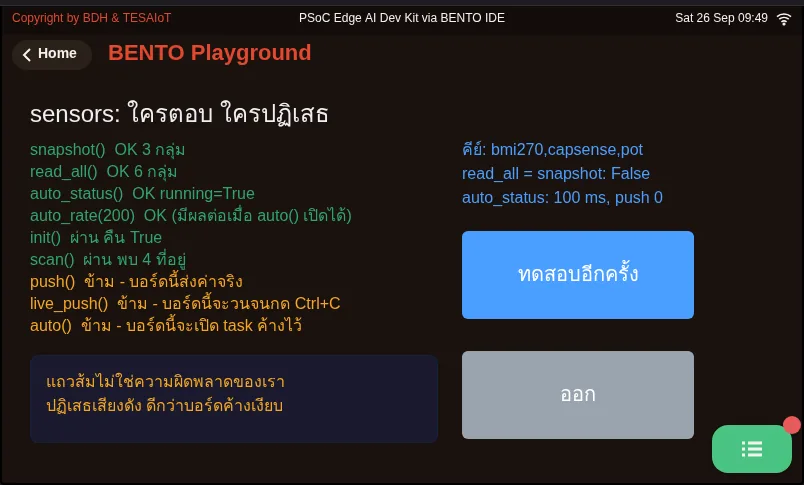
09_sensors_api_tour.py Call every name in the sensors module, and see who answers and who refusesCheck your understanding
Section titled “Check your understanding”The same questions are in quiz.yaml for automatic marking.
-
sensors.pot.read() returns 40915. Which statement is most correct? (choose one · objective 1)
- A) That is 62.43% of full scale, but it still cannot be stated in volts until the real board’s V_ref is known
- B) That is definitely 2.06 V, because voltage() multiplies by 3.3 V, which is the knob’s real voltage
- C) That means the board’s ADC really has 65536 levels of resolution
- D) That value only appears because sensors.init() was called first
Solution
A — 40915 / 65535 × 100 gives 62.43%, but voltage() multiplies by an assumed 3.3 V, while the schematic specifies 1.8 V and nobody has confirmed it by measurement. 65535 is the API’s scale, and init() never needs to be called at all.
-
You turn the knob slowly and see values from read() step by exactly 16 every time. What is the real measurement resolution? (choose one · objective 2)
- A) 4096 levels
- B) 65536 levels, following the scale read() returns
- C) 16 levels
- D) Cannot be told until V_ref is known
Solution
A — A step of k means 65536/k levels, that is 65536/16 = 4096, matching the firmware reading a 12-bit ADC and scaling it to 0-65535. The number of levels can be counted from the raw value’s step size, with no need to know the reference voltage.
-
A touch button has reported True when nobody is touching it and False when touched, from the start of the lesson. What is the correct fix? (choose one · objective 3)
- A) Lift every finger off the touch pad completely, then unplug the USB cable and plug it back in
- B) Press Program to Device to run the script again
- C) Invert True/False in our own code
- D) On the Dev Kit, flip a switch on the base to reset it
Solution
A — The baseline is captured at boot by the driver on the display core. If a finger rests on the pad at that moment, the chip remembers “finger present” as the normal state. Running the script again does not capture a new baseline, and the switches on the Dev Kit’s base are power switches, not a reset button.
-
Your loop rests 50 ms and reads sensors.snapshot() every round, and you notice d[‘pot’][‘sequence’] does not move for several rounds in a row. What does that mean? (choose one · objective 4)
- A) We are reading the same value again, because the display core reads the knob every 200 ms and our loop is faster than that
- B) The knob is broken and the board must be replaced
- C) The ADC is stuck and sensors.init() must be called again
- D) The value has been filtered until it is steady — a good sign
Solution
A — sequence is that group’s sample counter; if it has not moved, it is still the same sample, not that the world has gone still. It is a tool that tells you whether your loop’s tempo has outrun the data’s real rate.
-
Which statements about the sensors module on the Eva Kit are correct? Choose every correct one. (choose all that apply · objective 4)
- A) init(), scan(), push(), live_push(), auto() are rejected with OSError because the SCB0 bus belongs to the display core
- B) auto() is the most dangerous, because it starts a background task that drives the bus instead; the hang continues after that line finishes, and try/except cannot help
- C) read_all() reads more than snapshot(), so it should be used instead
- D) sensors.sht40 works the same as on the Dev Kit
- E) This course uses snapshot(), because it gives an identically shaped dict on both boards
Solution
A, B, E — All five functions end up driving the bus the display core holds, so the Eva rejects them. read_all() on the Eva is just one line that calls snapshot() in turn, and sht40 does not exist in the Eva’s module at all (printing it raises AttributeError).
Measure the real numbers on your team’s board. Record every item in your learning log.
- Hold your hand still on the knob for ten seconds, then record the range the percentage shakes up and down within
- Print
sensors.pot.read()to the console in a short loop, turn the knob slowly, and see how much the value steps by. If it steps by a constant k, the real resolution is 65536/k levels - Turn the knob to its limit and read
pot.read()andpot.voltage(); if you have a multimeter, measure at the knob’s pin (Eva Kit pin P15[1], Dev Kit VR1’s middle pin) and note whether the numbers agree - Dev Kit teams: record which way VR1 turns to increase the value, since the documentation has not yet measured it — do not reuse the number for R34
- Run
09_sensors_api_tour.pyand record which of the nine rows on your team’s board answer and which refuse, compared with the table in the slides
Going further
Section titled “Going further”Lesson 2.8 settles the shaking numbers without cheating the value, using dsp.EMA and dsp.Median, then walks through the gauge code that puts the raw value next to the filtered one.
Next lesson: Lesson 2.8 — Filtering a signal: EMA and Median, then walking through a gauge
Reflect
Section titled “Reflect”- In your team’s own work, what values are measured as analogue, and what unit should that number display for the person reading the screen?
- If your team’s device sits somewhere humid, or the user wears gloves, is a touch button still a good choice, and why or why not?
Review questions
Answer on your own first, then open the answer.
-
sensors.pot.read() returns 40915. Which statement is most correct? (Objective 1)
- คิดเป็น 62.43% ของช่วงเต็มสเกล แต่ยังบอกเป็นโวลต์ไม่ได้จนกว่าจะรู้ V_ref ของบอร์ดจริง
- คิดเป็น 2.06 V แน่นอน เพราะ voltage() คูณด้วย 3.3 V ซึ่งเป็นแรงดันจริงของลูกบิด
- แปลว่า ADC ของบอร์ดละเอียด 65536 ขั้นจริง
- ค่านี้ได้มาเพราะเรียก sensors.init() ไว้ก่อนแล้ว
Show answer
Answer: A. คิดเป็น 62.43% ของช่วงเต็มสเกล แต่ยังบอกเป็นโวลต์ไม่ได้จนกว่าจะรู้ V_ref ของบอร์ดจริง
40915 / 65535 × 100 ได้ 62.43% แต่ voltage() คูณด้วย 3.3 V ที่สมมติไว้ ขณะที่ผังบอร์ดระบุ 1.8 V และยังไม่มีใครวัดยืนยัน ส่วน 65535 เป็นสเกลของ API และไม่ต้องเรียก init() เลย
-
You turn the knob slowly and see read() move in equal steps of 16. What is the real resolution of the measurement? (Objective 2)
- 4096 ขั้น
- 65536 ขั้น ตามสเกลที่ read() คืน
- 16 ขั้น
- บอกไม่ได้จนกว่าจะรู้ V_ref
Show answer
Answer: A. 4096 ขั้น
ก้าวละ k หมายถึง 65536/k ขั้น คือ 65536/16 = 4096 ตรงกับที่เฟิร์มแวร์อ่าน ADC 12 บิตแล้วขยายเป็น 0-65535 จำนวนขั้นนับจากก้าวของค่าดิบได้โดยไม่ต้องรู้แรงดันอ้างอิง
-
A touch button reports True when nobody touches it and False when touched, since the start of the lesson. What is the right fix? (Objective 3)
- ยกนิ้วออกจากแผ่นสัมผัสให้หมด แล้วถอดสาย USB เสียบกลับ
- กด Program to Device เพื่อรันสคริปต์ใหม่
- กลับค่า True/False ในโค้ดของเรา
- บน Dev Kit โยกสวิตช์บนฐานเพื่อรีเซ็ต
Show answer
Answer: A. ยกนิ้วออกจากแผ่นสัมผัสให้หมด แล้วถอดสาย USB เสียบกลับ
baseline ถูกเก็บตอนบอร์ดบูตโดยไดรเวอร์บนคอร์จอ ถ้ามีนิ้วค้างตอนนั้น ชิปจะจำสภาพมีนิ้วเป็นสภาพปกติ การรันสคริปต์ใหม่ไม่ได้เก็บ baseline ใหม่ และสวิตช์บนฐาน Dev Kit คือสวิตช์ไฟ ไม่ใช่ปุ่มรีเซ็ต
-
Your loop sleeps 50 ms and reads sensors.snapshot() each round, and d['pot']['sequence'] stays the same for several rounds. What does it mean? (Objective 4)
- เราอ่านค่าเดิมซ้ำ เพราะคอร์จออ่านลูกบิดทุก 200 ms และลูปของเราเร็วกว่านั้น
- ลูกบิดเสีย ต้องเปลี่ยนบอร์ด
- ADC ค้าง ต้องเรียก sensors.init() ใหม่
- ค่าถูกกรองจนนิ่งแล้ว เป็นสัญญาณที่ดี
Show answer
Answer: A. เราอ่านค่าเดิมซ้ำ เพราะคอร์จออ่านลูกบิดทุก 200 ms และลูปของเราเร็วกว่านั้น
sequence คือเลขนับตัวอย่างของกลุ่มนั้น ถ้าไม่ขยับแปลว่ายังเป็นตัวอย่างเดิม ไม่ใช่ว่าโลกหยุดนิ่ง มันจึงเป็นเครื่องมือบอกว่าจังหวะลูปเร็วเกินความจริงของข้อมูลหรือยัง
-
Which statements about the sensors module on the Eva Kit are correct? Choose all that apply. (Objective 4)
- init() scan() push() live_push() auto() ถูกปฏิเสธด้วย OSError เพราะบัส SCB0 เป็นของคอร์จอ
- auto() อันตรายที่สุด เพราะมันเปิดงานเบื้องหลังที่ขับบัสแทน อาการค้างจึงอยู่ต่อหลังบรรทัดนั้นจบ และ try/except ช่วยไม่ได้
- read_all() อ่านได้มากกว่า snapshot() จึงควรใช้แทน
- sensors.sht40 ใช้ได้เหมือนบน Dev Kit
- คอร์สนี้ใช้ snapshot() เพราะได้ dict หน้าตาเดียวกันทั้งสองบอร์ด
Show answer
Answer: A. init() scan() push() live_push() auto() ถูกปฏิเสธด้วย OSError เพราะบัส SCB0 เป็นของคอร์จอ · B. auto() อันตรายที่สุด เพราะมันเปิดงานเบื้องหลังที่ขับบัสแทน อาการค้างจึงอยู่ต่อหลังบรรทัดนั้นจบ และ try/except ช่วยไม่ได้ · E. คอร์สนี้ใช้ snapshot() เพราะได้ dict หน้าตาเดียวกันทั้งสองบอร์ด
ห้าฟังก์ชันจบที่การขับบัสที่คอร์จอถือไว้ Eva จึงปฏิเสธ read_all() บน Eva คือบรรทัดเดียวที่เรียก snapshot() ต่อ และ sht40 ไม่มีในโมดูลของ Eva เลย (พิมพ์แล้วได้ AttributeError)
Cite this lesson
If you teach from this lesson or reuse it in slides or documents, credit it with the text below. If you changed it, add (adapted) after the title.
"Analog and touch: the ADC, the potentiometer and CapSense" from TESA Open Knowledge by the Thai Embedded Systems Association (TESA), https://github.com/tesaiot/tesa-qualification-program, licensed under CC BY-NC 4.0
Thai attribution: "อนาล็อกและสัมผัส: ADC ลูกบิด และ CapSense" จาก TESA Open Knowledge โดยสมาคมสมองกลฝังตัวไทย (Thai Embedded Systems Association: TESA) https://github.com/tesaiot/tesa-qualification-program สัญญาอนุญาต CC BY-NC 4.0
Lesson link: https://tesaiot.github.io/tesa-qualification-program/en/courses/aiot-micropython/m02-ui-to-hardware/l07-adc-capsense/
This lesson adapts the source below; keep its credit too.
https://github.com/Advance-Innovation-Centre-AIC/embedded-systems-for-aiot-developer/blob/a80bbe88a34bcb9bb8d991f42f9252b77cdab079/session-05.html (slides 1–20)
TESA Open Knowledge · © 2026 สมาคมสมองกลฝังตัวไทย (TESA) · CC BY-NC 4.0
Content is licensed CC BY-NC 4.0. Reuse it non-commercially and credit the Thai Embedded Systems Association (TESA) every time. · How to cite TESA