Read a sensor and watch the value change
Objectives
Section titled “Objectives”- Read
potandazfromsensors.snapshot()and show them on screen so they change as you touch things - Explain why the code checks keys with
inand catchesOSError - Complete a warning-light program that works correctly when the board is tilted
Before you start
Section titled “Before you start”- In the previous lesson, why did we have to convert the number with
str()before passing it toSeg7? - From the first lesson, which step of “sense, decide, act” is a sensor in?
See it work first
Section titled “See it work first”- Open examples/01_knob_and_tilt.py in BENTO IDE and run it in the BENTO Emulator
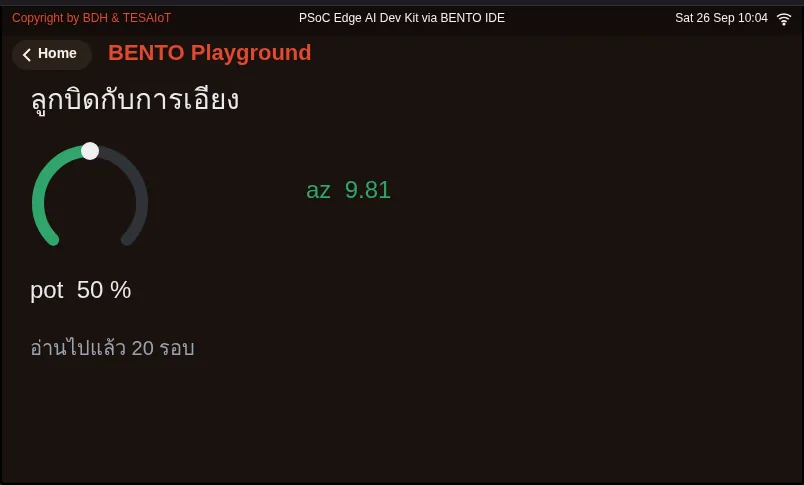
- Press HW to open the simulated hardware panel, then turn the POTEN knob and watch the ring on screen sweep along with it
- Drag the tilt pad on the same panel and watch the
aznumber change, and the colour turn orange when tilted a lot
If you use a real board, turn the knob on the board and tilt the board by hand; the result is the same.
Concepts
Section titled “Concepts”1. Ask once, get every sensor
Section titled “1. Ask once, get every sensor”sensors.snapshot() returns a single bundle of data (a dict) with several sensor values all read at the same moment. It looks roughly like this.
{ "pot": {"percent": 42.5, ...}, # knob rotation 0-100 "bmi270": {"ax": 0.1, "ay": -0.2, "az": 9.8, ...}, # acceleration, in m/s^2 "capsense": {"btn0": False, "btn1": False, "slider": 0, ...}, # touch pad}The real value has other fields too, such as a round counter, sequence, inside each sub-bundle.
The knob is a variable resistor; the board reads a voltage from it with an ADC (analog-to-digital converter) and converts it to a percentage.
bmi270 is a motion-sensing chip; when lying flat, gravity keeps az around 9.8, and this value drops as it is tilted.
2. Ask before you take
Section titled “2. Ask before you take”The keys in the bundle are only the ones the board actually has; they are not always all present. Writing s["pot"] directly on a board with no knob would stop the program with a KeyError.
The safe way is to ask first with if "pot" in s:, and only then read the value.
3. A real board may not be ready yet
Section titled “3. A real board may not be ready yet”Right after power-on, a real board may not be ready to answer about sensors for a moment. During that time, snapshot() throws an OSError.
It does not mean the code is wrong, so we wrap it with try / except OSError and try again next time round.
In the emulator, this line almost never throws an OSError. This is a good example of the principle from the previous lesson:
a program that passes in the emulator must still be written to allow for a real board.
Worked example
Section titled “Worked example”examples/01_knob_and_tilt.py is a shortened version of
examples/s01/12_every_sense_at_once.py
from the AIoT in Action course.
- Move 1: place things on screen once, outside the loop The
ui.Arcring, a label for the pot value, a label for the az value, and a status label - Move 2: loop and ask every 200 ms for a total of 20 seconds, using
time.ticks_ms()andtime.ticks_diff()to time it - Move 3: ask for the value safely
try: s = sensors.snapshot(); onOSError, wait and try again - Move 4: ask before you take
if "pot" in s:, then convert the percentage to an integer withint()before passing it to the ring - Move 5: change colour by meaning Green when lying flat, orange when tilted
Screens from the BENTO Emulator for this lesson’s examples (click a file name to open the code)
Practice
Section titled “Practice”Open practice/tilt_alarm.py. This lesson has 4 blanks to fill in, more than the previous lesson, because you have already seen every command you need.
- Blank 1: ask for the whole sensor bundle
- Blank 2: the condition that the key
bmi270is in the bundle - Blank 3: turn the light on together with the label “tilted”
- Blank 4: turn the light off together with the label “lying flat”
Solution
Section titled “Solution”Try it yourself for at least 15 minutes first, then open solution/tilt_alarm.py and compare.
Check your understanding
Section titled “Check your understanding”Answer the questions in quiz.yaml. A score of 80% or more passes.
Make Change the warning light so it uses the knob to set the threshold instead of a fixed number, for example turning the knob to 50% means a middle-of-the-road threshold. Take a screenshot with the warning light on, keep it in your portfolio, and write one line about where the threshold you chose came from.
Going further
Section titled “Going further”Real sensor values are never perfectly still; there is always some noise mixed in. The AIoT in Action course has an example that smooths the value out with a filter,
such as examples/s05/06_ema_time_constant.py,
and how to convert the raw ADC reading to volts in examples/s05/05_adc_counts_to_volts.py.
Reflect
Section titled “Reflect”If you were to use this warning light on a real warehouse shelf, how would you set the threshold, and how would you stop the light from flickering rapidly when the value hovers right around the threshold?
Review questions
Answer on your own first, then open the answer.
-
If s = sensors.snapshot(), which expression reads the knob percentage? (Objective 1)
- s["percent"]
- s["pot"]["percent"]
- s.pot.percent()
- sensors.pot()
Show answer
Answer: B. s["pot"]["percent"]
snapshot() คืน dict ซ้อน dict ก้อนย่อย "pot" มีช่อง "percent" อยู่ข้างใน
-
With the board lying flat on a table, roughly what should az read? (Objective 1)
- 0
- 9.8
- 100
- -50
Show answer
Answer: B. 9.8
แรงโน้มถ่วงของโลกราว 9.8 m/s^2 ชี้ลงแกน z ตอนวางราบ พอเอียง ค่านี้จะลดลง
-
Why write if "pot" in s before reading s["pot"]? (Objective 2)
- เพื่อให้โปรแกรมเร็วขึ้น
- เพราะคีย์ในก้อนมีเท่าที่บอร์ดมีให้ ถ้าไม่มีแล้วอ่านตรง ๆ จะได้ KeyError
- เพราะ MicroPython อ่าน dict ได้ครั้งเดียว
- เพื่อเปิดลูกบิดให้ทำงาน
Show answer
Answer: B. เพราะคีย์ในก้อนมีเท่าที่บอร์ดมีให้ ถ้าไม่มีแล้วอ่านตรง ๆ จะได้ KeyError
บอร์ดต่างรุ่นมีเซนเซอร์ไม่เท่ากัน การถามก่อนหยิบทำให้โค้ดชุดเดียวรันได้ทุกบอร์ดโดยไม่หยุดกลางทาง
-
On a real board, if sensors.snapshot() raises OSError right after power-up, what should the program do? (Objective 2)
- หยุดโปรแกรมทันที เพราะเซนเซอร์เสีย
- ดักไว้ด้วย try/except แล้วรอลองใหม่รอบหน้า
- รีเซ็ตบอร์ดทุกครั้ง
- เปลี่ยนไปใช้อีมูเลเตอร์แทน
Show answer
Answer: B. ดักไว้ด้วย try/except แล้วรอลองใหม่รอบหน้า
ช่วงแรกหลังเปิดเครื่องบอร์ดอาจยังไม่พร้อมตอบ ไม่ใช่ของเสีย ดักไว้แล้วลองใหม่ คือวิธีที่ตัวอย่างใช้
-
Order the lines of the tilt warning. (Objective 3)
- if az < LIMIT:
- s = sensors.snapshot()
- led.on()
- az = s["bmi270"]["az"]
Show answer
Correct order: B. s = sensors.snapshot() → D. az = s["bmi270"]["az"] → A. if az < LIMIT: → C. led.on()
ขอค่าก่อน หยิบ az ออกมา เทียบกับเกณฑ์ แล้วจึงสั่งไฟ (ในโค้ดจริงต้องถาม "bmi270" in s ก่อนหยิบ az ด้วย)
Cite this lesson
If you teach from this lesson or reuse it in slides or documents, credit it with the text below. If you changed it, add (adapted) after the title.
"Read a sensor and watch the value change" from TESA Open Knowledge by the Thai Embedded Systems Association (TESA), https://github.com/tesaiot/tesa-qualification-program, licensed under CC BY-NC 4.0
Thai attribution: "อ่านเซนเซอร์แล้วดูค่าเปลี่ยน" จาก TESA Open Knowledge โดยสมาคมสมองกลฝังตัวไทย (Thai Embedded Systems Association: TESA) https://github.com/tesaiot/tesa-qualification-program สัญญาอนุญาต CC BY-NC 4.0
Lesson link: https://tesaiot.github.io/tesa-qualification-program/en/courses/explorer/m02-sense-and-connect/l01-read-a-sensor/
This lesson adapts the source below; keep its credit too.
https://github.com/Advance-Innovation-Centre-AIC/embedded-systems-for-aiot-developer/blob/a80bbe88a34bcb9bb8d991f42f9252b77cdab079/examples/s01/12_every_sense_at_once.py · ตัวอย่างโค้ดทุกไฟล์ในหลักสูตรนี้ย่อและดัดแปลงจากตัวอย่างของ AIoT in Action (MIT) ใช้ API ของ BENTO MicroPython ตามที่ตัวอย่างต้นฉบับใช้ ไม่มีการเพิ่มคำสั่งใหม่
TESA Open Knowledge · © 2026 สมาคมสมองกลฝังตัวไทย (TESA) · CC BY-NC 4.0
Content is licensed CC BY-NC 4.0. Reuse it non-commercially and credit the Thai Embedded Systems Association (TESA) every time. · How to cite TESA