Hands-on: the potentiometer gauge and touch slider
Module 2 — From Screen to Hardware · Slides: slides.md · Module overview · Course page
Fill the six blanks in the practice file until the knob and touch-slider gauge works fully on the board with raw and filtered values side by side, then explain why the solution judges the threshold on the filtered value and fix the symptoms that show no error.
Objectives
Section titled “Objectives”By the end of this lesson you will be able to:
- Fill the six blanks in practice/s05_pot_capsense.py one at a time, running after each, until the gauge meets the MVP criteria on the board: the bar follows the knob over the full 0-100 range, the threshold stops by itself at 10 and 95, one warning lamp at a time lights when crossing the threshold, the touch bar follows the finger, the copper-button lamps light the correct one, and the on-screen numbers change once per second
- Explain the solution behaviour, namely why the five reads share one try with a fresh flag, why the warning lamps judge ema_pct rather than the raw value (to avoid alarm chattering), and how the two bottom-right lines differ when alpha is changed to 0.05 and to 0.8
- Diagnose symptoms that show no error from the trap table to their real cause (such as filtered equal to raw, a ui.Scale that never moves, a threshold box showing 0070, inverted touch buttons) and pick the example file that answers that symptom
Before you start
Section titled “Before you start”Following on from lesson 2.8, which took the gauge code apart into five moves, today you make values flow into that screen yourself. Before writing code, read all three pages of the “common traps” table in the slides. On the board’s screen, keep the BENTO Playground card open, and when plugging in the USB cable, lift every finger off the touch pad completely (the baseline is captured at boot). On the Dev Kit, never flip a switch on the base, since it is a power switch, not a reset button. Have your learning log ready to record voltage readings and to photograph the screen.
- Equipment: an Eva Kit or TESAIoT Dev Kit board with the BENTO MicroPython firmware installed, or the BENTO Emulator in BENTO IDE
- Before this: Lesson 2.8 — Filtering: EMA vs Median, then the gauge code
Concepts
Section titled “Concepts”The practice file already has the full four-card screen with 33 pieces written (one over the course budget of 32 — see the slides for a suggestion on which piece to cut). Do not touch it; our job is making values flow into it. The file presets starting values
(pct = 0.0, slider = 0, events = []), so it already runs before you fill in anything. Use this as a tool: fill in one blank at a time, run after each, and watch the screen “wake up” piece by piece.
If it breaks, you know right away it broke at whatever you just added.
The solution makes three decisions you must be able to explain. First, all five reads sit inside the same try; if the display core does not answer this round, the whole screen’s values stay as one consistent set,
never half old and half new, and the fresh flag tells the value-quality line that what you see is from a previous round. Second, over = ema_pct >= th uses the filtered value.
If it used the raw value, the lamps would flicker back and forth whenever the value sat close to the threshold. Real control panels call this alarm chattering, and it is one reason people on the shop floor turn off warning sounds entirely.
Third, the bar and lamp update every 200 ms round, but the number is rewritten once per second, because the eye can read a position at once but cannot keep up with a number running five times a second.
The trap table has twenty-three rows, and many show no error at all. Some come from the order of operations against the hardware (a finger left resting during boot, or the display core not yet answering right after a reset).
Some come from a value silently clamped (Median(window=4) gives 5, SMA(window=200) gives 64). Some come from misunderstanding a widget (ui.Scale does not accept .value();
a spinbox does not change value on a touch, so it needs +/- buttons; .color() on ui.Bar sets the track, not the value bar). When you get stuck, start from the symptom in the table, not by fixing code that was never wrong.
When there is a known, limited set of choices — such as the six filters — a “next” button hides the whole list. ui.Roller keeps the choices spread out and always highlights the selected one.
Two things worth knowing, already measured: value= at creation time is both the selected row and the Thai font size, so it is never set at creation — command .value(n) afterward instead —
and .prop(ui.PROP_VISIBLE_ROWS, n) overwrites the height set by h=, so pick one or the other.
Worked example
Section titled “Worked example”Must be finished within this lesson (about 40 minutes total; if you have already done 01 and 06 in lessons 2.7 and 2.8, do only 05)
05_adc_counts_to_volts.py(10 minutes) — before pressing forward, predict how much coarser the steps get as the bit count drops, and watch the last step, where the number claims more bits than the real steps you can actually catch. A number can look prettier without being more precise.01_capsense_dimmer.pyfrom lesson 2.7 (15 minutes) — drag your finger and release it, and see thatslider()equalling 0 does not mean the finger was released.06_ema_time_constant.pyfrom lesson 2.8 (15 minutes) — read the tau of each alpha, then pick the MVP’s alpha from the numbers.
Open whichever answers what you’re stuck on
- Touching the pad and not sure whether the board registered it, or your hand is wet:
02_capsense_menu_wet_hand.py— a touch pad has no resistance to feel, so it must always answer back through the screen, a light and a sound, and water on the pad makes the board read a finger as resting there continuously - The filtered value still jumps along with a single outlier:
07_median_beats_mean.py— press forward until the window reaches 7, and watch the median line absorb three spikes in a row, because a window of N can tolerate at most (N-1)//2 consecutive spikes - The value still wiggles after you let go:
03_pot_setpoint_deadband.py— adds the rule that a move smaller than this counts as no move at all, and pins the ends of the scale to 0 and 100
Optional further reading, outside the passing criteria: 04_pot_taper_volume.py (halfway on a volume knob is not half of what the ear hears as loud) and 10_roller_picks_the_filter.py
(pick a filter by swiping, with no sensor needed — try comparing it with the round-robin button of 08_six_filters_one_signal.py)
| File | What this file teaches |
|---|---|
| examples/02_capsense_menu_wet_hand.py | A two-button touch menu, and the matter of a wet hand |
| examples/03_pot_setpoint_deadband.py | A setpoint knob, with a dead band |
| examples/04_pot_taper_volume.py | Why a volume knob must follow a curve |
| examples/05_adc_counts_to_volts.py | A raw number from the ADC is not a voltage — it is a count of steps |
| examples/07_median_beats_mean.py | One outlier destroys an average, but cannot touch a median |
| examples/10_roller_picks_the_filter.py | Choosing by swiping, not by pressing round after round |
The slides for this lesson also refer to files that live in other lessons:
- m02-ui-to-hardware/l07-adc-capsense/examples/01_capsense_dimmer.py — a touch slider as a dimmer switch
- m02-ui-to-hardware/l08-filters/examples/06_ema_time_constant.py — what EMA’s alpha means in real units of time
- m03-sensor-hmi/l06-accel-chart-lab/examples/01_imu_vibration_monitor.py — watching a machine’s vibration
Screens from the BENTO Emulator for this lesson’s examples (click a file name to open the code)
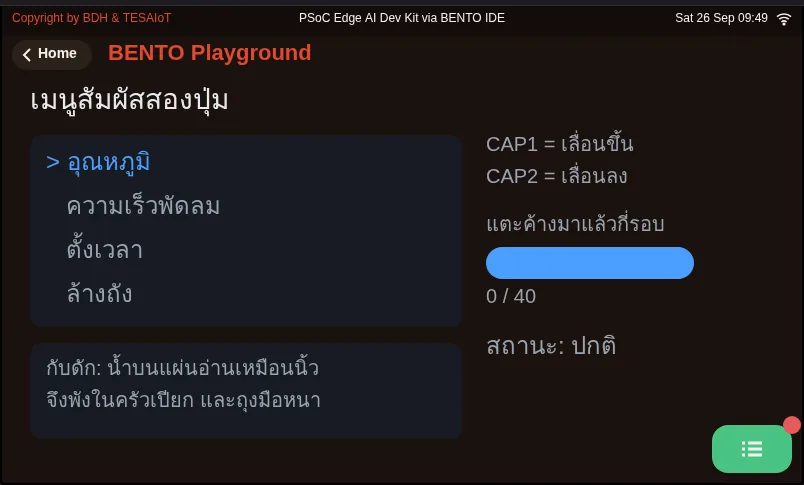
02_capsense_menu_wet_hand.py A two-button touch menu, and the matter of a wet hand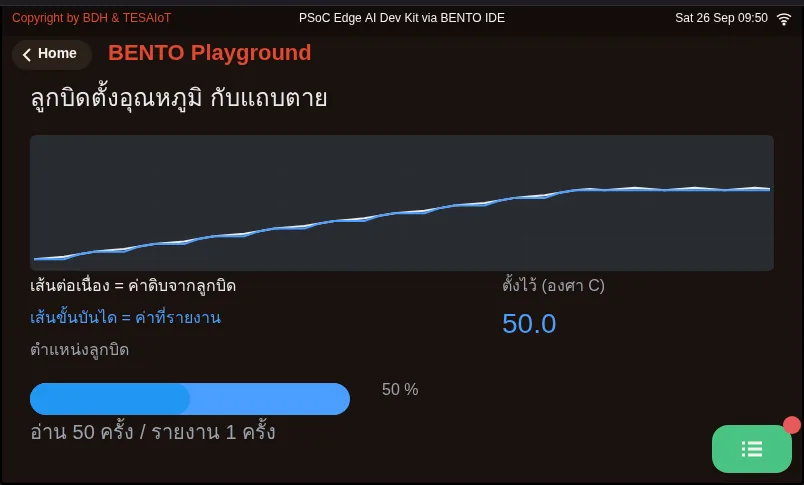
03_pot_setpoint_deadband.py A setpoint knob, with a dead band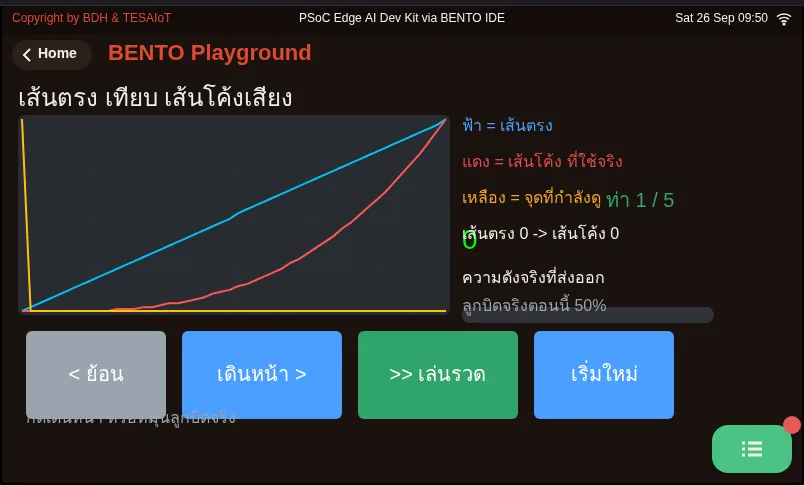
04_pot_taper_volume.py Why a volume knob must follow a curve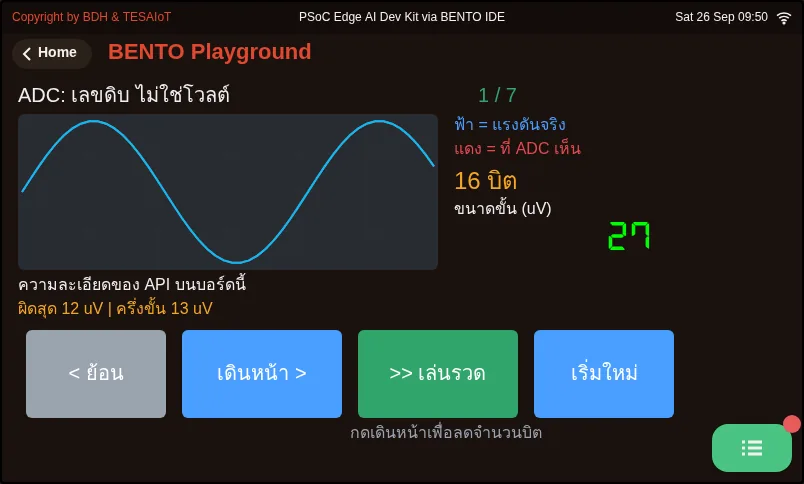
05_adc_counts_to_volts.py A raw number from the ADC is not a voltage — it is a count of steps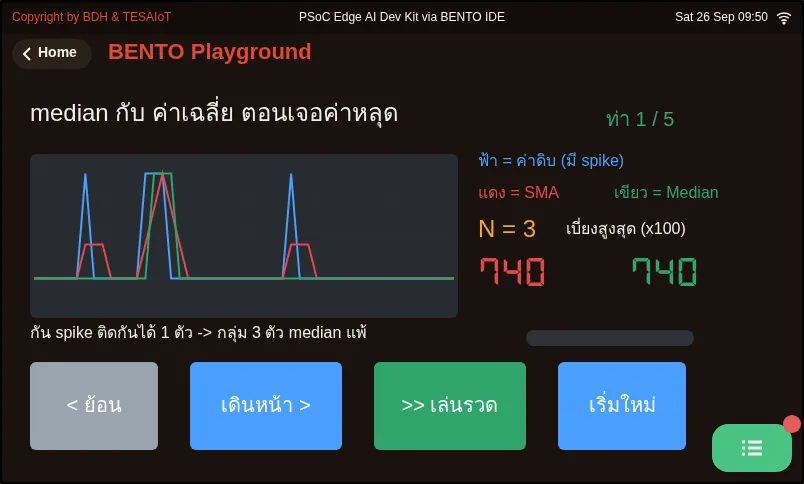
07_median_beats_mean.py One outlier destroys an average, but cannot touch a median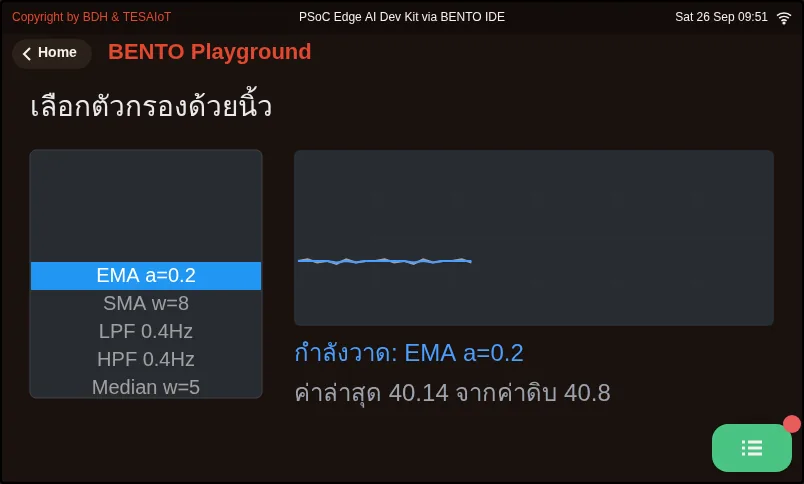
10_roller_picks_the_filter.py Choosing by swiping, not by pressing round after roundPractice
Section titled “Practice”The practice file has six # เติม: (fill in) blanks, ordered the way the program runs. The raw value and voltage already move before you fill anything in, because the file already reads them; the rest wakes up piece by piece.
- Blank 1:
ema = dsp.EMA(alpha=0.2)outside the loop. The screen does not change yet, but it must exist before blank 5, andalpha=must always be written by name - Blank 2:
pct = sensors.pot.percent()— the percentage number and the “raw” line start moving - Blank 3:
slider = sensors.capsense.slider()— the bottom-left touch bar follows your finger - Blank 4:
pot_bar.value(int(max(0, min(100, pct))))— the bar over the ruler on the top-left card follows the knob - Blank 5:
ema_pct = ema.update(pct)— the “filtered” line moves, and the two warning lamps start switching by threshold, becauseoveris computed fromema_pct - Blank 6:
events = ui.poll()— the threshold’s +/- buttons start responding. This blank is skipped most often, because the file already runs without it; the symptom is buttons that do not respond, with not a single line of error
Send each blank to the board and watch the screen before moving to the next. If you open the solution, read it until you understand it, then type it yourself — never copy and paste.
| Practice file | Topic |
|---|---|
| practice/s05_pot_capsense.py | The knob + the touch slider + an EMA filter (fill-in version) |
Solution
Section titled “Solution”Open the solution after trying on your own at least once, and read how to use the solutions first.
| Solution | Goes with |
|---|---|
| solution/s05_pot_capsense.py | practice/s05_pot_capsense.py |
Check your understanding
Section titled “Check your understanding”The same questions are in quiz.yaml for automatic marking.
-
You fill in the first five blanks; the screen is complete and the numbers move, but pressing the threshold +/- buttons does nothing at all, with no error whatsoever. What is the most likely cause? (choose one · objective 1)
- A) Blank 6 has not been filled in yet; events is still [], and ui.poll() is never called, so events have no way of ever reaching the loop
- B) ui.Spinbox must be tapped directly on the number to change its value
- C) sensors.init() must be called first, or the buttons will not work
- D) On-screen buttons cannot be used alongside a CapSense pad
Solution
A — The practice file sets events = [] so it can run before anything is filled in, which is why blank 6 is the one skipped most often. Without calling ui.poll(), buttons do not respond and some widgets stay hidden for as long as two seconds. An empty spinbox cannot be changed by a finger at all, which is exactly why it needs buttons beside it.
-
After filling in blanks 1–4, the top bar already follows the knob, but no matter how far you turn past the threshold of 70, the “over” lamp never lights. Which explanation is correct? (choose one · objective 1)
- A) over is computed from ema_pct, which is still 0.0 until blank 5, ema_pct = ema.update(pct), is filled in
- B) ui.Led must have .color() commanded before it can light
- C) The warning lamps must wait for the number to change once per second first
- D) The threshold of 70 is higher than the knob can physically reach
Solution
A — In the solution, over = ema_pct >= th, so the warning lamps judge the filtered value. Before blank 5 is filled in, ema_pct is still its default of 0.0, so the “below threshold” lamp stays lit on its own.
-
A friend suggests changing it to over = pct >= th, to make the warning lamp more responsive. What should you expect? (choose one · objective 2)
- A) When the value sits close to the threshold, the lamps will flicker back and forth following the raw value’s jitter (alarm chattering), until people on the shop floor stop paying attention to the warning
- B) The lamp will be steadier, because the raw value has no lag
- C) No difference, because the raw and filtered values are always equal
- D) The program will raise TypeError
Solution
A — The raw value jitters at its lowest bits all the time; once the value sits close to the threshold, the lamp will keep switching. That is why the solution judges the filtered value, trading a small lag for a lamp people can trust.
-
If dsp.EMA(alpha=0.2) is changed to alpha=0.05, then to alpha=0.8, what happens to the bottom-right “filtered” line? (choose one · objective 2)
- A) 0.05 is very steady but follows your hand so slowly it feels laggy; 0.8 is almost the raw value, filtering only a little
- B) 0.05 is almost the raw value; 0.8 is very steady but slow to follow
- C) Both give the same result, because EMA clamps alpha to 0.2
- D) 0.05 makes the filtered value start from zero and climb for several seconds every time it runs
Solution
A — alpha is the weight of the new value; the lower it is, the more it trusts the past, so it is steady but lagging; the higher it is, the closer to the raw value. And the first sample is used directly as the starting value, so the filtered value never has to climb up from zero.
-
Which symptom-to-fix pairs from the trap table are correct? Choose every correct one. (choose all that apply · objective 3)
- A) The EMA line equals RAW every round → move the creation of dsp.EMA to a single point outside the loop
- B) ui.Scale never moves at all → the thing that must move is the ui.Bar placed over it
- C) The threshold box shows 0070 → call sp_th.digits(2, 0)
- D) The touch buttons report inverted → press Program to Device to run the script again
- E) You want the bar to turn red past the threshold → call .color() on ui.Bar
Solution
A, B, C — Inverted buttons happen because the baseline is captured at boot; you must lift every finger off and unplug and replug the USB cable — running the script again does not help — and .color() on ui.Bar sets the track, not the value bar, which is why the solution reports state with lamps and text instead.
The MVP for lessons 2.7–2.9. Do this on a real board, and record the results in your learning log.
- Turning the knob makes the bar follow across the full range from 0 to 100, and the numbers on the ruler under the bar are readable at every tick
- The raw / percentage / voltage values all appear and agree logically (the far right is roughly 65535 and 100%); for voltage, record the reading you actually get to compare against a multimeter
- Pressing +/- changes the number in the threshold box and stops on its own at the range edges of 10 and 95
- Turning the knob past the threshold switches the lamps, one at a time only — never both lit at once
- Dragging a finger on the touch slider makes the bottom bar follow the finger’s position, and touching a copper button lights the correct lamp (not inverted)
- The two bottom-right lines show the raw and filtered values at the same time, and the filtered line is visibly steadier
- The on-screen number changes once per second, not five times a second (stare for ten seconds and count)
- The team can answer how the result differs if
alphais changed to 0.05 and to 0.8 (try it for real and stare at the two bottom-right lines for ten seconds) - Attach a photo of the screen taken while holding the knob turned, to your learning log
Going further
Section titled “Going further”Team homework: pick one of the four extensions in the slides — an alpha playground (RAW, EMA 0.05, EMA 0.5 on one screen), Median against a spike from tapping the board,
the knob commanding real lights split into ranges by gpio.num_leds() with hysteresis against flicker, or a touch button that switches screens by checking the rising edge of the pin. All four build on the same solution file.
Module 3 begins at lesson 3.1, moving from a knob someone turns to a sensor measuring the real world with sensors.bmi270.motion() and dsp.tilt() — keep the alpha your team chose for later use.
Next lesson: Lesson 3.1 — The accelerometer and tilt: roll and pitch
Reflect
Section titled “Reflect”- If you had to send the knob’s value to the cloud every 5 seconds, would you send the raw value or the filtered one, and what does sending the filtered value cost you in lost information?
- If the destination is an alarm system, what is the price of the lag your team’s chosen filter adds?
Review questions
Answer on your own first, then open the answer.
-
You filled the first five blanks, the screen is complete and the numbers move, but the threshold up/down buttons do nothing and there is no error. What is the most likely cause? (Objective 1)
- ยังไม่ได้เติมจุด 6 events ยังเป็น [] และไม่มีการเรียก ui.poll() เหตุการณ์จึงไม่มีทางกลับมาถึงลูป
- ui.Spinbox ต้องแตะที่ตัวเลขโดยตรงจึงจะเปลี่ยนค่า
- ต้องเรียก sensors.init() ก่อนปุ่มจึงจะทำงาน
- ปุ่มบนจอใช้พร้อมกับแผ่น CapSense ไม่ได้
Show answer
Answer: A. ยังไม่ได้เติมจุด 6 events ยังเป็น [] และไม่มีการเรียก ui.poll() เหตุการณ์จึงไม่มีทางกลับมาถึงลูป
ไฟล์ฝึกตั้ง events = [] ไว้ให้รันได้ก่อนเติม จุด 6 จึงถูกข้ามบ่อยที่สุด ถ้าไม่เรียก ui.poll() ปุ่มกดไม่ติดและ widget บางตัวถูกซ่อนนานถึงสองวินาที ส่วน spinbox เปล่า ๆ นิ้วเปลี่ยนค่าไม่ได้อยู่แล้ว จึงต้องมีปุ่มข้าง ๆ
-
After filling blanks 1-4 the top bar follows the knob, but however far you turn past the 70 threshold the "over" lamp never lights. Which explanation is correct? (Objective 1)
- over คิดจาก ema_pct ซึ่งยังเป็น 0.0 จนกว่าจะเติมจุด 5 ema_pct = ema.update(pct)
- ui.Led ต้องสั่ง .color() ก่อนจึงจะติด
- ไฟเตือนต้องรอให้ตัวเลขเปลี่ยนวินาทีละครั้งก่อน
- เกณฑ์ 70 สูงเกินกว่าที่ลูกบิดจะหมุนถึง
Show answer
Answer: A. over คิดจาก ema_pct ซึ่งยังเป็น 0.0 จนกว่าจะเติมจุด 5 ema_pct = ema.update(pct)
ในเฉลย over = ema_pct >= th ไฟเตือนจึงตัดสินจากค่าที่กรองแล้ว ก่อนเติมจุด 5 ema_pct ยังเป็นค่าเริ่มต้น 0.0 ไฟ "ต่ำกว่าเกณฑ์" จึงติดค้างอยู่ดวงเดียว
-
A teammate suggests over = pct >= th so the warning reacts faster. What should you expect? (Objective 2)
- ตอนค่าอยู่ใกล้เกณฑ์ ไฟจะกระพริบสลับดวงตามการสั่นของค่าดิบ (alarm chattering) จนคนหน้างานเลิกสนใจเสียงเตือน
- ไฟจะนิ่งกว่าเดิม เพราะค่าดิบไม่มีความหน่วง
- ไม่ต่างกัน เพราะค่าดิบกับค่ากรองเท่ากันเสมอ
- โปรแกรมจะขึ้น TypeError
Show answer
Answer: A. ตอนค่าอยู่ใกล้เกณฑ์ ไฟจะกระพริบสลับดวงตามการสั่นของค่าดิบ (alarm chattering) จนคนหน้างานเลิกสนใจเสียงเตือน
ค่าดิบสั่นที่บิตล่างตลอดเวลา พอค่าอยู่ใกล้เกณฑ์พอดี ไฟจะสลับไปมา เฉลยจึงตัดสินจากค่าที่กรองแล้ว แลกความหน่วงเล็กน้อยกับไฟที่เชื่อถือได้
-
If you change dsp.EMA(alpha=0.2) to alpha=0.05 and then to alpha=0.8, how does the "filtered" line at the bottom right behave? (Objective 2)
- 0.05 นิ่งมากแต่ตามมือช้าจนรู้สึกหน่วง ส่วน 0.8 เกือบเท่าค่าดิบ กรองได้นิดเดียว
- 0.05 เกือบเท่าค่าดิบ ส่วน 0.8 นิ่งมากแต่ตามช้า
- ทั้งสองค่าได้ผลเท่ากัน เพราะ EMA หนีบ alpha ไว้ที่ 0.2
- 0.05 ทำให้ค่ากรองเริ่มจากศูนย์แล้วไต่ขึ้นหลายวินาทีทุกครั้งที่รัน
Show answer
Answer: A. 0.05 นิ่งมากแต่ตามมือช้าจนรู้สึกหน่วง ส่วน 0.8 เกือบเท่าค่าดิบ กรองได้นิดเดียว
alpha คือน้ำหนักของค่าใหม่ ยิ่งต่ำยิ่งเชื่ออดีต จึงนิ่งแต่หน่วง ยิ่งสูงยิ่งใกล้ค่าดิบ และตัวอย่างแรกถูกใช้เป็นค่าตั้งต้นตรง ๆ ค่ากรองจึงไม่ต้องไต่ขึ้นจากศูนย์
-
Which symptom-and-fix pairs are correct according to the trap table? Choose all that apply. (Objective 3)
- บรรทัด EMA เท่ากับ RAW ทุกรอบ → ย้ายการสร้าง dsp.EMA ไปไว้ครั้งเดียวนอกลูป
- ui.Scale ไม่ขยับเลย → ตัวที่ต้องขยับคือ ui.Bar ที่วางทับ
- ช่องเกณฑ์ขึ้น 0070 → เรียก sp_th.digits(2, 0)
- ปุ่มสัมผัสรายงานกลับด้าน → กด Program to Device เพื่อรันสคริปต์ใหม่
- อยากให้แถบเปลี่ยนเป็นสีแดงตอนเกินเกณฑ์ → เรียก .color() ของ ui.Bar
Show answer
Answer: A. บรรทัด EMA เท่ากับ RAW ทุกรอบ → ย้ายการสร้าง dsp.EMA ไปไว้ครั้งเดียวนอกลูป · B. ui.Scale ไม่ขยับเลย → ตัวที่ต้องขยับคือ ui.Bar ที่วางทับ · C. ช่องเกณฑ์ขึ้น 0070 → เรียก sp_th.digits(2, 0)
ปุ่มกลับด้านเพราะ baseline ถูกเก็บตอนบูต ต้องยกนิ้วออกแล้วถอด USB เสียบกลับ การรันสคริปต์ใหม่ไม่ช่วย และ .color() ของ ui.Bar ไปลงที่ราง ไม่ใช่แถบค่า เฉลยจึงบอกสถานะด้วยไฟกับตัวหนังสือแทน
Cite this lesson
If you teach from this lesson or reuse it in slides or documents, credit it with the text below. If you changed it, add (adapted) after the title.
"Hands-on: the potentiometer gauge and touch slider" from TESA Open Knowledge by the Thai Embedded Systems Association (TESA), https://github.com/tesaiot/tesa-qualification-program, licensed under CC BY-NC 4.0
Thai attribution: "ลงมือทำ: เกจลูกบิดกับแถบสัมผัส" จาก TESA Open Knowledge โดยสมาคมสมองกลฝังตัวไทย (Thai Embedded Systems Association: TESA) https://github.com/tesaiot/tesa-qualification-program สัญญาอนุญาต CC BY-NC 4.0
This lesson adapts the source below; keep its credit too.
https://github.com/Advance-Innovation-Centre-AIC/embedded-systems-for-aiot-developer/blob/a80bbe88a34bcb9bb8d991f42f9252b77cdab079/session-05.html (slides 42–67)
TESA Open Knowledge · © 2026 สมาคมสมองกลฝังตัวไทย (TESA) · CC BY-NC 4.0
Content is licensed CC BY-NC 4.0. Reuse it non-commercially and credit the Thai Embedded Systems Association (TESA) every time. · How to cite TESA